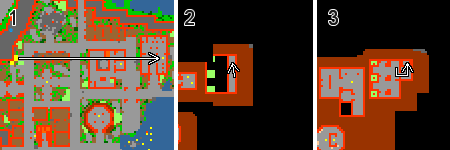
In Service of Yalahar Quest
Location
General
Requirements
Legend
The new found island of Yalahar needs to be investigated thoroughly.
Reward
Passage into the innermost area and through the gates to the city quarters; 5 Platinum Coins, choice between Yalahari Mask, Yalahari Armor, Yalahari Leg Piece and Yalahari Footwraps and base Yalaharian Outfits
.
Required Equipment
- Travel money
- Novice Rank or higher of the Tibian Explorer Society
- For mission 1: Crowbar or Whacking Driller of Fate
- Completed all 3 Barbarian Tests
- For missiong 5: Completed (or bring a friend who has completed) the first mission of Ice Islands Quest (Nibelor: Breaking the Ice)
- For mission 7: Helmet of the Deep, or Depth Galea
- To save time and travelling money, get 5 of the following items before starting:
| Town | Where | Item | Cost |
|---|---|---|---|
| Thais | Gamon (here) | 200 gp | |
| Venore | Rodney or Livielle (both here) | 200 gp | |
| Ab'Dendriel | Brasith (here) | 200 gp | |
| Carlin | Florentine (here) | 150 gp | |
| Liberty Bay | Lyonel (here) | 150 gp (can be made)1 | |
| Port Hope | Elephants | -- | |
| Darashia | Omur (here) | 200 gp | |
| Ankrahmun | Mehkesh (here) | 200 gp |
Notes:
- Empty Rum Flasks can be looted from pirates or found as Daily Respawns in various locations, including in one of the pirate ships of the Foreigner Quarter. Armenius sells Mugs of Rum that can be transfered to the Rum Flask.
Rewards
This quest is long and requires level 80, however, the level requirement only applies to the last mission. Only the item and outfit rewards of the quest require level 80, the access to quarter Mechanisms are obtained throughout the quest. The following table summarizes what reward is obtained when.
| Reward | Objective |
|---|---|
| 5 Platinum Coins | Complete 'The Way to Yalahar'. |
| Additional boat routes to and from Yalahar | Complete 'Searoutes around Yalahar'. |
| Access to Alchemist Quarter mechanism | Start mission 3. |
| Access to Trade Quarter mechanism | Start mission 4. |
| Access to Arena Quarter mechanism | Start mission 5. |
| Access to Cemetery Quarter mechanism | Start mission 6. |
| Access to Sunken Quarter mechanism | Start mission 7. |
| Access to Factory Quarter mechanism | Start mission 8. |
| 1 out of 3 Achievements: Follower of Azerus/Palimuth, Turncoat | Choose a side in mission 9. |
| Yalaharian Outfit | Complete mission 10. |
| Yalahari Leg Piece, Yalahari Mask, or Yalahari Armor | Complete mission 10. |
The Way to Yalahar
First make sure you are a member of the Explorer Society and have the rank of novice or higher, otherwise you will not be able to talk to Captain Max in Liberty Bay.
Go to Wyrdin in the centre of the Ivory Towers in Edron and talk to him about a mission. He will explain to you that a member of the Tibian Explorer Society is in Yalahar and would like his Research Notes of the unknown city. He will also tell you that Captain Max in Liberty Bay will take you to Yalahar.
Alternatively, as a free account player, head to Wyrdin's Apprentice to the west of Kazordoon and talk to him about Yalahar. You will need to pay him 250 gold for the password (whizzkid), then you can travel from Thais to Yalahar from Captain Bluebear on Thais' boat.
Once in Yalahar, find Timothy just north of depot and ask him for his research notes. He will give them to you and talk about a native friend who is in need of help.
To finish the mission, go back to Wyrdin or Wyrdin's Apprentice and talk to him about the mission. You will be rewarded 500 gold. It is not mandatory to go to Wyrdin to continue the quest.
Searoutes around Yalahar
Finishing this mission is not mandatory either, however it is recommended as it will save you a lot of time and money. It allows you to travel from different cities to Yalahar rather than only from Liberty Bay.
Go to captain Karith in Yalahar east of Captain Cookie, and ask him for a passage. You must give Karith only five (out of 8 possible) of the items described in the Required Equipment section to prove that traveling to other cities will be worth while. It does not matter which ones you handle, the 8 destinations will be unlocked.
Having the 5 items, you must handle them to Karith naming the city from which you acquired them and answering yes to each of them. The items do not need to be handed in at once, but it saves money and time. You will now be able to travel with Karith to these cities: Ab'Dendriel, Ankrahmun, Carlin, Darashia, Liberty Bay, Port Hope, Thais, and Venore. Karith respects the postmen, so the fare will be 10 gp cheaper for those who completed The Postman Missions Quest.
Mission 01: Something Rotten
First, talk to Palimuth, east of Timothy, and ask him for a mission. He will ask you to help with some sewer malfunctions. You will need either a
Crowbar or a
Whacking Driller of Fate. There will be 4 locations where you need to go that have been marked with an X on your map. They are not very hard to find.
Most locations can be accessed through the Sewer Grate just east of depot. One can only be accessed through the sewer grate far to the north-west, close to the Alchemist Quarter stairs (Guide Edna can mark this on your map). Then report back to Palimuth.
Mission 02: Watching the Watchmen
You have to find all 7 guards. This is a good mission to explore the Quarters of Yalahar.
It is faster by starting on the Foreigner Quarter (south-west), although you can also start at the Magician Quarter (north-east). You need to find the guards in the walls between the Quarters and ask them for their report. They will then give you their report and you can pass through into the next quarter to find the next guard.
The guards' locations are shown on the map below (inside the Quarters and marked with blue flags):
Recommended order: Foreign > Arena > Alchemist > Cemetery > Magician > Sunken > Factory > Trade.
After having all reports from the guards, go back to Palimuth. You can leave through the Magician Quarter, which has no mechanism at the gate.
Mission 03: Death to the Deathbringer
From here onwards you will be able to do the mission following Palimuth (good side) or Yalahari (Azerus) (bad side). The difficulty is the same for both sides but achievements differ. You will still need to ask mission of Palimuth even if you choose to not help him, otherwise sealed doors will not open.
- Doing all missions following Palimuth side will give you the achievement Follower of Palimuth.
- Following Azerus (Yalahari), you will get the achievement Follower of Azerus.
- If you do at least one mission from the opposite side, you will get the Turncoat achievement.
Which addon you will get for the outfit in the end is decided on Mission 09: Decision.
Palimuth will give you two notes to read (in the small room on the left) and then send you to his superior for this mission. Yalahari (Azerus) will also ask you to read two notes he gives you and request you help him with a problem in the Alchemist Quarter — he wants you to retrieve an The Alchemists' Formulas as well as kill the 3 plague bearers. Palimuth does npt like the idea of Azerus getting a hold of the formulas and asks you to burn them by using them on an oven. You will now be able to use the mechanism to the Alchemist Quarter.
During this mission, you will face Death Blobs, Mutated Humans, Mutated Rats, Acid Blobs, Slimes, Mutated Tigers and Bog Raiders. First, you will need to kill the three plague bearers and then get The Alchemists' Formulas. Then, head back to either Palimuth (good side) or Yalahari (Azerus) (bad side). Note that only the player gaining the most experience from each boss will complete that part. So if you are doing this mission with a team, you will need to kill each boss several times.
Additionally, since the Summer Update 2012, the hitpoints and spell damage of the diseased bosses have been reduced (announced here), and a shortcut to Diseased Fred was added.
Players can find Diseased Dan here, Diseased Bill here, and Diseased Fred here.
You may have to face Bog Raiders and Mutated Tigers to get the formulas. Go down the stairs north-east of Diseased Bill and Diseased Fred, then head north-west to the building where the papers are found (here). Now you have to choose whether to burn the formulas on an oven or give them to Yalahari (Azerus). If you wish to do good, there is one oven to the west of the box, so it is recommended that you burn them there if you are following that path.
Mission 04: Good to be Kingpin
For this mission, you are asked to go to the Trade Quarter and negotiate or threaten Mr. West. Once again, you will gain access to the mechanism, although if you choose to help Palimuth you will not want to use this.
| Mission | Dangers | Map | |
|---|---|---|---|
| Good Side | Palimuth asks you to travel through the sewers to Mr. West, avoiding the need to kill his people:
|
Tarantulas, Slimes, and Centipedes | |
| Bad Side | Yalahari (Azerus) will ask you to use the gate to the Trade Quarter, killing some of Mr. West's henchmen to showcase determination and power:
|
Bandits, Smugglers, Mad Scientists, Gladiators, Gang Members |
Mission 05: Food or Fight
On this mission you are asked to find a druid by the name of Tamerin, on the Arena Quarter, here. You will get permission to use the gates mechanism.
Yalahari (Azerus) wants you to get Tamerin to breed warbeasts to help them take back control of all the Quarters. Whereas Palimuth begs for you to request that Tamerin breeds cattle for food. But Tamerin will only listen to your mission after you fulfill 2 favors for him:
- First: bring him a flask of Animal Cure. It can be bought from Siflind on Nibelor
- You need to have started this mission in order to buy it, as well as the Ice Islands Quest started for access to Nibelor. If you are unable to go to Nibelor, you can ask someone else who has the quest and access to get it for you, as long as they are on this current mission.
- Second: kill Morik the Gladiator and bring his helmet as proof. He is located here, at the last room going around clockwise on the first floor.
Report back to Tamerin as he will listen to your request and you can now make your choice:
- Asking for Cattle will help Palimuth (good side)
- Asking for Warbeasts will help Yalahari (Azerus) (bad side).
Mission 06: Frightening Fuel
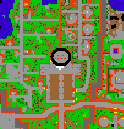
Go to the big building in the Cemetery Quarter and use the Ghost Charm on the Strange Carving at the back of the room. Kill Tormented Ghosts and use the Ghost Residue on the charm thrice — this will make 2 more Tormented Ghosts appear. At this point the Ghost Charm will then change into a Charged Ghost Charm.
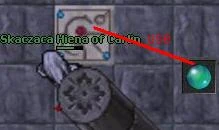
- When choosing the Good side: go to Palimuth, ask him about the mission, and hand in the charm.
- When choosing the Bad side: go to Yalahari (Azerus), ask him about the mission, and give it back.
Mission 07: A Fishy Mission
- Bad side: Yalahari (Azerus) will send you for a new mission — to go to the Sunken Quarter and kill the Quara Leaders, Inky, Splasher and Sharptooth. These bosses can sometimes do a lot of damage.
- Good side: rather than fighting any Quara leaders, Palimuth's mission will send you to find the cause for the Quaras aggressive behavior. Find Maritima (here), ask her about the Quara, and she will explain what their problem is.
You will now need a Helmet of the Deep or a Depth Galea as you are going underwater on the Sunken Quarter. Many Quara will be faced during this mission. Talk to Tarak (here), ask him for a trip there. Wear your helmet and jump into the water.
The maps below are a suggestion, they indicate the way to navigate while encountering less of the strong quara. The green areas are the places you will go for the Yalahari's bad side, whereas the yellow shows Palimuth's good side. Until the 2nd map, there will only be Quara Constrictors and Quara Mantassins. On the last floor, there are also Quara Hydromancers, Quara Pinchers, and Quara Predators.
Mission 08: Dangerous Machinations
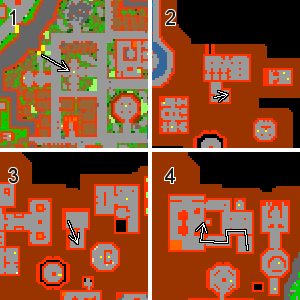
For this mission, the Yalahari requests you to go to the Factory Quarter and find a pattern crystal, which will be used to supply weapons to help take control of the city. Palimuth will send you there to use the crystal to supply food for the city.
| Mission | Dangers | Maps | |
|---|---|---|---|
| Good Side |
|
Damaged Worker Golems, Worker Golems | ![]() |
| Bad Side |
|
Worker Golems | ![]() |
| Both Sides |
|
Damaged Worker Golems, Worker Golems | ![]() |
Mission 09: Decision
You now need to decide between supporting Palimuth or the Yalahari's goal. You must first say mission to both of them, to which they will both tell you you need to decide between themself or the other.
- Good side: to choose Palimuth's side, go to him, and simply ask him for a mission again.
- Bad side: to choose Yalahari (Azerus)' side, go to him and say mission.
Whomever you choose will ask you if you are choosing them, and then just say yes to confirm your decision. This will complete mission 9.
Depending on your previous choices, you will obtain one of the following achievements:
- Follower of Azerus - when the bad side was chosen for all missions.
- Follower of Palimuth - when the good side was chosen for all missions.
- Turncoat - when a mix of good and bad side missions were done.
- None: if all missions were done on one side, but at this mission it was decided to choose the other side (i.e., did all Palimuth's good missions and joined Azerus, or vice versa).
You can now ask for the next mission.
Mission 10: The Final Battle
Depending on the player's level, a team or stronger helpers might be needed. Lower level players will have issues due to damage and mana drain. Be aware that there is a time limit of around 12 minutes to kill Azerus.
Someone who has not done the quest yet has to click on the machine at the center of the room to start the fight:
- Azerus will first appear with Rift Worms — kill the Rift Worms and ignore Azerus as he is extremely hard to kill at this point.
- Azerus will then teleport to another place in the room and summon Rift Broods, use Earth Damage on them while still ignoring Azerus.
- Azerus will then summon Rift Scythes, use Fire Damage.
- Azerus will then summon War Golems, but now it will be much easier to damage Azerus, so focus on Azerus while ignoring the golems.
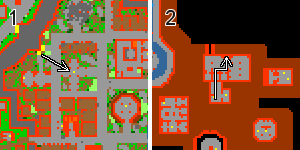
- Once Azerus is dead, his body will turn into a Magic Forcefield. All players must step in the forcefield and be teleported to a room where many rift monsters can be seen from above. The message You have a very bad feeling about this... will be displayed.
- Walk to the most northern point in the room (as shown in the image below). The quest is finished for the character once the message It seems by defeating Azerus you have stopped this army from entering your world! Better leave this ghastly place forever. is displayed.
Rewards
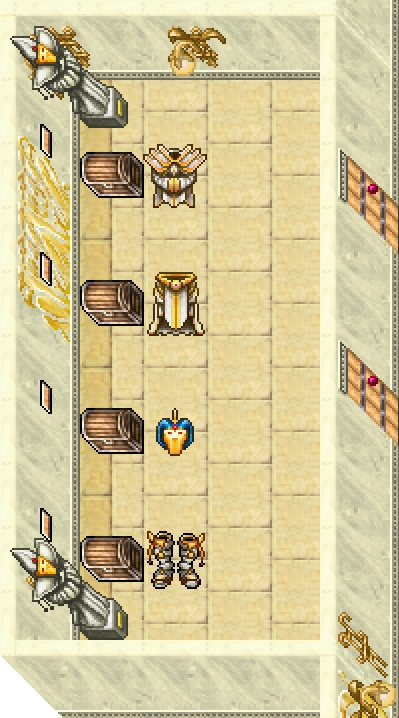
Rewards in order
Report back to Palimuth to receive the Yalaharian Outfits
, as well as access to the reward room located here. You may only select one item. Starting from the northernmost chest, the rewards are:
Yalahari Armor - worn only by Knights.
Yalahari Leg Piece - worn only by Paladins.
Yalahari Mask - worn only by Sorcerers and Druids.
Yalahari Footwraps - worn only by Monks.
To obtain the addon for the Yalaharian Outfits, you must complete the Blood Brothers Quest.
Transcripts
The Way to Yalahar
|
Player: Hello |
|||
|
Player: hello |
|||
|
Player: hi |
|||
Searoutes around Yalahar
|
Player: hi |
|||
Mission 01: Something Rotten
|
Player: hello |
|||
Mission 02: Watching the Watchmen
|
Player: mission |
|||
Mission 03: Death to the Deathbringer
|
Player: hi |
|||
|
Player: hi |
|||
|
Player: hi |
|||
|
Player: hi |
|||
|
Player: hi |
|||
- Not burning the research papers:
|
Player: hi |
|||
- Burning the research papers:
|
Player: hi |
|||
Mission 04: Good to be Kingpin
|
Player: Mission |
|||
- If going through sewers or not killing any men of Mr. West:
|
Player: Hi |
|||
- If going through the gate and killing at least 1 of Mr. West's men:
|
Player: Hi |
|||
Mission 05: Food or Fight
|
Player: mission |
|||
|
Player: Hi |
|||
- If cattle:
|
Player: mission |
|||
- If warbeasts:
|
Player: mission |
|||
Mission 06: Frightening Fuel
|
Player: mission |
|||
- Giving the ghost charm to Palimuth:
|
Palimuth: Greetings. |
|||
|
Player: mission |
|||
- Giving the ghost charm to Azerus:
|
Player: mission |
|||
Mission 07: A Fishy Mission
|
Player: mission |
|||
|
Player: mission |
|||
- Talking to Maritima:
|
Player: quara |
|||
|
Player: mission |
|||
|
Player: mission |
|||
- Killing the quara bosses:
|
Player: mission |
|||
Mission 08: Dangerous Machinations
|
Player: mission |
|||
|
Player: mission |
|||
- Using the Food Matrix:
|
Player: mission |
|||
- Using the Weapon Matrix:
|
Player: mission |
|||
Mission 09: Decision
|
Player: mission |
|||
or if you did more missions for Azerus
|
Palimuth: Listen, I know you have worked for Azerus and his friends, but it is not too late to change your mind! I beg you to rethink your loyalties. ... |
|||
- You now have to decide your side:
|
Palimuth: So do you want to side with me? |
|||
|
Yalahari: So do you want to side with me player? |
|||
Mission 10: The Final Battle
- If you choose Palimuth's side:
|
Player: mission |
|||
- If you choose the Yalahari side:
|
Player: mission |
|||
- After the final battle:
- If you choose Palimuth's side:
|
Player: mission |
|||
- If you choose the Yalahari side:
needs to be added
Searoutes around Yalahar
|
Player: hi |
|||
Mission 01: Something Rotten
|
Player: hello |
|||
Mission 02: Watching the Watchmen
|
Player: mission |
|||
Mission 03: Death to the Deathbringer
|
Player: hi |
|||
|
Player: hi |
|||
|
Player: hi |
|||
|
Player: hi |
|||
|
Player: hi |
|||
- Not burning the research papers:
|
Player: hi |
|||
- Burning the research papers:
|
Player: hi |
|||
Mission 04: Good to be Kingpin
|
Player: Mission |
|||
- If going through sewers or not killing any men of Mr. West:
|
Player: Hi |
|||
- If going through the gate and killing at least 1 of Mr. West's men:
|
Player: Hi |
|||
Mission 05: Food or Fight
|
Player: mission |
|||
|
Player: Hi |
|||
- If cattle:
|
Player: mission |
|||
- If warbeasts:
|
Player: mission |
|||
Mission 06: Frightening Fuel
|
Player: mission |
|||
- Giving the ghost charm to Palimuth:
|
Palimuth: Greetings. |
|||
|
Player: mission |
|||
- Giving the ghost charm to Azerus:
|
Player: mission |
|||
Mission 07: A Fishy Mission
|
Player: mission |
|||
|
Player: mission |
|||
- Talking to Maritima:
|
Player: quara |
|||
|
Player: mission |
|||
|
Player: mission |
|||
- Killing the quara bosses:
|
Player: mission |
|||
Mission 08: Dangerous Machinations
|
Player: mission |
|||
|
Player: mission |
|||
- Using the Food Matrix:
|
Player: mission |
|||
- Using the Weapon Matrix:
|
Player: mission |
|||
Mission 09: Decision
|
Player: mission |
|||
or if you did more missions for Azerus
|
Palimuth: Listen, I know you have worked for Azerus and his friends, but it is not too late to change your mind! I beg you to rethink your loyalties. ... |
|||
- You now have to decide your side:
|
Palimuth: So do you want to side with me? |
|||
|
Yalahari: So do you want to side with me player? |
|||
Mission 10: The Final Battle
- If you choose Palimuth's side:
|
Player: mission |
|||
- If you choose the Yalahari side:
|
Player: mission |
|||
- After the final battle:
- If you choose Palimuth's side:
|
Player: mission |
|||
- If you choose the Yalahari side:
needs to be added
Mission 01: Something Rotten
|
Player: hello |
|||
Mission 02: Watching the Watchmen
|
Player: mission |
|||
Mission 03: Death to the Deathbringer
|
Player: hi |
|||
|
Player: hi |
|||
|
Player: hi |
|||
|
Player: hi |
|||
|
Player: hi |
|||
- Not burning the research papers:
|
Player: hi |
|||
- Burning the research papers:
|
Player: hi |
|||
Mission 04: Good to be Kingpin
|
Player: Mission |
|||
- If going through sewers or not killing any men of Mr. West:
|
Player: Hi |
|||
- If going through the gate and killing at least 1 of Mr. West's men:
|
Player: Hi |
|||
Mission 05: Food or Fight
|
Player: mission |
|||
|
Player: Hi |
|||
- If cattle:
|
Player: mission |
|||
- If warbeasts:
|
Player: mission |
|||
Mission 06: Frightening Fuel
|
Player: mission |
|||
- Giving the ghost charm to Palimuth:
|
Palimuth: Greetings. |
|||
|
Player: mission |
|||
- Giving the ghost charm to Azerus:
|
Player: mission |
|||
Mission 07: A Fishy Mission
|
Player: mission |
|||
|
Player: mission |
|||
- Talking to Maritima:
|
Player: quara |
|||
|
Player: mission |
|||
|
Player: mission |
|||
- Killing the quara bosses:
|
Player: mission |
|||
Mission 08: Dangerous Machinations
|
Player: mission |
|||
|
Player: mission |
|||
- Using the Food Matrix:
|
Player: mission |
|||
- Using the Weapon Matrix:
|
Player: mission |
|||
Mission 09: Decision
|
Player: mission |
|||
or if you did more missions for Azerus
|
Palimuth: Listen, I know you have worked for Azerus and his friends, but it is not too late to change your mind! I beg you to rethink your loyalties. ... |
|||
- You now have to decide your side:
|
Palimuth: So do you want to side with me? |
|||
|
Yalahari: So do you want to side with me player? |
|||
Mission 10: The Final Battle
- If you choose Palimuth's side:
|
Player: mission |
|||
- If you choose the Yalahari side:
|
Player: mission |
|||
- After the final battle:
- If you choose Palimuth's side:
|
Player: mission |
|||
- If you choose the Yalahari side:
needs to be added
Mission 02: Watching the Watchmen
|
Player: mission |
|||
Mission 03: Death to the Deathbringer
|
Player: hi |
|||
|
Player: hi |
|||
|
Player: hi |
|||
|
Player: hi |
|||
|
Player: hi |
|||
- Not burning the research papers:
|
Player: hi |
|||
- Burning the research papers:
|
Player: hi |
|||
Mission 04: Good to be Kingpin
|
Player: Mission |
|||
- If going through sewers or not killing any men of Mr. West:
|
Player: Hi |
|||
- If going through the gate and killing at least 1 of Mr. West's men:
|
Player: Hi |
|||
Mission 05: Food or Fight
|
Player: mission |
|||
|
Player: Hi |
|||
- If cattle:
|
Player: mission |
|||
- If warbeasts:
|
Player: mission |
|||
Mission 06: Frightening Fuel
|
Player: mission |
|||
- Giving the ghost charm to Palimuth:
|
Palimuth: Greetings. |
|||
|
Player: mission |
|||
- Giving the ghost charm to Azerus:
|
Player: mission |
|||
Mission 07: A Fishy Mission
|
Player: mission |
|||
|
Player: mission |
|||
- Talking to Maritima:
|
Player: quara |
|||
|
Player: mission |
|||
|
Player: mission |
|||
- Killing the quara bosses:
|
Player: mission |
|||
Mission 08: Dangerous Machinations
|
Player: mission |
|||
|
Player: mission |
|||
- Using the Food Matrix:
|
Player: mission |
|||
- Using the Weapon Matrix:
|
Player: mission |
|||
Mission 09: Decision
|
Player: mission |
|||
or if you did more missions for Azerus
|
Palimuth: Listen, I know you have worked for Azerus and his friends, but it is not too late to change your mind! I beg you to rethink your loyalties. ... |
|||
- You now have to decide your side:
|
Palimuth: So do you want to side with me? |
|||
|
Yalahari: So do you want to side with me player? |
|||
Mission 10: The Final Battle
- If you choose Palimuth's side:
|
Player: mission |
|||
- If you choose the Yalahari side:
|
Player: mission |
|||
- After the final battle:
- If you choose Palimuth's side:
|
Player: mission |
|||
- If you choose the Yalahari side:
needs to be added
Mission 03: Death to the Deathbringer
|
Player: hi |
|||
|
Player: hi |
|||
|
Player: hi |
|||
|
Player: hi |
|||
|
Player: hi |
|||
- Not burning the research papers:
|
Player: hi |
|||
- Burning the research papers:
|
Player: hi |
|||
Mission 04: Good to be Kingpin
|
Player: Mission |
|||
- If going through sewers or not killing any men of Mr. West:
|
Player: Hi |
|||
- If going through the gate and killing at least 1 of Mr. West's men:
|
Player: Hi |
|||
Mission 05: Food or Fight
|
Player: mission |
|||
|
Player: Hi |
|||
- If cattle:
|
Player: mission |
|||
- If warbeasts:
|
Player: mission |
|||
Mission 06: Frightening Fuel
|
Player: mission |
|||
- Giving the ghost charm to Palimuth:
|
Palimuth: Greetings. |
|||
|
Player: mission |
|||
- Giving the ghost charm to Azerus:
|
Player: mission |
|||
Mission 07: A Fishy Mission
|
Player: mission |
|||
|
Player: mission |
|||
- Talking to Maritima:
|
Player: quara |
|||
|
Player: mission |
|||
|
Player: mission |
|||
- Killing the quara bosses:
|
Player: mission |
|||
Mission 08: Dangerous Machinations
|
Player: mission |
|||
|
Player: mission |
|||
- Using the Food Matrix:
|
Player: mission |
|||
- Using the Weapon Matrix:
|
Player: mission |
|||
Mission 09: Decision
|
Player: mission |
|||
or if you did more missions for Azerus
|
Palimuth: Listen, I know you have worked for Azerus and his friends, but it is not too late to change your mind! I beg you to rethink your loyalties. ... |
|||
- You now have to decide your side:
|
Palimuth: So do you want to side with me? |
|||
|
Yalahari: So do you want to side with me player? |
|||
Mission 10: The Final Battle
- If you choose Palimuth's side:
|
Player: mission |
|||
- If you choose the Yalahari side:
|
Player: mission |
|||
- After the final battle:
- If you choose Palimuth's side:
|
Player: mission |
|||
- If you choose the Yalahari side:
needs to be added
Mission 04: Good to be Kingpin
|
Player: Mission |
|||
- If going through sewers or not killing any men of Mr. West:
|
Player: Hi |
|||
- If going through the gate and killing at least 1 of Mr. West's men:
|
Player: Hi |
|||
Mission 05: Food or Fight
|
Player: mission |
|||
|
Player: Hi |
|||
- If cattle:
|
Player: mission |
|||
- If warbeasts:
|
Player: mission |
|||
Mission 06: Frightening Fuel
|
Player: mission |
|||
- Giving the ghost charm to Palimuth:
|
Palimuth: Greetings. |
|||
|
Player: mission |
|||
- Giving the ghost charm to Azerus:
|
Player: mission |
|||
Mission 07: A Fishy Mission
|
Player: mission |
|||
|
Player: mission |
|||
- Talking to Maritima:
|
Player: quara |
|||
|
Player: mission |
|||
|
Player: mission |
|||
- Killing the quara bosses:
|
Player: mission |
|||
Mission 08: Dangerous Machinations
|
Player: mission |
|||
|
Player: mission |
|||
- Using the Food Matrix:
|
Player: mission |
|||
- Using the Weapon Matrix:
|
Player: mission |
|||
Mission 09: Decision
|
Player: mission |
|||
or if you did more missions for Azerus
|
Palimuth: Listen, I know you have worked for Azerus and his friends, but it is not too late to change your mind! I beg you to rethink your loyalties. ... |
|||
- You now have to decide your side:
|
Palimuth: So do you want to side with me? |
|||
|
Yalahari: So do you want to side with me player? |
|||
Mission 10: The Final Battle
- If you choose Palimuth's side:
|
Player: mission |
|||
- If you choose the Yalahari side:
|
Player: mission |
|||
- After the final battle:
- If you choose Palimuth's side:
|
Player: mission |
|||
- If you choose the Yalahari side:
needs to be added
Mission 05: Food or Fight
|
Player: mission |
|||
|
Player: Hi |
|||
- If cattle:
|
Player: mission |
|||
- If warbeasts:
|
Player: mission |
|||
Mission 06: Frightening Fuel
|
Player: mission |
|||
- Giving the ghost charm to Palimuth:
|
Palimuth: Greetings. |
|||
|
Player: mission |
|||
- Giving the ghost charm to Azerus:
|
Player: mission |
|||
Mission 07: A Fishy Mission
|
Player: mission |
|||
|
Player: mission |
|||
- Talking to Maritima:
|
Player: quara |
|||
|
Player: mission |
|||
|
Player: mission |
|||
- Killing the quara bosses:
|
Player: mission |
|||
Mission 08: Dangerous Machinations
|
Player: mission |
|||
|
Player: mission |
|||
- Using the Food Matrix:
|
Player: mission |
|||
- Using the Weapon Matrix:
|
Player: mission |
|||
Mission 09: Decision
|
Player: mission |
|||
or if you did more missions for Azerus
|
Palimuth: Listen, I know you have worked for Azerus and his friends, but it is not too late to change your mind! I beg you to rethink your loyalties. ... |
|||
- You now have to decide your side:
|
Palimuth: So do you want to side with me? |
|||
|
Yalahari: So do you want to side with me player? |
|||
Mission 10: The Final Battle
- If you choose Palimuth's side:
|
Player: mission |
|||
- If you choose the Yalahari side:
|
Player: mission |
|||
- After the final battle:
- If you choose Palimuth's side:
|
Player: mission |
|||
- If you choose the Yalahari side:
needs to be added
Mission 06: Frightening Fuel
|
Player: mission |
|||
- Giving the ghost charm to Palimuth:
|
Palimuth: Greetings. |
|||
|
Player: mission |
|||
- Giving the ghost charm to Azerus:
|
Player: mission |
|||
Mission 07: A Fishy Mission
|
Player: mission |
|||
|
Player: mission |
|||
- Talking to Maritima:
|
Player: quara |
|||
|
Player: mission |
|||
|
Player: mission |
|||
- Killing the quara bosses:
|
Player: mission |
|||
Mission 08: Dangerous Machinations
|
Player: mission |
|||
|
Player: mission |
|||
- Using the Food Matrix:
|
Player: mission |
|||
- Using the Weapon Matrix:
|
Player: mission |
|||
Mission 09: Decision
|
Player: mission |
|||
or if you did more missions for Azerus
|
Palimuth: Listen, I know you have worked for Azerus and his friends, but it is not too late to change your mind! I beg you to rethink your loyalties. ... |
|||
- You now have to decide your side:
|
Palimuth: So do you want to side with me? |
|||
|
Yalahari: So do you want to side with me player? |
|||
Mission 10: The Final Battle
- If you choose Palimuth's side:
|
Player: mission |
|||
- If you choose the Yalahari side:
|
Player: mission |
|||
- After the final battle:
- If you choose Palimuth's side:
|
Player: mission |
|||
- If you choose the Yalahari side:
needs to be added
Mission 07: A Fishy Mission
|
Player: mission |
|||
|
Player: mission |
|||
- Talking to Maritima:
|
Player: quara |
|||
|
Player: mission |
|||
|
Player: mission |
|||
- Killing the quara bosses:
|
Player: mission |
|||
Mission 08: Dangerous Machinations
|
Player: mission |
|||
|
Player: mission |
|||
- Using the Food Matrix:
|
Player: mission |
|||
- Using the Weapon Matrix:
|
Player: mission |
|||
Mission 09: Decision
|
Player: mission |
|||
or if you did more missions for Azerus
|
Palimuth: Listen, I know you have worked for Azerus and his friends, but it is not too late to change your mind! I beg you to rethink your loyalties. ... |
|||
- You now have to decide your side:
|
Palimuth: So do you want to side with me? |
|||
|
Yalahari: So do you want to side with me player? |
|||
Mission 10: The Final Battle
- If you choose Palimuth's side:
|
Player: mission |
|||
- If you choose the Yalahari side:
|
Player: mission |
|||
- After the final battle:
- If you choose Palimuth's side:
|
Player: mission |
|||
- If you choose the Yalahari side:
needs to be added
Mission 08: Dangerous Machinations
|
Player: mission |
|||
|
Player: mission |
|||
- Using the Food Matrix:
|
Player: mission |
|||
- Using the Weapon Matrix:
|
Player: mission |
|||
Mission 09: Decision
|
Player: mission |
|||
or if you did more missions for Azerus
|
Palimuth: Listen, I know you have worked for Azerus and his friends, but it is not too late to change your mind! I beg you to rethink your loyalties. ... |
|||
- You now have to decide your side:
|
Palimuth: So do you want to side with me? |
|||
|
Yalahari: So do you want to side with me player? |
|||
Mission 10: The Final Battle
- If you choose Palimuth's side:
|
Player: mission |
|||
- If you choose the Yalahari side:
|
Player: mission |
|||
- After the final battle:
- If you choose Palimuth's side:
|
Player: mission |
|||
- If you choose the Yalahari side:
needs to be added
Mission 09: Decision
|
Player: mission |
|||
or if you did more missions for Azerus
|
Palimuth: Listen, I know you have worked for Azerus and his friends, but it is not too late to change your mind! I beg you to rethink your loyalties. ... |
|||
- You now have to decide your side:
|
Palimuth: So do you want to side with me? |
|||
|
Yalahari: So do you want to side with me player? |
|||
Mission 10: The Final Battle
- If you choose Palimuth's side:
|
Player: mission |
|||
- If you choose the Yalahari side:
|
Player: mission |
|||
- After the final battle:
- If you choose Palimuth's side:
|
Player: mission |
|||
- If you choose the Yalahari side:
needs to be added
Mission 10: The Final Battle
- If you choose Palimuth's side:
|
Player: mission |
|||
- If you choose the Yalahari side:
|
Player: mission |
|||
- After the final battle:
- If you choose Palimuth's side:
|
Player: mission |
|||
- If you choose the Yalahari side:
needs to be added