

Forgotten Knowledge Quest
Forgotten knowledge from ancient times can be retrieved to enable Imbuing again.
Halls of Hope and six other areas in Tibia.
Reward
Dangers
56


Required Equipment
Method
Walk to the Halls of Hope north of Thais, here.
When a Game World has been just created, the temple will be unfinished, and it must be finished by giving enough Heavy Old Tomes to Albinius. These tomes can be obtained from Brass-Shod Chests  , which can be found in the following locations:
- The basement of the tower next to Mount Sternum (here);
- A house outside the Mount Sternum Undead Cave (here);
- The Valkyrie shack north of Thais (here);
- On the way to the Orcs in the Ancient Temple (here);
- Below the White Flower Temple (here).
They can also be looted from certain creatures such Cyclops, various kinds of Orcs, Ghouls, Skeletons and Trolls. Hand them to Albinius by saying Temple and Yes. He will take all the tomes you have in your backpack. After handing enough tomes, Albinius will restore the temple to its former glory and you will be able to use Imbuing Shrines .
.
- Note1: if the temple is already rebuilt, all you have to do is give him 5 Tomes by saying Temple then Yes to be allowed to use the Imbuing Shrines.
- Note2: you will only unlock the first two imbuing levels. The third is unlocked after finishing the quest.
When the temple is finished, it will contain six portals leading to six locations with eventually a boss monster to fight. These bosses must be killed to unlock the strongest Imbuing level. Furthermore these bosses drop pieces of an item with which you can tame a Stone Rhino (Mount). A character may only enter each boss room once every 20 hours.
Bane of the Cosmic Force - Energy Portal

Talk to Albinius about the "Energy Portal". He will ask for 50 Marsh Stalker Feathers. Give them to him and you will be able to enter the Energy Portal which takes you to the Replica Dungeon, here, initially filled with Iron Servant Replicas.
When you pull the left lever herea message will appear:
5 Diamond entities are consuming too much raw energy for the cosmic chamber to awaken, it will be put to rest again in 10 m.
Similarly when you pull the right lever herea message will appear:
5 Golden entities are consuming too much pure energy for the cosmic chamber to awaken, it will be put to rest again in 10 m.
The Iron Servant Replicas are joined by golden and diamond ones. Killing at least 5 Golden and 5 Diamond Servant Replicas within 10 minutes will cause a lava flow and a water flow to through the system, which if you follow leads to the center of the dungeon, here, where an Energy Gate will appear. Enter it and you will appear herein a room with 5 Stone Tiles and a lever. Stand on the tiles with your team of 1-5 players and pull the lever, to be teleported to the boss room here.
Lloyd

Forgotten Knowledge Quest - Lloyd
In the boss room you will face Lloyd and four immobile cosmic energy prisms: Cosmic Energy Prism A, B, C and D. After you kill Lloyd a message will appear:
The cosmic energies in the chamber refocus on Lloyd!
At this moment you can kill one of the four cosmic energy prisms (from A to D). Then Lloyd will re-appear and you will have to kill him again. You will have to repeat this process until all 4 cosmic energy prisms are slain, then Lloyd can be stopped for good. Please note that there is a time limit of 10 minutes on the boss fight, after which you will be kicked from the room with a sound (MY COSMIC HARNESS MAKES ME INVINCIBLE!).
A good place to trap Lloyd is northeast of the Cosmic Energy Prism D, a wild growth rune can help to prevent him re-targeting. Another thing to note is, that it seems like he is using an attack that hits everyone who is close to someone else (animated with electricity), if you stay away from each other, you might be able to avoid this hit.
If you want to kill Lloyd a second time you can do so 20 hours after you last killed him. To do that, you will have to kill 5 Golden Servant Replicas and 5 Diamond Servant Replicas again to be able to enter the Energy Gate, even if it's already opened. From now on the slain Servants won't be counted in your quest log anymore.
The Energy Gate itself will only appear if at least one person killed the Servants within the last 10 minutes after pulling the levers. You can kill the servants at any time in order to enter the Energy Gate. For example you can kill them on a Wednesday and enter the portal on a Saturday as long as you didn't kill Lloyd in between those days, and that somebody else has activated the Energy Gate.
After killing Lloyd, use the Abandoned Imbuing Shrine found hereto unlock the following Powerful Imbuements:
 Powerful Cloud Fabric: reduces energy damage by 15%.
 Powerful Electrify: converts 50% of physical damage to Energy damage.
 Powerful Swiftness: increases walking speed by 30.
 Powerful Punch: increases fist skill by 4 levels.
Circle of the Black Sphinx - Death Portal

Talk to Albinius about the "Death Portal". He will ask for 50 Pelvis Bones. Give them to him and enter the portal. When you enter the Death Portal you will find yourself in the Old Masonry located here, filled with Necromancers, Renegade Knights and Vicious Squires on the upper floors, and Astral Shapers on the lower floors.
Walk south-east and go down here. In a parchment called  The Ghostsilver Lantern (Book) you will read the story about Zegrath and his Ghostsilver Lantern. Walk north-east hereand go down. Walk east and go up here. Use the spider web (actually the floor before it) in the north-west corner of the room and you will receive a
  Ghostsilver Lantern. Walk north-east and enter a room through a Door (Iron Bars), a message will appear:
As you enter the room you hear a moaning sound. It seemingly comes from an old desk nearby.
In the middle of the room you will find an  Old Desk. Use it and a message appears:
As you open the drawer a ghostly apparition shortly appears hovering over the desk. You find an old note inside the drawer..
You will receive an  Old Note.
Walk south-east and use a  Heap of Rubbish, hereand you will receive a
  Painting of a Girl with the message:
You have found a painting of a girl.
Take the picture back to the room with the Old Desk and use it with the old desk. A message will appear:
You put the portrait into the drawer and close it. The ghost appears again and you hear a jingling sound inside the drawer..
Use the old desk again, you will receive an  Old Silver Key with the message:
You open the drawer again and find an old silver key that surely wasn't there before..
Walk east past the wall hereand a message appears (if you do have the key):
In the light of the ghostsilver lantern you discover an otherwise invisible door. As you have the fitting key you can pass it.
From now on you can fight the boss. Bring your lantern and activate it, then use the wall to appear here. Walk though the teleporter to the pre-boss room here. Gather a team of 1-5 players, stand on the tiles and pull the lever to face the boss Lady Tenebris with her Shadow Tentacles.
If you change your mind and want to leave without fighting the boss, make sure your lantern is lit and use the wall to the north in the pre-boss room.
Lady Tenebris


Forgotten Knowledge Quest - Lady Tenebris
Initially, you'll have to deal with Lady Tenebris and Shadow Tentacles. When the tentacles are killed, Lady Tenebris will start to summon Shadow Fiends, which don't deal a lot of damage but paralyze you, for this stage you will need Great Fireball Runes, Waves and maybe Hell's Core. Keep on focusing Lady Tenebris and use your AoE damage to kill the Shadow Fiends.
From time to time Lady Tenebris will teleport the party into the middle of the room and after a few seconds she will cast an explosion around her that deals up to 2500 Death Damage. Players must be ready to absorb or block the death damage. It is wise to have a Stone Skin Amulet ready in a hotkey to equip it immediately after being teleported, this way the maximum damage will be reduced from 2500 to just 500 (even lower if equipped with other death reducing items like Death/Butterfly Ring or Moon Mirror).
After killing Lady Tenebris, use the Abandoned Imbuing Shrine around hereto unlock the following Powerful Imbuements:
 Powerful Lich Shroud: reduces death damage by 10%.
 Powerful Reap: converts 50% of physical damage to Death damage.
 Powerful Vampirism: converts 25% of damage to HP with a chance of 100%.
Dragon in Distress - Ice Portal

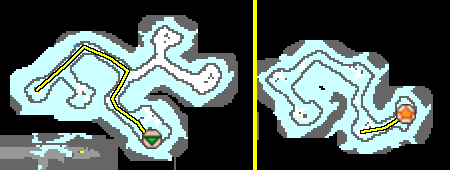


Follow this path to reach the Dragon Mother NPC.
Talk to Albinius about the "Ice Portal". He will ask for 50 Fish. Give them to him so you can enter the portal. Go through the Ice Portal, walk north-eastdown a hole and then follow the map to the right to the NPC A Dragon Mother. Talk to her saying: hi, assistance, yes, egg. She will ask you to retrieve her stolen egg.
Then, walk back to the portal and walk here. Follow the path down until you reach a room with a teleport, enter it to find a room with a lever. Stand on the squares and pull the lever to enter the boss room. The time limit is 17 minutes.
Melting Frozen Horror

Forgotten Knowledge Quest - Frozen Horror


The blocker should challenge the Solid Frozen Horror while the rest of the team runs north to the Dragon Egg. There are two Icicle towers next to egg, keep a magic wall on each side active to prevent them from damaging the Dragon Egg as shown below. Attack the egg with fire damage attacks such as Great Fireball Runes and Flame Strike and the such will heal the egg. Don't use ice attacks because those will lower its health.
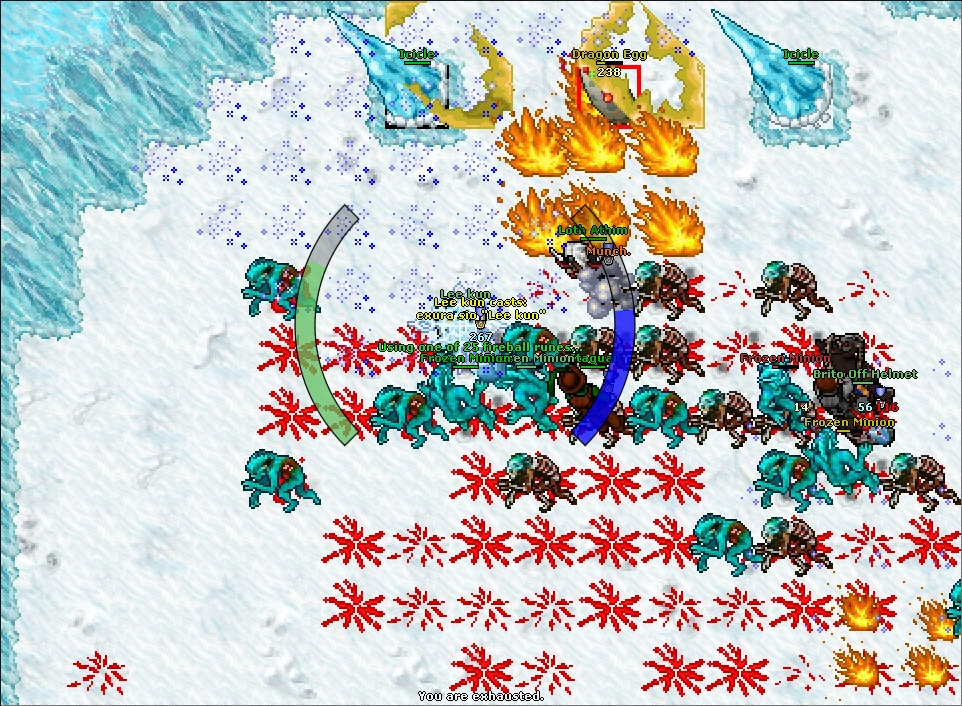
After some seconds Frozen Minions will spawn in the room. Since the minions' ice spells will heal the boss and damage the egg, it is suggested that a paladin blocks the minions, running around the room if necessary. The minions can be killed but will spawn again shortly. The Solid Frozen Horror should be kept away from the egg as it does an area spell that cancels magic walls and also can do ice waves.
Once the Dragon Egg's health is full, an orange message appears announcing that the boss is now vulnerable (The egg sends out a fiery eruption! Weakening the frozen horror significantly!). The boss will transform into a Melting Frozen Horror, quickly start attacking it (for the mages it is suggested to use Sudden Death Runes). After 20 seconds the boss becomes solid again at which point you have to heat the Egg again.
After defeating The Melting Frozen Horror, a Baby Dragon will hatch. Report back to The Dragon Mother, then exit her room. Instead of going up, follow the cave around and enter the Mystic Flame located here. This will lead you to a small dungeon inhabited by Twisted Shapers and Shaper Matriarchs. Use the Abandoned Imbuing Shrine to the North-East hereto unlock the following Powerful Imbuements:
 Powerful Quara Scale: reduces ice damage by 15%.
 Powerful Frost: converts 50% of physical damage to Ice damage.
 Powerful Blockade: increases shielding skill by 4 levels.
The Desecrated Glade - Earth Portal

Talk to Albinius and say "Earth Portal". He will ask for 50 Acorns. Give them to him and enter the portal. Go through the Earth Portal or walk to the Outlaw Camp and find NPC Weakened Forest Fury. Talk to her saying: hi, distress, yes. She will give you an  Empty Birdcage.
Walk into the Stony Pond next to her and you will appear in the Desecrated Glade, here. In this cave you will face: Cave Parrots, Orclops Ravagers and Orclops Doomhaulers.
When you use the Empty Birdcage on a Cave Parrot it will be caught and turn into an  Occupied Birdcage while a message appears:
The cave parrot may be tough but he somehow couldn't resist this particular birdcage. Or maybe it was you...
Walk some levels down until you see a Giant Tree located here. Use the Occupied Birdcage and the bird will fly away with  Hearts Effect and a message will appear:
You open the cage and let the cave parrot roam free!
Repeat this process until you freed 3 parrots. Furthermore, try to loot some  Reinvigorating Seeds (you only need one of these) from Orclops Ravagers. They need to be used on the
  Fertile Soil with the message:
You planted some seeds into the soil.
This will make a  Growing Birch appear. To water the birch you need one
  Phial of Fresh Water, which can be obtained by using the Stony Pond near the Weakened Forest Fury with the message:
A phial of fresh pond water. It looks crystal clear and sparkles a little.
When you use it on the Growing Birch it will say:
The birch grows as you pour the sparkling water from the phial over it.
The Growing Birch will grow into a  Blooming Birch, you need to grow 5 birches.
Now you can "heal" the giant tree located here, by using the Phial of Fresh Water on it.
Enter the Mystic Flame which appeared in front of you and you will appear in a Tree Wall cave deep below Tiquanda, here. Walk north-west until you find a teleporter, here. Enter it to appear in a room with 5 Stone Tiles and a Lever. Stand on the stone tiles with a team of 1-5 players and pull the lever, to be teleported in the boss room a little to the west, which contains an Abandoned Imbuing Shrine in the west.
The Enraged Thorn Knight


When you enter the room 8 Possessed Trees will spawn, together with the Mounted Thorn Knight. There are also up to 4 Thorn Minions. When you kill these trees, they will turn into Unbound Blightwalker, Unbound Defiler, Unbound Demon Outcast or Unbound Demons. One way is to kill them one by one, because the thorn knight will take more damage afterwards. Another way is staying to the south and trying to avoid killing them.
The Mounted Thorn Knight has 3 phases which slightly differ. Phase 1: He summons Thorn Minions and sits on his mount. Phase 2: He turns into The Shielded Thorn Knight and his mount Thorn Steed, which has to be killed first. Phase 3: He turns into The Enraged Thorn Knight. All of them can be killed with fire damage, however death damage will heal them 10 times the intended damage (A SD rune hitting normally 500 will instead heal them 5000).
After killing The Enraged Thorn Knight, use the Abandoned Imbuing Shrine found hereto unlock the following Powerful Imbuements:
 Powerful Snake Skin: reduces earth damage by 15%.
 Powerful Venom: converts 50% of physical damage to Earth damage.
 Powerful Slash: increases sword skill by 4 levels.
 Powerful Chop: increases axe skill by 4 levels.
 Powerful Bash: increases club skill by 4 levels.
The Unwary Mage - Fire Portal

Go to Ivalisse located in the Halls of Hope, here. Talk to Ivalisse, say temple, father, yes, yes and she will give you the mission to find her father who was looking for Draken in Zao.
The area Ivalisse talks about is located behind the Fire Portal (you need to have completed the entire The New Frontier Quest to enter), which brings you to northern Zao here. East of the building you can go up with a ladder, walk north over a Bridge and enter the Temple Complex here.
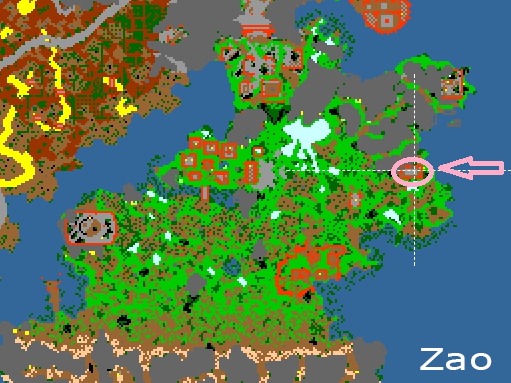
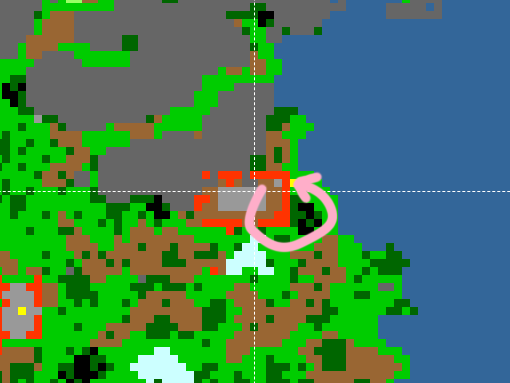
Walk south past some Mutated Bats and Mutated Tigers and go west through a Lizard area where you face all kinds of High Class Lizards. Walk until you can go down one floor and walk north-east. Eventually you will find a room with A Strange Chalice, here. This is of course a disguised Silus, the father of Ivalisse.
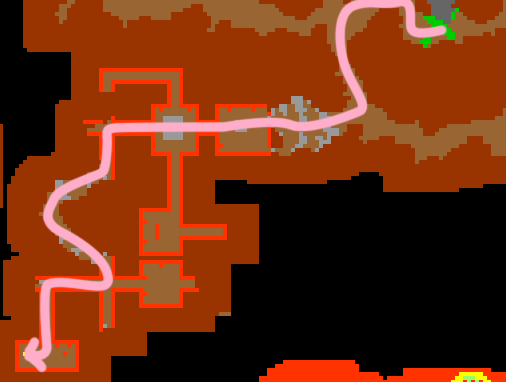
Talk to him saying hi, chalice, daughter, story, disguised, thirsty, learned. From him you will learn the password to enter the teleporter in the Temple Complex, which is zzubaran.
You can now enter the teleporter located here, which brings you one floor down, herewhere you will face Draken Warmasters and Draken Spellweavers.
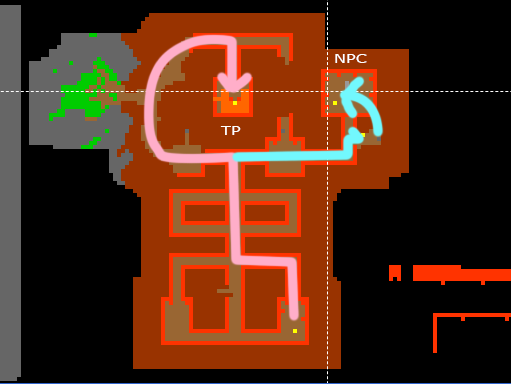
Walk south to a teleporter located here, which brings you to a room a little to the west, here. There you will find several Stone Tiles and a Lever.
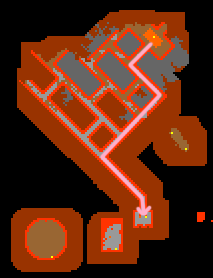
Gather between 1 and 5 people so you can kill the Soul of Dragonking Zyrtarch. If a group enters the room you can't enter it. If you exit the boss room during the fight you can't enter it right away again.
Soul of Dragonking Zyrtarch


 Bring around 50x Soulfire Runes as this will make spawning the Corrupted Souls much easier.
Once you pull the lever you'll be sent into a room with 4 Soulcatchers (these are stationary 'object creatures'), 2 Dragon Servants, and the (immortal) Dragonking Zyrtarch. The knight should try to position themselves in the center around here, keeping Dragonking away from the Soulcatchers, as they will heal him if they are nearby.
The rest of the team should focus on damaging the Soulcatchers using damage-over-time spells, such as Inflict Wound, Curse, Electrify, Envenom, Holy Flash, Ignite, or Soulfire. Since Soulcatchers are not immune to Fire (unlike the other creatures during the fight), Soulfire Runes are highly recommended. Otherwise, you'll have to wait for the spells' Cooldown until you've spawned at least 3 Corrupted Souls.
The team has to kill all three Corrupted Souls on the same tile to create the portal to the room below. The first vortex to appear will be green,  the second will be purple,
  and the last will be red.
When the portal turns red, the whole team must enter the red vortex, begining with the shooters, as they walk over it they will be dropped into the room below. The knight should then lure the Dragonking over the vortex before following through himself. Be sure to lure the boss over the red vortex before the knight jumps in! If, for any reason, all 5 players jump down without the boss, you can use the teleport hereto go back to the room and try again.
Once your down and inside, you will face the mortal version of the boss, the Soul of Dragonking Zyrtarch. Be careful, as there will also be 2 Dragon Wraths in the room. To assist in keeping the shooters safe they should use Fire Bombs or Energy Bombs in an area slightly away from the center of the room to create a somewhat "safer zone", as the Dragon Wraths will not pass over these fields. Meanwhile, the knight must keep the boss and the 2 dragons in the middle of the room for ease of access to the shooters.
Each round the team will have 30 seconds from the moment the Dragonking enters this room to do damage to him. Once the time has passed, the team and the boss will be teleported back to room above, and the process of stacking the Vortexs must be repeated until you've defeated The Dragonking.
- Note: You have a limit of 17 minutes to kill this boss.
After the boss is killed:
- Use the Abandoned Imbuing Shrine located to the north in the room here.
- Report back to Ivalisse by saying Temple and Father.
Defeating The Soul of Dragonking Zyrtarch unlocks the following Powerful Imbuements:
 Powerful Dragon Hide: reduces fire damage by 15%.
 Powerful Scorch: converts 50% of physical damage to Fire damage.
 Powerful Void: converts 8% of damage to mana with a chance of 100%.
Time is a Window - Holy Portal

Talk to Albinius and say "Holy Portal". He will ask for 50 Incantation Notes. Give them to him and enter the portal. Entering the Holy Portal takes you to the Astral Shaper Dungeon, deep below Tiquanda. You will enter the dungeon here. Walk east, while you encounter Twisted Shapers and Broken Shapers, and enter a Time Machine located here, which teleports you herewith a message:
The mechanism takes you back in time.
Note: When you use the time machine, the only way to exit is by defeating The Time Guardian, or you can just use the exit teleport in the boss room.
This floor contains no creatures, but a teleporter to the north, here. Enter it and you will appear here, in a room with a sign saying "Room of Cleansing", an Old Machine. Use the old machine to receive an Imbuing Crystal.
Go through the western teleporter, which takes you here, a room with 5 tiles and a lever, where you can try to face The Time Guardian with 1-5 people.
The Time Guardian
The Time Guardian will appear with several Time Keepers and has 3 forms with different weaknesses:


This is a very dynamic fight, the boss alternates between 3 forms. Shooters are usually safe if 2 blockers trap the boss in one corner and avoid the beams and waves from the boss. The main source of damage from the boss is Fire and Physical damage, with minimum income of Death Damage. Blockers are recomended to wear mainly Physical and Fire protection, the boss can hit up to ~1200 to 1300 Physical Damage and up to ~900 Fire damage, while only ~300 Death Damage.
 Explosion Runes
Lost Time
Time Waster
NOT inflict Ice Damage
Explosion Runes
Lost Time
Time Waster
NOT inflict Ice Damage
 Great Fireball Runes
Great Fire Wave
Strong Flame Strike
Hell's Core
Great Fireball Runes
Great Fire Wave
Strong Flame Strike
Hell's Core
For this stage Druids can use Eternal Winter, but it may be counterproductive due to the long attack cooldown. Using  Avalanche Runes, Strong Ice Wave and Strong Ice Strike is usually a better option.
It is recommended to skip this form every time you notice a big amount of Time Wasters and your team is struggling with their damage or dealing with them in general.
In general the team has to keep an eye on the Time Guardian changing his form and react appropriate. To summarize the strategy: you want to deal as much physical damage as possible on The Time Guardian, as much fire damage as possible on The Freezing Time Guardian (the more Lost Time spawn, the better) and don't overdo ice damage on The Blazing Time Guardian (so you always have enough corpses from Lost Time to get rid of the spawning Time Wasters). Killing the Time Keepers with area damage from time to time will help to lower the incoming damage, but is usually not needed as they will keep respawning. Energy protection is very usefull for that aswell.
After killing The Time Guardian, use the Abandoned Imbuing Shrine located outside the boss room and east of the Time Machine's entrance, hereto unlock the following Powerful Imbuements:
 Powerful Demon Presence: reduces holy damage by 15%.
 Powerful Precision: increases distance skill by 4 levels.
Final Fight - The Last Lore Keeper


After you killed all six bosses from the elemental portals, you can enter the Energy Gate in the Halls of Hope. You will end up in the Astral Shaper Boss Dungeon located here.
You will meet various Astral Shapers. Walk south and go down the hole here. Walk north-west and go down some stairs here. Walk east until you find some Stone Rhinos and a Mystic Flame, here. Enter the teleporter and you fill travel to a room located here. Walk in the teleporter to get in a room with 15 Stone Tiles and a lever. Get your team of 1-15 people on the tiles and pull the lever to enter the boss room. About battle recommendations, Paladins should Use Holy Damage on the four main enemies (4 Bound Astral Powers, The Astral Source, An Astral Glyph and The Last Lore Keeper), it deals 100% of the damage. Knights are advised to bring an Energy dealing weapon (Gnome Sword/Falcon Battleaxe/Falcon Mace or Soulmaimer if available) or less preferable any powerful energy imbued weapon, as all enemies are strong against Physical Damage. Finally, Mages should use SDs against the Bound Astral Powers, and should prefer energy based attacks as The Astral Source is weak to it and both An Astral Glyph and The Last Lore Keeper are not as strong to energy. Also, for UEs, Sorcerers of course should prefer Rage of the Skies and Druids Wrath of Nature (almost everything is strong to Ice) while cleaning the room of lesser enemies or racking up damage.

Forgotten Knowledge Quest - The Last Lore Keeper
The secret to completing this fight successfully is executing the mechanics very precisely, otherwise you'll run out of time very quickly. Once you enter the room, the Astral Glyph starts to gather energy that will expel you from the room. To prevent that, you have to kill the Bound Astral Powers so you have enough time to weaken the Source and kill the Glyph. Once the Bound Astral Powers respawn, you'll have to kill them again otherwise the Source will gather more energy and kick you out. Once The Astral Source is in black HP (it won't die), it will stop gathering energy and you won't have to deal with Bound Astral Powers anymore. The recommended strategy is the following:
Astral Powers #1
Entering the room a message will appear:
The Astral Glyph begins to draw upon bound astral power to expel you from the room!
Bound Astral Power
The boss room contains four green vortices in its corners leading to smaller side rooms, each one with one Bound Astral Powers and possibly a couple Animated Swords. After pulling the lever, the team should move to one of the vortices and start attacking the Astral Power in it. Shooters can use SDs to greatly increase the damage. When it's in red HP, all the team members but one player should leave the room and proceed to the next Astral Power. This player should attack the Power a few more turns to make sure it's on black HP and close to die. When the second Astral Power reaches approximately 40% health, the player that stayed behind should finish off the first one.
The same strategy should be employed with the second and third Powers, whereas the final Power should be killed immediately.
Note: The players that stay behind in the first three rooms should stay in the room after killing the Astral Power and wait until the team is back to the main room to leave. Once you leave the room with the Astral Power dead, you'll not be allowed into another room and will be forced to stay in the main room with the Swords and Glyph.
Upon killing an Astral Power, the following message appears: The destruction of the power source gained you more time until the glyph is powered up!
The Astral Source #1
The Astral Source
Once all 4 Powers are dead, the team must gather in the main room and start attacking The Astral Source, be careful with the Drown Wave from The Astral source,it deals great Physical Damage. When it reaches black HP it will become The Distorted Astral Source (Your damage distorted the source and prevents the Glyph to draw its power!) and A Shielded Astral Glyph will become just An Astral Glyph (Without the power of the source, the Glyph loses its protection!). When this happens, start attacking the Glyph and the Source at the same time, so the Source doesn't heal back.
Astral Powers #2
Between 2 to 2.5 minutes after you returned to the main room, the Bound Astral Powers will start to respawn. A team member should be checking the room where the first Power was killed and call the team in when it respawns. Once this happens, the same rotation as before must be performed: leave it in red HP with a shooter, move to the next one and kill the previous Power when the HP of the one being attacked reaches about 40%.
The Astral Source #2

An Astral Glyph
Back in the main room, the Astral Source will have healed a bit and the Glyph will be shielded again (Drawing upon the power of the source, the Glyph becomes shielded again!). Repeat the same process as before to remove the shield and cause damage to the Glyph. This time around you should have enough time to kill the Astral Glyph, which will make The Last Lore Keeper appear.
Last Lore Keeper
The Last Lore Keeper
Getting to this stage is the hardest part of the boss fight. Once the Lore Keeper spawns, you won't have to deal with the Source or Powers anymore. Just trap it somewhere in the room (e.g. by the Imbuing Shrine) and attack it. The members in wave range should be careful with the Keeper's Energy Wave. Since there will be many Animated Swords in the room, the weakest team members can be positioned closer to the walls while stronger ones stay on the edges with the Swords. When too many Swords are on screen the mages can use UE combos to clear them.
After defeating The Last Lore Keeper, use the Abandoned Imbuing Shrine around hereto unlock the following Powerful Imbuements:
 Powerful Strike: raises crit hit damage by 50% and crit hit chance by 10%.
 Powerful Epiphany: raises magic level by 4 levels.