

Liquid Black Quest
Spectulus discovered a strange island.
Reward
Dangers
18


Required Equipment
Preliminary Information
The Liquid Black Quest centers around the Deeplings world change. However, the missions are not linearly dependent. This means you can do the missions without having done any previous missions, so you can skip most of this spoiler.
The missions available, however, are dependent on the Deeplings world change. The table below lists the Deeplings stage, the missions available, and how to progress during these stages. Note that 200 points are required to progress to the next stage.
| Deepling stage | Missions available | Progression method |
|---|---|---|
| 1 | Heart of the Sea, Soul Net | Soul Net (5 points), kill 1 Deepling guard (1 point until 100 points, then 0.1(?) point) |
| 2 | Coral Mine, Soul Net | Same as stage 1(?) + Coral Mine (2 points for 1 coral crate) |
| 3 | Deepling Guardians (+addon 1), Anchor (addon 2), Soul Net | Same as stage 1(?) Note: there's no further stage, but if 200 points are accumulated on the final day of Deepling stage 3, the world change will revert to stage 2 rather than stage 1. |
The First Visitor
- Go to Gray Island. It is only accessible through harbours from Ab'Dendriel, Venore, Darashia and Edron.
- Once there you may talk to Scrutinon to learn more about Quirefang. When you are ready enter the Hole south of Scrutinon.
- In the -1 Floor walk north-east through the underground passage and enter the Water Vortex. Once you appear at the other side of the cave (Gray Beach entrance), use your Rope on the ground spot.
- After going up, head north to reach Gray Beach. To the north-west there are a Depot and a Temple. Go to the east and enter a hole.
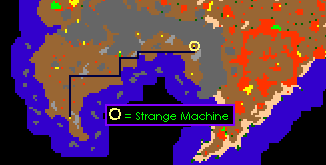
- In this cave you will find a Chest (Quest) and a Strange Machine. Open the chest to receive
 Notes and Coordinates. Use the notes and you will get the following message: "The scribblings seem to describe an underground machine. There are also some cryptic coordinates written on it.", then use the
  Soft Green Chair. You will then get the folowing message and be teleported to the Ivory Towers, on Edron: "At least the instructions of the portable teleporter of this machine were readable in the strange notes you found!"
 - Greet Spectulus and ask him about his machine and the Deeplings.
- Spectulus will then explain his story about the Deepling area and offer you some special equipment to make it possible to go underwater there and give you 150 gp to travel back to the Gray Island.
Shortcut to Fiehonja (Teleport)
From Gray Beach, follow the coast to the east and enter the south-easternmost hole (here). Head down the large staircase until the bottom.
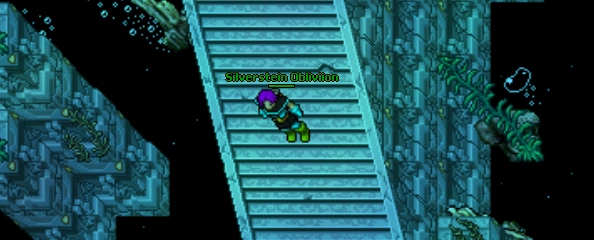

When you reach the bottom of the stairs, follow the cave south to ramp. Follow the one-way path to the main part of Fiehonja. Walk to the north until you find a ramp going up and to the north (hereor here). Go up and head further north to a staircase below with a Teleport. Enter the teleport to gain access to the Fiehonja-Gray Beach shortcut.
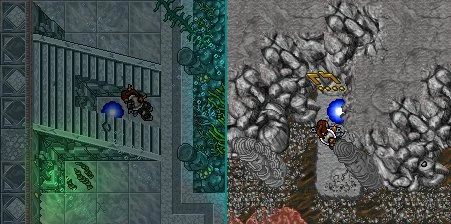
The teleport on Gray Beach will take you to the Fiehonja protection zone (with the Qjell statue)
Lagatos' Book of Death (for Outfit)
Note: you can do this at any time, it is not required for the progression of the quest (although you will need it to get Deepling addon 1 and 2). It is in this section only because Deepling stage 1, 2 or 3 is not required to complete this mission.
Kill Deepling Spellsinger's to loot Keys to the Drowned Library. Use these keys to open Seashell Bookcases, found in two libraries shown in the image below, for a chance to get one of the three seashell books.
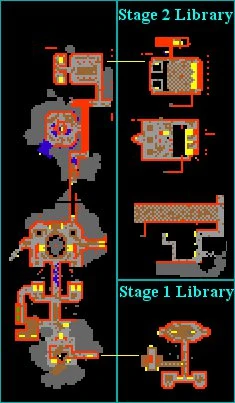
Get all 3 seashell books (blue, green and yellow). This should take around 20 keys, depending on luck. Use all 3 books and go to Spectulus and ask him about the books. Once you hand the three books to him, he will give you the Deepling Outfit.
Be warned: if you buy these from players, ensure they have the blood-marks on them. Similar-looking books have been found containing text in the Fiehonja Library, the blood-marks will distinguish the addon items from the reading books.


 - addon items (you need these)


 - similar looking books (don't buy these)
First Stage
Heart of the Sea
Note: This mission is not required to advance to stage 2 or obtain the outfit or its addons. You may want to do this mission for the chance of obtaining a True Heart of the Sea and some other minor rewards. Otherwise, there is nothing to be gained from doing it. You can repeat this mission each time the Deeplings revert to stage 1. Keep in mind that you need to do this mission 5 times to receive any reward.
In order to please Qjell you must sacrifice Hearts of the Sea to replace the original, which was lost a long time ago. From Gray Beach go through the teleport to Fiehonja to arrive near the Qjell statue. West-southwest from the Qjell statue you will find a ramp leading below. Go down and follow the cave north-west. Along the path you will find a Strong Water Vortex which you will need to use later. For now, go south-west from the vortex through the small crevice. It will have a Warning Sign by the entrance. Follow the cave through the thin passage until you arrive at a ramp leading up. The crystal mine can be found up this ramp.
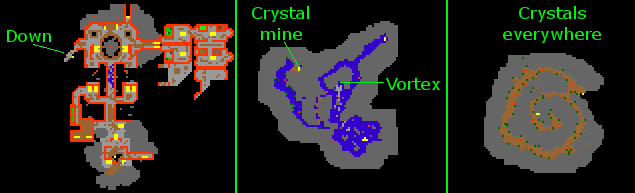
The crystal mine has 3 floors with a lot of Large Red Crystals. You shouldn't need to go far from the start. You must use a Pick (or equivalent) on the Large Red Crystals. When you do so, one of these will occur:
✗ Nothing will happen.
- You gathered nothing more than some small chips of red gem.
✗ A Deepling Guard will spawn.
- Suddenly a guard jumps at you from behind!
✓ You will obtain a Rough Red Gem.
- With considerable effort you manage to knock a largely unscathed rough gem out of the rocks.
In either case you will be unable to mine for 30 seconds. Continue mining until you have obtained a Rough Red Gem. When you have mined a Rough Red Gem you will be unable to mine another until you cut and offer the one you have mined, or after a certain period of time passes (possibly 24 hours).
With the Rough Red Gem, go back the way you came and stop near the Warning Sign. There is a Strong Water Vortex nearby. Use the Rough Red Gem on the Strong Water Vortex to craft a Heart of the Sea. Now continue on your way back to the Qjell statue. Use the Heart of the Sea, from a distance, on the statue's gem slot on its head. It may take a few tries to hit the correct spot.
Repeat this mission 5 times to be eligible for a reward in the Stage 2 library. When the server contributes a combined total of 100 Hearts, a big red glowing gem will appear in the slot. No more gems can be mined until next Stage 1 when this occurs. Note again that delivering 100 offers no additional reward, and is not required to progress to the next stage—it is only there for flavor.


Mining Large Crystal, 60 trials.
| Item |
Amount |
Percentage |
Tries to get 1 |
|---|---|---|---|
 The Heart of the Sea The Heart of the Sea |
13 | 21.67% | 5 |
 Small chips (nothing) Small chips (nothing) |
24 | 40% | 3 |
| Deepling Guard |
23 | 38.33% | 3 |
See also: Large Crystal.
Soul Net (for addon 2)
This mission contributes 5 points to the Deeplings progression.
Talk to Alternative Rock on the surface of Gray Beach. Agree to help and he will give you a Soul Net.
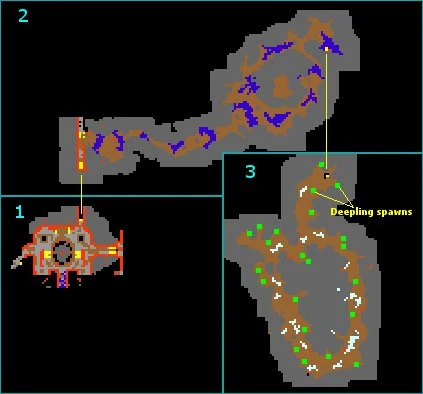
Enter the Fiehonja teleport and leave the protection zone to the north ramp. Follow the cave north and then east all the way, go up the ramp to the spawning ground.
The only creatures in this area are Deepling Workers and Deepling Brawlers, quite harmless compared to the higher-class Deeplings faced on the way in. Your objective is to purify the piles of Deepling Spawn (Cursed) by using the soul net on them. You must purify every deepling spawn before the first one regenerates (about 2 minutes, i.e. all deepling spawns must be pure). You will need speed items/spells if you are doing it alone below level 150. In the map above, the green dots represent approximate locations of the spawns.
You may repeat this mission as many times as you want, but you must wait 5 minutes after the final purification for the evil Deepling spirits to regenerate. Rarely, purifying the final spawn will yield a Small Golden Anchor, this can be used later (stage 3) for the second addon of the Deepling outfit.
Farming Small Golden Anchor, 9 trials.
| Item |
Amount |
Percentage |
Tries to get 1 |
|---|---|---|---|
 Small Golden Anchor Small Golden Anchor |
4 | 44.44% | 3 |
| The curse on the spawn has been lifted. All remaining evil spirits have fled from this place. (nothing) |
5 | 55.56% | 2 |
See also: Small Golden Anchor.
Second Stage
Heart of the Sea (rewards)
Required: having delivered Qjell 5 or more Hearts of the Sea during Deepling stage 1.
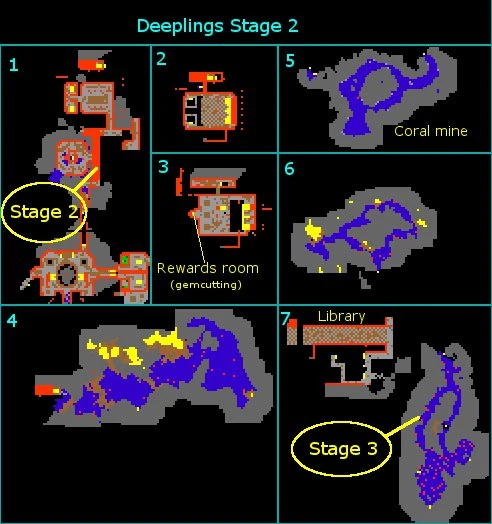
From the Qjell statue, head north, down the ramp and continue north up a ramp. If the server is in Deepling stage 2 or 3, there will be no wall blocking your path north. Continue walking north until you come to the library (you'll find Seashell Bookcases against the walls).
Be careful as Deeplings come in large groups from here on. Go up the ramp and head east to another ramp. Go up once, head around the ramps to the west to a teleport.
If you delivered Qjell 5 or more Hearts of the Sea during the latest Deepling stage 1, you will gain access to the teleport. Inside it there is nothing dangerous, and when using the Treasure Chest (Blue) and the Hoards of Gold on the floor you can get some Platinum Coins and three random rewards. As a rare reward you can get a True Heart of the Sea. It has been confirmed that a single character can obtain a True Heart of the Sea multiple times.
Possible rewards are:
 10 Platinum Coins (chest)
 True Heart of the Sea (ground)
 Deepling Backpack (ground)
 Deepling Staff (ground)
 Heavy Trident (ground)
 Necklace of the Deep (ground)
 Deepling Squelcher (ground)
Coral Mine
Follow the route to the Qjell reward room, but before the teleport, branch off north through a corridor and down a set of ramps leading outside of the library.
Head furthest east where you will find a ramp (look at map 4 in the image above), go up the ramp and you will find deposits of Fossilised Coral. Use a pick on the deposits until you mine a Crate Full of Coral. You need to mine 10 to gain access to your rewards, but can only mine up to three crates full of coral before having to use the crates. Once you have the crate full of coral, head back down the ramp and about half way back to the library ramp and you will find another ramp on the south side of the cave (again, check map 4). Head up this ramp and you should find an incomplete ramp and a construction tile. Use the crate of coral on the construction tile and use a shovel on the incomplete ramp, which will cause the crate to disappear. This will allow you to mine again. Repeat this until you have mined 10 crates.
Note:
- you cannot use another player's crates to gain boss access. Access is granted by mining the coral, using them on the platform allows you to mine more, and shoveling only removes the crate from the platform. In other words, you must mine your own 10 crates to gain access.
- if you lose a crate, you will be unable to mine 1 of the 3 crates permitted. For example, if one of your crates are stolen, you can only mine 2 maximum at one point until the next day.
- if there are no coral deposits or if the ramp is complete, then the server is in Deepling stage 3. You cannot gain Deepling boss access during stage 3.
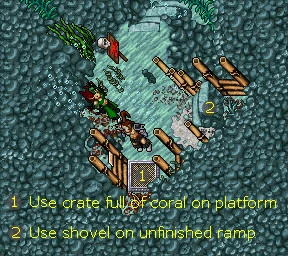
If you have done this enough, you will gain access to the active Deepling boss when the world progresses to Stage 3.
Mining coral, 1248 trials.
| Item |
Amount |
Percentage |
Tries to get 1 |
|---|---|---|---|
 You manage to mine enough chunks of coral to fill one crate. You manage to mine enough chunks of coral to fill one crate. |
121 | 9.7% | 11 |
| It seems you disturbed a Deepling worker. |
776 | 62.18% | 2 |
| The coral you mined was crumbly and of minor quality. |
351 | 28.13% | 4 |
Third Stage
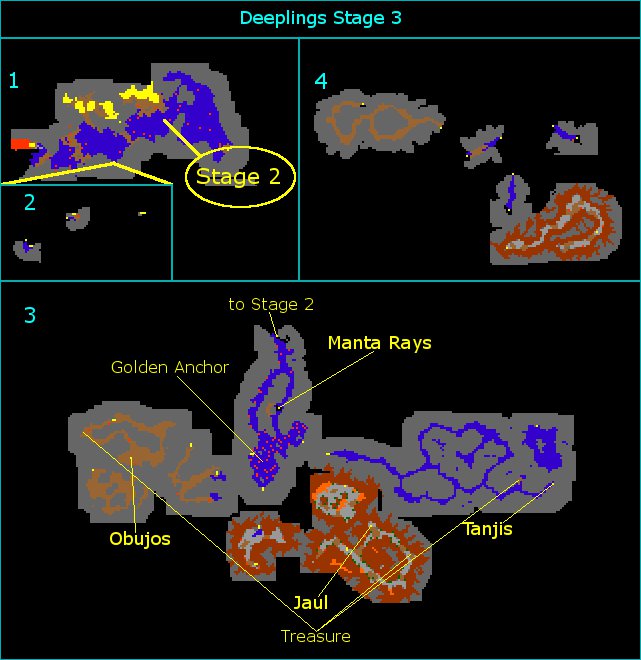
The third is the final stage and thus there's no way to further progress. The third stage brings about some changes to Fiehonja:
- The third area of Fiehonja is unlocked (the area the coral was delivered will now be a constructed ramp), including access to Manta Rays and at least one of the three Deepling bosses (Tanjis, Obujos, Jaul).
- The boss is selected randomly (most commonly Tanjis, Obujos and then Jaul) and remains for that day only. At server save, the boss will be re-rolled, but it is possible that the same boss is rolled.
- You gain a once-only access to the current boss if and only if you mined the appropriate amount of crates. Upon entering the teleport to a boss, you may stay there for up to 20 minutes, during which time the boss may spawn (spawn time is 3–10 minutes), influenced by amount of players online. After killing the boss at least once, you may open the chest by his lair to receive an additional reward.
- The coral mine now contains no coral deposits.
Anchor (for addon 2)
Required: Small Golden Anchor (obtained in Soul Net mission).
- Go the the stage 3 area and search for the Golden Anchor. (to get in the stage 3 and the anchor follow the maps in the next presentation from Step One to Step Five).


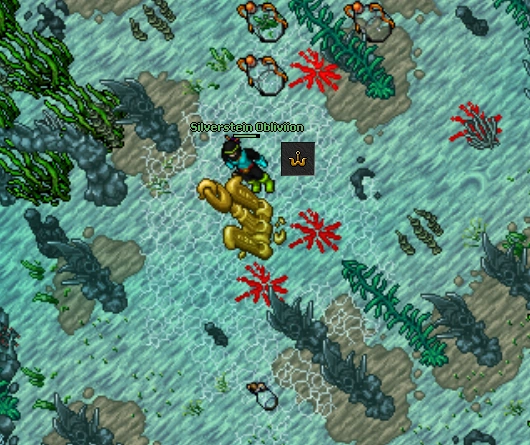
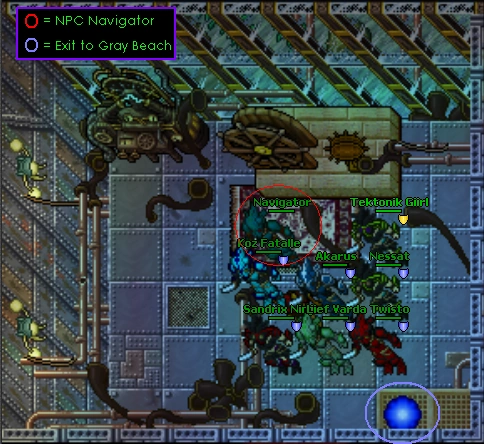
- Use your Small Golden Anchor on the Golden Anchor and you will be teleported to a room with the NPC Navigator inside it. Greet him and you will receive the achievement Navigational Error.
- The answer to his riddle is "Flou".
- Ask him about his helmet and he will give you the second addon in return for your Small Golden Anchor.
- If you step in the teleporter you will get teleported back to the surface, so make sure the people in your team without a Small Golden Anchor are strong enough to get back.
First Addon
Required: having attempted repair of the ramp 10 times during Deepling stage 2, note that the chances to get the addon items are very rare so this is a minimum requirement. Alternatively, buy all 3 Deepling guardian treasure: Tanjis' Sight, Obujos' Shell, and Jaul's Pearl.
This is the hardest addon, but the idea is very simple. When you kill each boss (Obujos, Tanjis and Jaul), the permission to open the respective chests will be granted to you. There's a chance to get some items from them. When you get Obujos' Shell, Tanjis' Sight and Jaul's Pearl, you have to go to NPC Rock Steady. You have to say "Hi", "Collect", "Yes" three times, that way you will give the items to him to complete his collection. When you have handed all of those he will thank you with the first addon. Also you will get the achievement Spolium Profundis.
Boss Access Mechanics
- Access to a specific boss room is revoked as soon as you gain credit for killing one of them. But you can enter and leave the room as long as you do not get credit for a kill. This means that players can enter the room, bring the boss to red HP, leave the room, re-enter to reset the 20 minute timer, and only then kill the boss. This is useful in order to gain more time within the room, increasing chances to get additional kills.
- Access to other bosses is revoked once any of the 3 reward chests are opened. As of 10.38, opening one chest will also revoke your access to the other bosses' chest rewards. Thus, in practice, you may only open 1 of the chests and therefore kill 1 of the bosses per stage 3 rotation.
- Technically, during your first kills, you can kill all 3 bosses in one week (if they all spawn), but this will only work once, since at the beginning your chests are not picked and you have no boss kills. This is mostly irrelevant in the long run, so players should just consider they can only kill one boss per stage 3 rotation.
- If you fail to open a chest, there is no gain in repeating the Coral Mine mission, your access to bosses cannot be renewed until you receive rewards for killing them.
- If you do not fight a boss during the same rotation you participated in stage 2, the access you got will be saved for another rotation. Each rotation being each cycle of stage 1-3. For example: You mined 10 crates for stage 2, but you never find a team for the boss. You may wait until many weeks later, and you will still have access without having to mine crates again.