

Wrath of the Emperor Quest
Help Zalamon in his fight against the corrupted Emperor.
Primarily Zao including the Zao Rebel Camp and Razachai, Banuta
Reward
Dangers
16


Required Equipment
Mission 01: Catering the Lion's Den
You must bring Zalamon 3 nails and a piece of wood so that he can make a Marked Crate for you. Go to the spot marked on your mini map in eastern Muggy Plains (northeast of the village that has Lizard Zaoguns in it) and use a Shovel or equivalent on the hole here.
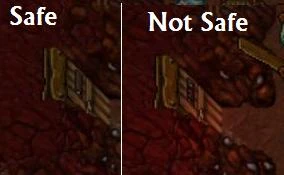
Using the Marked Crate as a disguise you must sneak past the lizard defenses. You will have to pass some doors with Observation Slits in them  . Only try to move past these doors when the slit is closed. You will also encounter five Lizard Tunnel Guards, and in order to pass them you need to stay close to the wall and far from any light sources. Turning down ambient light will help you identify lighted areas. Also, you cannot speak in the Local Chat Channel near them.
If you are discovered by any of the defenses you will be teleported to a prison where Zumtah resides. To get out, say hi, exit, no, yes, exit, no, yes, exit, no, yes, 278, exit, exit, exit, and exit. He will turn you into a Lancer Beetle, and now you can approach the Hole (Earth) and be teleported out to the beginning of the den. You will receive your Marked Crate back and can try again.
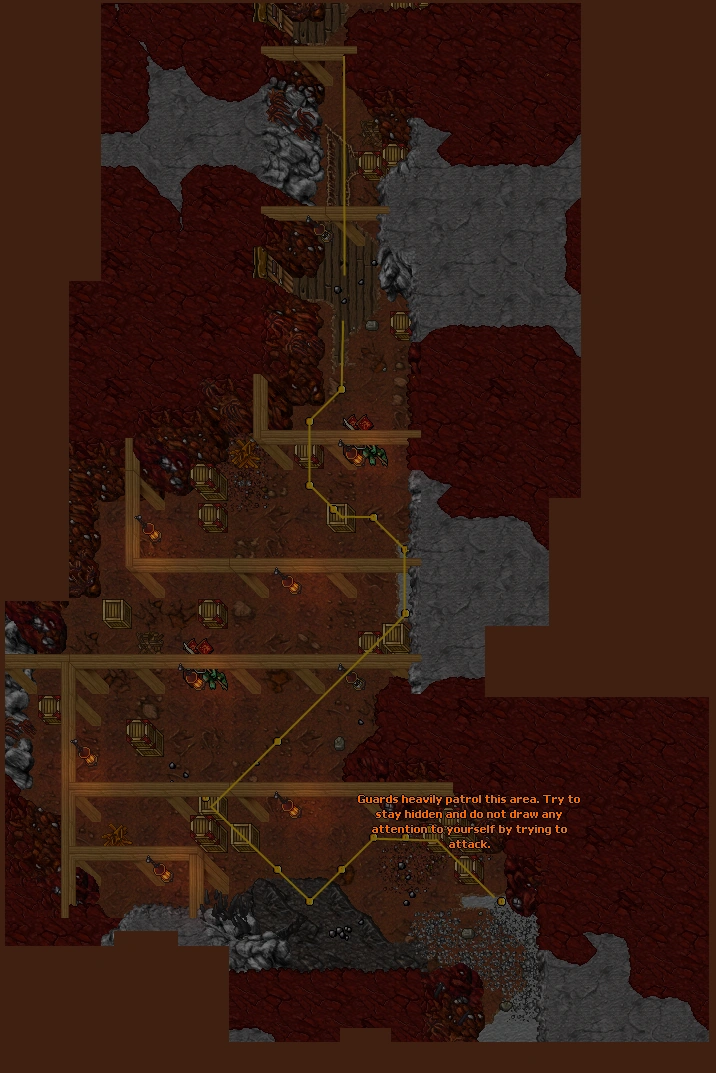
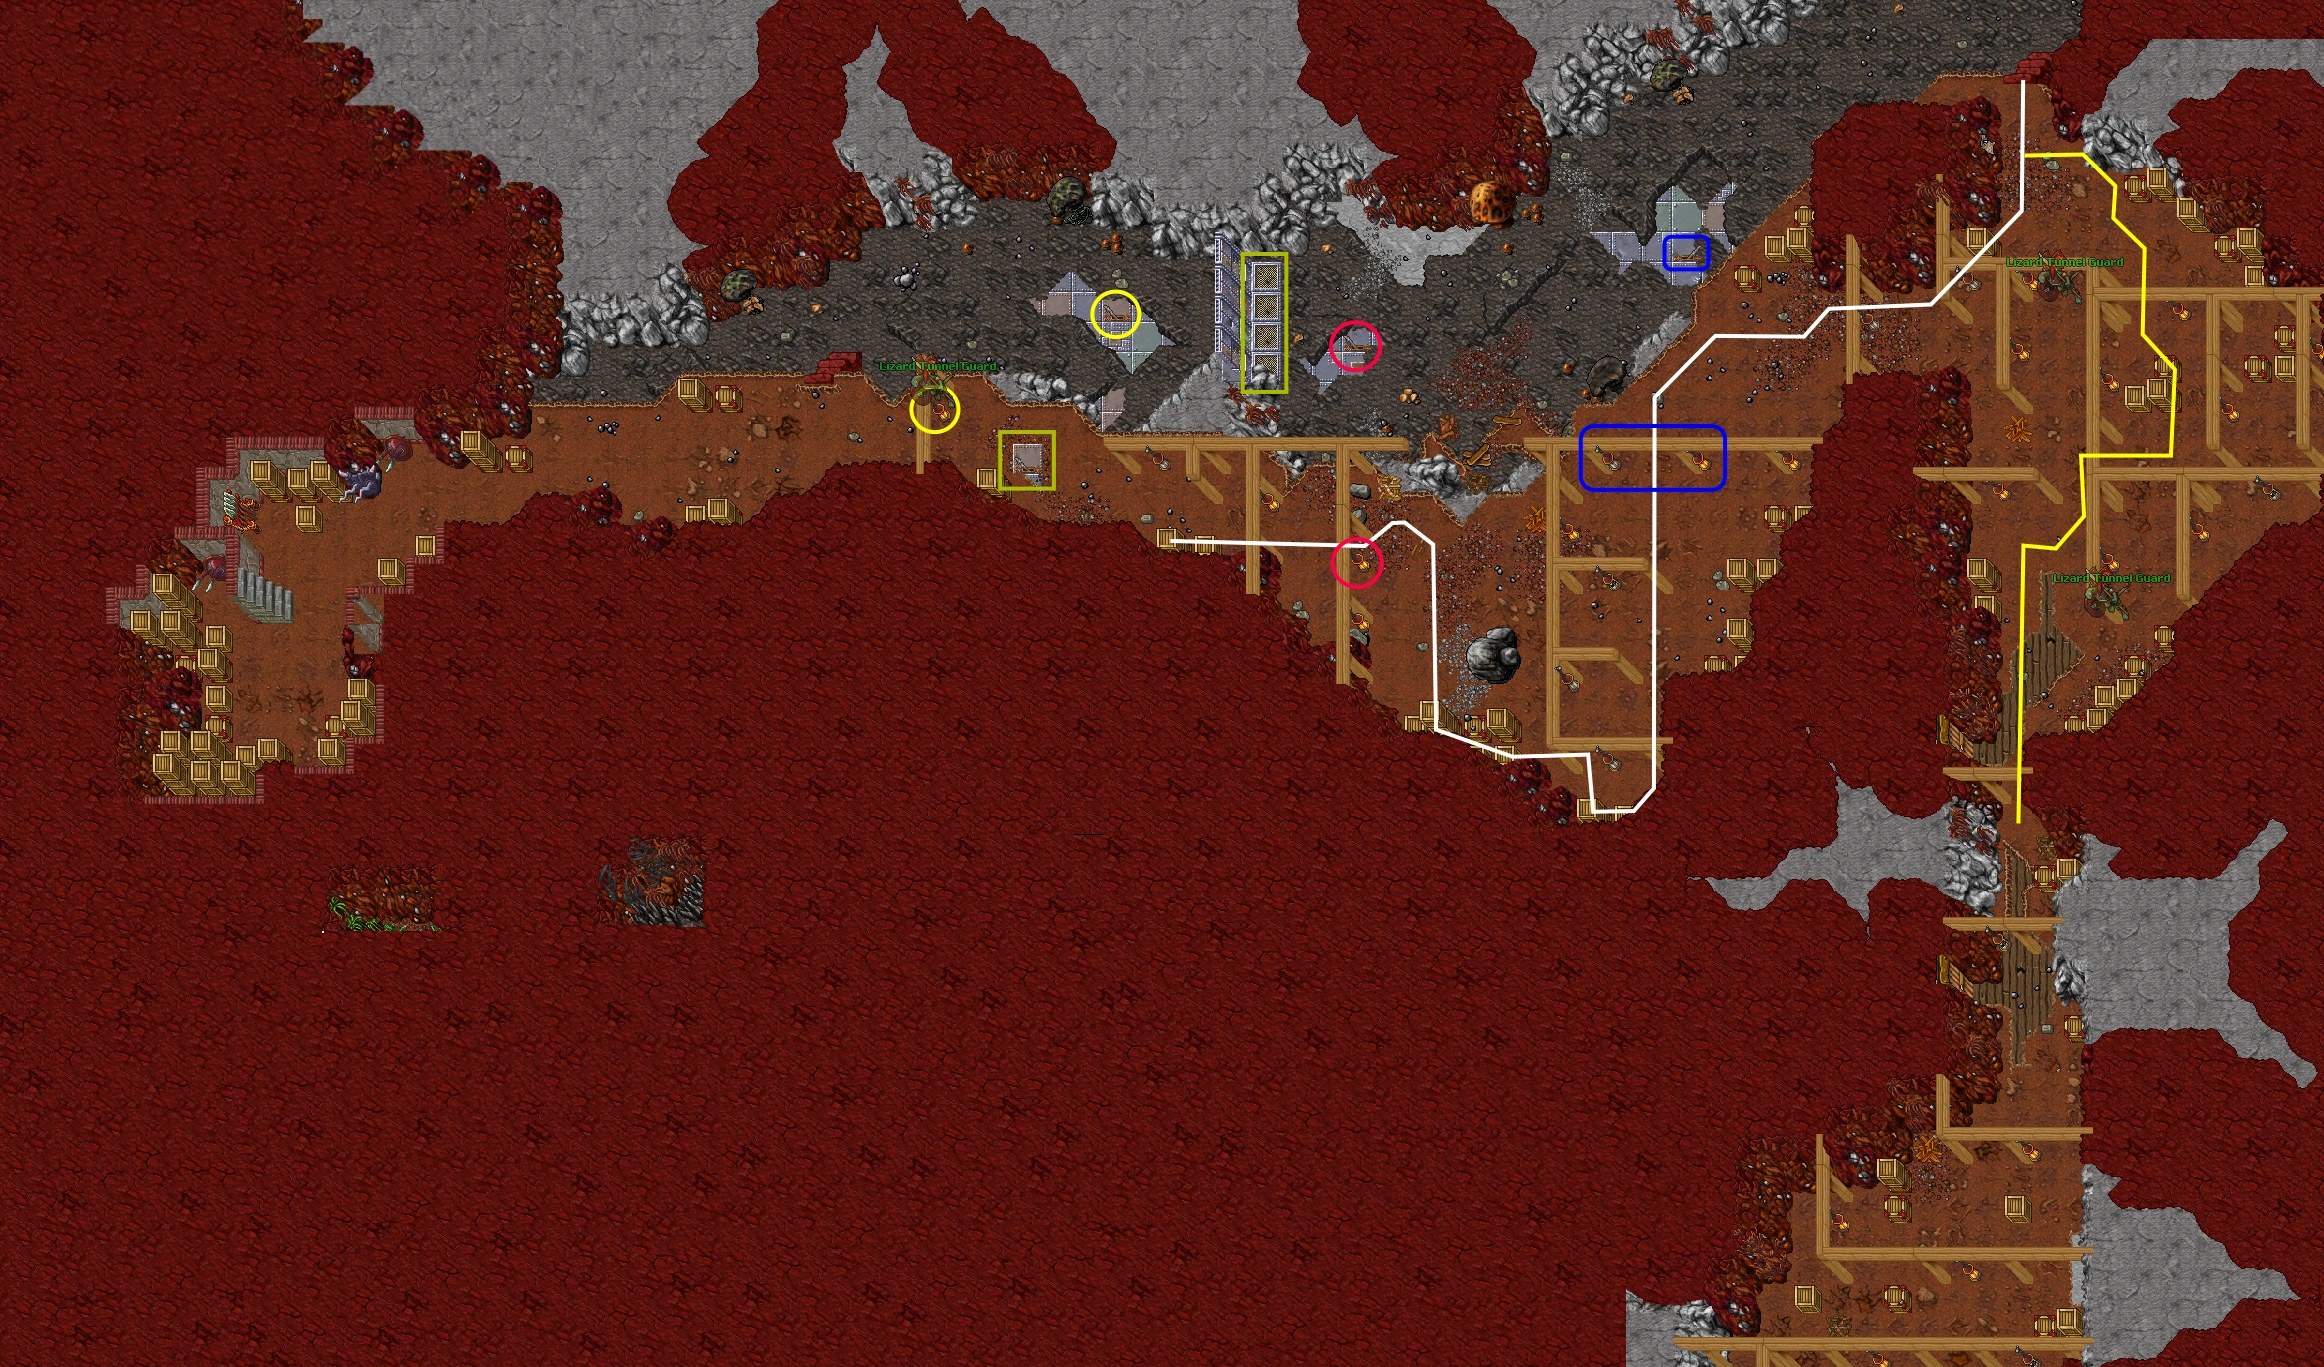
If you pass the defenses successfully, you will come to a staircase. Down the stairs there are three switches that turn off the lights above, and there is another switch upstairs that moves the wall. While one person on the team flips the first two switches (downstairs) another may go to flip the switch
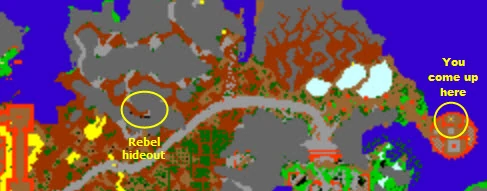
You'll come up into a lookout tower here
Mission 02: First Contact
Chartan needs you to reactivate the teleport to the Muggy Plains. To do this you will need a Rake, Obsidian Knife, Shovel and a Pick. You can bring one of the Secret Agent Tools instead of the Shovel and Pick. Head downstairs and into the temple.
- Go to the southernmost room and use a Shovel on the earth there to obtain Sacred Earth.
- Go to the room with the mud in it and use a Rake on it to obtain a Lump of Clay.
- Combine the clay with the sacred earth to obtain a Lump of Sacred Clay.
- Go to the room with the table in it and use a Pick on the crack to get Unworked Sacred Wood.
- Use an Obsidian Knife on the wood to obtain a Sacred Bowl.
- Use the lump of sacred clay on the bowl to obtain a Sacred Bowl of Purification.
- Use the bowl on the water in the room filled with water to get a Bowl with Sacred Water.
- Head to the first room and use the bowl on the fire basin to get Sacred Coal.
- Use this on the water next to the Jade Basin in the last room to reactivate the teleporter.
- Report back to Chartan that you've completed the mission.
Chartan will send you to Zalamon for the next mission. With the teleport reactivated, you can go south of Chartan and you step on the blue flame to teleport back to Muggy Plains.


Mission 03: The Keeper
Return to the Zao Steppe and to Zalamon's hideout. He will give you a Flask of Plant Poison to destroy plants in the garden of the Emperor to lure out and kill The Keeper. The garden is southeast of the rebel hideout. There you will find a hole (here

Use the poison on these plants.
Find the Giant Dreadcoils (purple plants to the right) and use your poison flask on them until its all gone. The Keeper will now have spawned at the north end of the room. The Keeper looks like a Serpent Spawn (it doesn't hit extremely hard but has a ton of health). It would be best to bring others to help kill it faster, although it is possible to solo with major waste. Once dead you should use the corpse to get The Tail of the Keeper. Fight your way back out of the cave and head to Zalamon.
Note: There is an alternate way to kill The Keeper: inside its lair, there are several poison fields, and the one with a brighter colour will deal 8000 damage to The Keeper when it steps on it. Once this happens the "active" field changes and you must lure it to a different one.
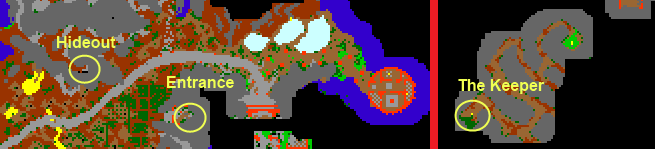
Mission 04: Sacrament of the Snake
Zalamon now wants you to go to Deeper Banuta and get an Ancient Sceptre that will help in the fight against the emperor. On each floor under Deeper Banuta you will have to collect a Sceptre Part from a Ghost of a Priest. These are the Cusp, Emerald, and Shaft. They cost 5000 gp each, so you'll need a total of 15,000 gp with you for this mission. On the 4th and final floor you assemble the Snake Sceptre. After you've done so and fought your way back out, head back to Zalamon and give it to him.
To get to the new area, go to the Deeper Banuta quest area (here
(Note: You cannot make the sceptre for another player, Each person has to activate the switch on the bottom floor to update their quest log)
On the way to the new quest area (floor -4) are Medusas,Serpent Spawns, Hydras, and Bonebeasts.
- Following the path below on floor -5 there are, in order: Centipedes, Giant Spiders, Serpent Spawns, Medusas, Acid Blobs, Ice Golems, Water Elementals, Frost Dragons, Eternal Guardians and Hydras.
- Following the path below on floor -6 there are, in order: Serpent Spawns, Medusas, Eternal Guardians, and possibly lured Hydras.
- Following the path below on floor -7 there are, in order: Serpent Spawns, Medusas, Souleaters, Eternal Guardians, Hydras, 2 Nightmares, 2 Hellspawns, 1 Phantasm, and 1 Ghastly Dragon.
- Following the path below on floor -8 there are: Serpent Spawns, Medusas, Souleaters, Eternal Guardians, Hydras.


Mission 05: New in Town
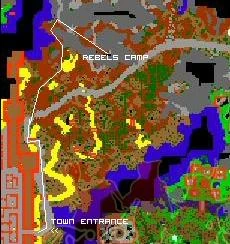


To start this mission, you need to complete the daily task of the Children of the Revolution Quest. Go to Zalamon and ask him for a mission. He tells you that you have to go inside the city. From the rebel hideout go out to the gray road and follow it to the southwest. You will face a lot of monsters on your way, particularly Brimstone Bugs, Souleaters, Lizard Legionnaires and some Lancer Beetles. Find the NPC Gate Guardian (around here
Note: Once you've entered the city by completing mission 5, the NPC Gate Guardian will no longer take you into the city. This means that if you help someone do mission 5, you will have to fight your way back to Rebel's Camp through all the monsters instead of going into the city.
Mission 06: The Office Job
Go deep inside the city (here
Explore the area where Zlak is to find Lizard Magistratus and kill 4 of them (You can check how many you have killed in your quest log) and report back to Zlak. The Magistratus are all located inside the building
Note: Downstairs from Zlak is a teleport
Mission 07: A Noble Cause
Ask Zlak for a mission.
Explore the area to find Lizard Noble (outside of the ministry building, here
Mission 08: Uninvited Guests
Depending on your team size, you need to take a huge amount of supplies now because if you don't get a Scale of Corruption you won't be able to get supplies and come back to the sleeping dragon to do next missions.
Go to the basement and walk north (here
Mission 09: The Sleeping Dragon
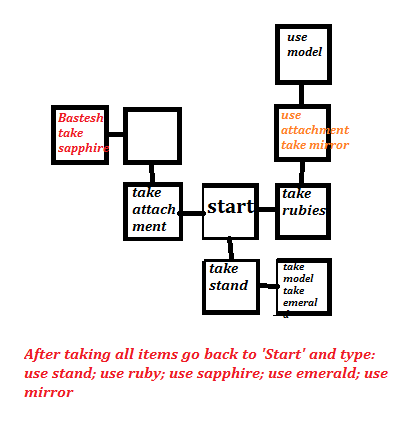

Ask Zizzle for another mission, and you'll receive an Interdimensional Potion and a Scribbled Sheet of Paper. Enter the southeast teleport, the room is Protection Zone so you will be safe. Walk north to A Sleeping Dragon (here
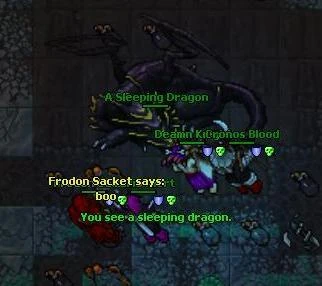

- west
- take attachment
- east
- south
- take stand
- east
- take model
- take emeralds
- west
- north
- east
- take rubies
- north
- use attachment
- take mirror
- north
- use model
- south
- south
- west
- west
- north
- west
- Bastesh
- take sapphire
- east
- south
- east
- use stand
- use ruby
- use sapphire
- use emerald
- use mirror
After solving the riddle you'll get the Wayfarer achievement. Ask the Sleeping Dragon for mission and you will get a Spiritual Charm.
Note: if you are completely lost, the following words will get you back to the plateau regardless of where you currently are: east, south, south, east, south, west, north.
P.S. - Once you finish mission 9 you will be able to teleport back to the Lizard Magistratus building in the center of Razachai, and by extension to Chartan to get more supplies. You can go backwards freely from Zizzle, but you'll need a Scale of Corruption each time to get back to the room where Zizzle is. The teleporter is located to the bottom left corner of the Zizzle's room, and you will appear behind a sealed door just north of the teleporter back to Chartan.
Mission 10: A Message of Freedom
After solving the riddle, you need to talk to Zizzle again to get a Replica of the Sceptre. Go back to the dragon room, walk north of A Sleeping Dragon (to the big door) and you will be teleported to another room. Through the next teleporter is the main room.
This room
Note: If the boss has been summoned you cannot enter the teleporter. You will have to wait until the team currently inside finishes. Also is a good option to put the Replica of the Sceptre into hotkeys, its recommended to check your questlog after using it on every boss remains.
Strategy Note: Energy Walls are very helpful here. Most of the creatures are weak to energy, and immune to death.
Mission 11: Payback Time
After using the Replica of the Sceptre on the 4 boss remains you will get into a teleport that takes you to NPC Awareness Of The Emperor. Ask him for a mission and you will now have to kill Zalamon. Pass the teleport and walk to the centre of the room. You will find Zalamon who first appears as a Snake God Essence, then turns into a Snake Thing, then a Lizard Abomination and finally into Mutated Zalamon. Finally use your sceptre on the dead body. You will receive Godslayer achievement.
Strategy Note: Fire and Energy Bombs will help you, but they still can retarget to the shooters. Throwing SDs works well for finishing these 4 bosses, as none of them are very strong against death.
Side Note: After defeating Mutated Zalamon (monster), you will not be allowed to enter Zalamon's (NPC) room anymore. You can take no further tasks from him, although Chartan will now give you the daily and weekly tasks of Children of the Revolution Quest.
Mission 12: Just Rewards
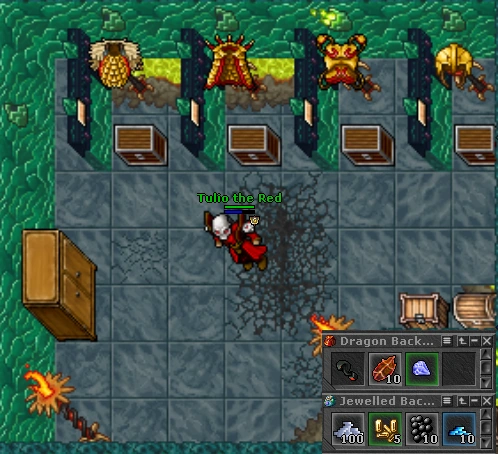

Go back with NPC Awareness Of The Emperor and ask for mission, He will send you with NPC Izsh 2 floors upstairs in the Lizard Magistratus area (here
After taking the Dragon Backpack, the Jewelled Backpack and choosing between one the rewards, Elite Draken Helmet, Royal Draken Mail, Royal Scale Robe or Merudri Scale Mail, you can open the wardrobe to obtain your outfit.
Mission 01: Catering the Lions Den
|
Player: hi |
|||
The first time you fail:
|
Player: hi |
|||
If you fail again:
|
Player: hi |
|||
Mission 02: First Contact
|
Player: hi |
|||
|
Player: hi |
|||
Mission 03: The Keeper
|
Zalamon: Not many travellerzz zzezze dayzz. I hope you bring good newzz. |
|||
|
Player: hi |
|||
Mission 04: Sacrament of the Snake
|
Player: hi
|
|||
|
Player: hi |
|||
You see a sceptre part. It weighs 12.10 oz.
|
Player: hi |
|||
You see a sceptre part. It weighs 0.40 oz.
|
Player: hi |
|||
You see a sceptre part. It weighs 1.00 oz.
Delivering the sceptre
|
Player: hi |
|||
Mission 05: New in Town
|
Player: hi |
|||
|
Player: hi |
|||
Mission 06: The Office Job
|
Zlak: Ah, ze human everyone iz talking about. Your victory over ze champion waz quite imprezzive. ... |
|||
Mission 07: A Noble Cause
|
Player: hi |
|||
Mission 08: Uninvited Guests
|
Player: hi |
|||
|
Player: hi |
|||
Mission 09: The Sleeping Dragon
|
Player: hi |
|||
|
Player: hi |
|||
|
Player: hi |
|||
You see a spiritual charm. It weighs 10.00 oz.
Mission 10: A Message of Freedom
|
Player: hi |
|||
You see a replica of the sceptre. It weighs 14.00 oz.
Mission 11: Payback Time
|
Player: hi |
|||
Mission 12: Just Rewards
|
Awareness Of The Emperor: Greetings, mortal. Be aware that you are trying my patience while we are talking. |
|||
|
Player: hi |
|||
Mission 02: First Contact
|
Player: hi |
|||
|
Player: hi |
|||
Mission 03: The Keeper
|
Zalamon: Not many travellerzz zzezze dayzz. I hope you bring good newzz. |
|||
|
Player: hi |
|||
Mission 04: Sacrament of the Snake
|
Player: hi
|
|||
|
Player: hi |
|||
You see a sceptre part. It weighs 12.10 oz.
|
Player: hi |
|||
You see a sceptre part. It weighs 0.40 oz.
|
Player: hi |
|||
You see a sceptre part. It weighs 1.00 oz.
Delivering the sceptre
|
Player: hi |
|||
Mission 05: New in Town
|
Player: hi |
|||
|
Player: hi |
|||
Mission 06: The Office Job
|
Zlak: Ah, ze human everyone iz talking about. Your victory over ze champion waz quite imprezzive. ... |
|||
Mission 07: A Noble Cause
|
Player: hi |
|||
Mission 08: Uninvited Guests
|
Player: hi |
|||
|
Player: hi |
|||
Mission 09: The Sleeping Dragon
|
Player: hi |
|||
|
Player: hi |
|||
|
Player: hi |
|||
You see a spiritual charm. It weighs 10.00 oz.
Mission 10: A Message of Freedom
|
Player: hi |
|||
You see a replica of the sceptre. It weighs 14.00 oz.
Mission 11: Payback Time
|
Player: hi |
|||
Mission 12: Just Rewards
|
Awareness Of The Emperor: Greetings, mortal. Be aware that you are trying my patience while we are talking. |
|||
|
Player: hi |
|||
Mission 03: The Keeper
|
Zalamon: Not many travellerzz zzezze dayzz. I hope you bring good newzz. |
|||
|
Player: hi |
|||
Mission 04: Sacrament of the Snake
|
Player: hi
|
|||
|
Player: hi |
|||
You see a sceptre part. It weighs 12.10 oz.
|
Player: hi |
|||
You see a sceptre part. It weighs 0.40 oz.
|
Player: hi |
|||
You see a sceptre part. It weighs 1.00 oz.
Delivering the sceptre
|
Player: hi |
|||
Mission 05: New in Town
|
Player: hi |
|||
|
Player: hi |
|||
Mission 06: The Office Job
|
Zlak: Ah, ze human everyone iz talking about. Your victory over ze champion waz quite imprezzive. ... |
|||
Mission 07: A Noble Cause
|
Player: hi |
|||
Mission 08: Uninvited Guests
|
Player: hi |
|||
|
Player: hi |
|||
Mission 09: The Sleeping Dragon
|
Player: hi |
|||
|
Player: hi |
|||
|
Player: hi |
|||
You see a spiritual charm. It weighs 10.00 oz.
Mission 10: A Message of Freedom
|
Player: hi |
|||
You see a replica of the sceptre. It weighs 14.00 oz.
Mission 11: Payback Time
|
Player: hi |
|||
Mission 12: Just Rewards
|
Awareness Of The Emperor: Greetings, mortal. Be aware that you are trying my patience while we are talking. |
|||
|
Player: hi |
|||
Mission 04: Sacrament of the Snake
|
Player: hi
|
|||
|
Player: hi |
|||
You see a sceptre part. It weighs 12.10 oz.
|
Player: hi |
|||
You see a sceptre part. It weighs 0.40 oz.
|
Player: hi |
|||
You see a sceptre part. It weighs 1.00 oz.
Delivering the sceptre
|
Player: hi |
|||
Mission 05: New in Town
|
Player: hi |
|||
|
Player: hi |
|||
Mission 06: The Office Job
|
Zlak: Ah, ze human everyone iz talking about. Your victory over ze champion waz quite imprezzive. ... |
|||
Mission 07: A Noble Cause
|
Player: hi |
|||
Mission 08: Uninvited Guests
|
Player: hi |
|||
|
Player: hi |
|||
Mission 09: The Sleeping Dragon
|
Player: hi |
|||
|
Player: hi |
|||
|
Player: hi |
|||
You see a spiritual charm. It weighs 10.00 oz.
Mission 10: A Message of Freedom
|
Player: hi |
|||
You see a replica of the sceptre. It weighs 14.00 oz.
Mission 11: Payback Time
|
Player: hi |
|||
Mission 12: Just Rewards
|
Awareness Of The Emperor: Greetings, mortal. Be aware that you are trying my patience while we are talking. |
|||
|
Player: hi |
|||
Mission 05: New in Town
|
Player: hi |
|||
|
Player: hi |
|||
Mission 06: The Office Job
|
Zlak: Ah, ze human everyone iz talking about. Your victory over ze champion waz quite imprezzive. ... |
|||
Mission 07: A Noble Cause
|
Player: hi |
|||
Mission 08: Uninvited Guests
|
Player: hi |
|||
|
Player: hi |
|||
Mission 09: The Sleeping Dragon
|
Player: hi |
|||
|
Player: hi |
|||
|
Player: hi |
|||
You see a spiritual charm. It weighs 10.00 oz.
Mission 10: A Message of Freedom
|
Player: hi |
|||
You see a replica of the sceptre. It weighs 14.00 oz.
Mission 11: Payback Time
|
Player: hi |
|||
Mission 12: Just Rewards
|
Awareness Of The Emperor: Greetings, mortal. Be aware that you are trying my patience while we are talking. |
|||
|
Player: hi |
|||
Mission 06: The Office Job
|
Zlak: Ah, ze human everyone iz talking about. Your victory over ze champion waz quite imprezzive. ... |
|||
Mission 07: A Noble Cause
|
Player: hi |
|||
Mission 08: Uninvited Guests
|
Player: hi |
|||
|
Player: hi |
|||
Mission 09: The Sleeping Dragon
|
Player: hi |
|||
|
Player: hi |
|||
|
Player: hi |
|||
You see a spiritual charm. It weighs 10.00 oz.
Mission 10: A Message of Freedom
|
Player: hi |
|||
You see a replica of the sceptre. It weighs 14.00 oz.
Mission 11: Payback Time
|
Player: hi |
|||
Mission 12: Just Rewards
|
Awareness Of The Emperor: Greetings, mortal. Be aware that you are trying my patience while we are talking. |
|||
|
Player: hi |
|||
Mission 07: A Noble Cause
|
Player: hi |
|||
Mission 08: Uninvited Guests
|
Player: hi |
|||
|
Player: hi |
|||
Mission 09: The Sleeping Dragon
|
Player: hi |
|||
|
Player: hi |
|||
|
Player: hi |
|||
You see a spiritual charm. It weighs 10.00 oz.
Mission 10: A Message of Freedom
|
Player: hi |
|||
You see a replica of the sceptre. It weighs 14.00 oz.
Mission 11: Payback Time
|
Player: hi |
|||
Mission 12: Just Rewards
|
Awareness Of The Emperor: Greetings, mortal. Be aware that you are trying my patience while we are talking. |
|||
|
Player: hi |
|||
Mission 08: Uninvited Guests
|
Player: hi |
|||
|
Player: hi |
|||
Mission 09: The Sleeping Dragon
|
Player: hi |
|||
|
Player: hi |
|||
|
Player: hi |
|||
You see a spiritual charm. It weighs 10.00 oz.
Mission 10: A Message of Freedom
|
Player: hi |
|||
You see a replica of the sceptre. It weighs 14.00 oz.
Mission 11: Payback Time
|
Player: hi |
|||
Mission 12: Just Rewards
|
Awareness Of The Emperor: Greetings, mortal. Be aware that you are trying my patience while we are talking. |
|||
|
Player: hi |
|||
Mission 09: The Sleeping Dragon
|
Player: hi |
|||
|
Player: hi |
|||
|
Player: hi |
|||
You see a spiritual charm. It weighs 10.00 oz.
Mission 10: A Message of Freedom
|
Player: hi |
|||
You see a replica of the sceptre. It weighs 14.00 oz.
Mission 11: Payback Time
|
Player: hi |
|||
Mission 12: Just Rewards
|
Awareness Of The Emperor: Greetings, mortal. Be aware that you are trying my patience while we are talking. |
|||
|
Player: hi |
|||
Mission 10: A Message of Freedom
|
Player: hi |
|||
You see a replica of the sceptre. It weighs 14.00 oz.
Mission 11: Payback Time
|
Player: hi |
|||
Mission 12: Just Rewards
|
Awareness Of The Emperor: Greetings, mortal. Be aware that you are trying my patience while we are talking. |
|||
|
Player: hi |
|||
Mission 11: Payback Time
|
Player: hi |
|||
Mission 12: Just Rewards
|
Awareness Of The Emperor: Greetings, mortal. Be aware that you are trying my patience while we are talking. |
|||
|
Player: hi |
|||
Mission 12: Just Rewards
|
Awareness Of The Emperor: Greetings, mortal. Be aware that you are trying my patience while we are talking. |
|||
|
Player: hi |
|||