

Too Hot to Handle Quest
Strange activities have been reported in a crypt under Kazordoon. Can you handle the heat and help the Gnomes' investigation?
Reward
Dangers
14


Requirements
To start this quest, the character must have completed the Recruitment mission of the Bigfoot's Burden Quest.
Description
This quest is part of the Those Below storyline, connected to the Bigfoot's Burden Quest and Dangerous Depths Quest quest lines. Its progression partially mirrors the access requirements of the Warzones 1–3.
Cursed Crypt
To start the quest you have to talk to Gnomystery (here) and do him a favour to investigate a suspect of an unknown place in the crypt north of him. However, Brodraem Orcbeard (here) does not allow you in. Talk to Brodraem and he will tell you unexpected incidents queered his pitch and that he would like to clean the sarcoghapi more often.
Accept his invitation to investigate the crypt, then use the easternmost tile of the closed wooden coffin shown in the image below to receive:
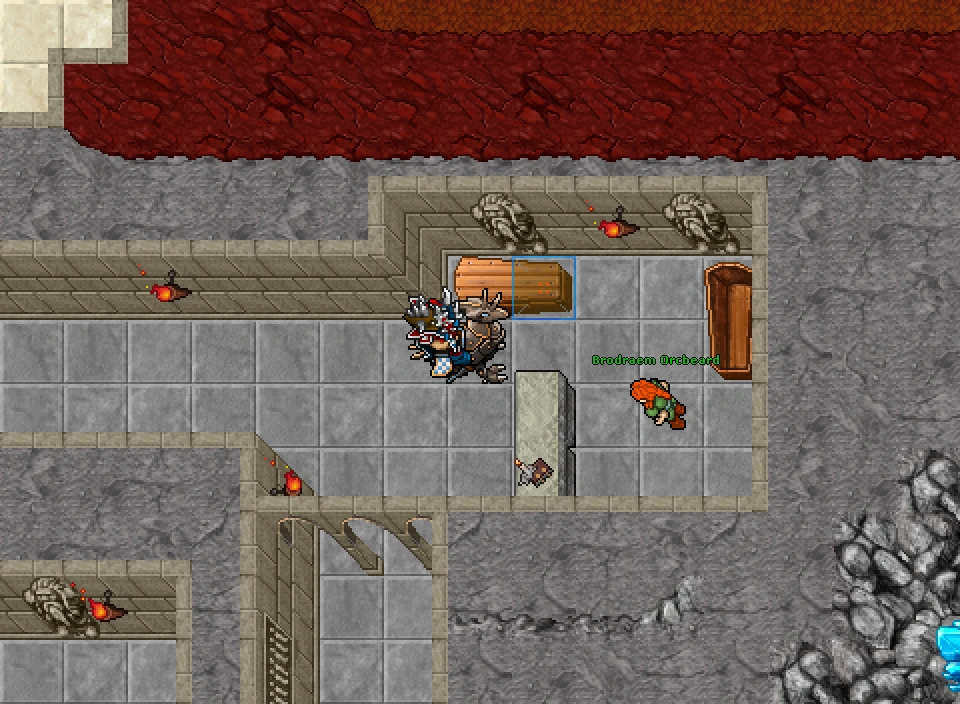


These items are required to complete the cleaning task.
Note: If you wish to collect additional  Replacement Marble tiles for decoration, make sure to do so before progressing further in the quest. You can collect the items once per hour. Attempting to gather them too soon will result in the message:
The coffin is restocked once an hour. Come back later.
Replacement Marble tiles for decoration, make sure to do so before progressing further in the quest. You can collect the items once per hour. Attempting to gather them too soon will result in the message:
The coffin is restocked once an hour. Come back later.
Once this part of the quest is completed, any further attempts to open the coffin will display the following message: You don't need this stuff in the coffin anymore.
Walk north towards the fence where you will find the sarcoghapi covered in dirt, broken marble floors and ruined columns. Now use the items taken from the wooden coffin to fix these problems. In total you need to:
- Clean 5 sarcoghapi by using the brush on them.
- Repair 3 ruined columns by using the chisel on them.
- Cover 4 holes in the floor by using the marbel floors on them.
Report back to Brodraem Orcbeard and he will tell you there might be chance to open the crypt again, and reward you with a  White Gem.
Go back within the crypt, walk towards north and walk towards the big crack hereuntil you fall down. Once down, walk east and go through the teleport. You will be teleported to a room with 6 Diremaws, and after walking around you will get the message This place triggers memories! You have seen these creatures already somewhere else. together with a Quest Log update.
Go back and tell Gnomystery the news and he informs you he will send out people to get more knowledge of the crypt.
Go back in the crypt and through the teleport and you will find yourself in a hub with Gnomevisor, who is already expecting you. He will share details on how to explore the crypt using a crystal shield that is provided by them. It is a very resourceful protection, but its initial protection is very weak and does not last long. For that reason, it is recommended to only use it with the lowest heat level area. In order to upgrade the shield, you will need crystal splinters, which are obtained by helping gnomes with research missions. To get to these missions you need protective layers which you obtain by killing monsters in the crypts.
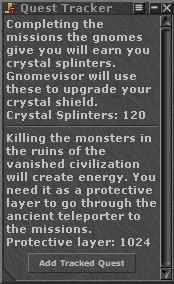
This shield is not an item, it is just a protection given to you by the Gnomes. Each Shield level, from 1 to 6, will allow you further access into the crypt. Your current shield Capacity will be shown as a number next to your character's name while inside the quest areas, identified by the  Blue Shield icon. To improve your shield, you must get crystal splinters by completing tasks, and each Shield level requires a different amount of Splinters to upgrade. The splinters are also not items, they are just quest points. Each task grants you a specific amount of splinters. Furthermore, to be able to enter a task you need to gather 20 protective layer points, which are obtained by killing the creatures inside the crypts.
In summary, this is how the quest progresses:
- Kill creatures to gather protective layer points.
- Spend your protective layer to enter and complete tasks and receive crystal splinters.
- Spend the splinters to improve your shield (by talking to Gnomevisor) and gain access to new areas.
| Shield Level | Splinters Cost | Capacity |
|---|---|---|
| 1 | -- | 360 |
| 2 | 20 | 540 |
| 3 | 40 | 720 |
| 4 | 75 | 1080 |
| 5 | 120 | 1440 |
| 6 | 180 | 1800 |
Shield Depletion
While inside the crypts, your shield will slowly deplete over time, decreasing by one every 5 seconds. This can be seen through the numbers near your character's name. If your shield is completely depleted, you can no longer stay inside the crypts.
Your shield is automatically renewed once per day when you enter the main hall of the crypts.
Heat Level
Besides the shield capacity, you will also have a heat level that increases over time (you will see several different messages on your game window related to that). They are shown next your character's name next to a fire icon. If the heat level gets to 50, you will start taking 7.5% of current HP as Death Damage from yourself every few seconds (Madness is hurting you!). You can reset your heat level by standing on one of the several machines inside the areas for a couple of seconds. These machines reduce your heat in turns of 5 points.
Tasks
The first and second areas have two tasks each, whereas the third area has three tasks plus the final boss. The tasks of the first two areas are unlocked at the same time, but each task of the third area is only available at a different shield level.
| Local | Tasks | Crystal Shield Level | Reward | Time Limit |
|---|---|---|---|---|
| Antrum of the Fallen | Treasure Hunting | 1 | 10 Crystal Splinters | 3 minutes |
| Monster Killing | 1 | 10 Crystal Splinters | 2 minutes | |
| Grotto of the Lost | Gnomish Explorer | 2 | 20 Crystal Splinters | 10 minutes |
| Wax Research | 2 | 10 Crystal Splinters | 3 minutes | |
| Dwelling of the Forgotten | Fishing in Lava Pools | 3 | 25 Crystal Splinters | 10 minutes |
| The Lost Structure | 4 | 30 Crystal Splinters | 10 minutes | |
| Mega Magmaoid | 5 | 40 Crystal Splinters | ? minutes |
Shield Level 1
Now that you got your crystal shield (capacity: 360) you are allowed to access Antrum of the Fallen, located in the northwest teleport.
In this area you can find the following creatures:
| Creature | HP | EXP |
|---|---|---|
| Afflicted Strider | 10000 | 6550 |
| Blemished Spawn | 9000 | 5300 |
| Eyeless Devourer | 10000 | 6000 |
At this point your goal is to kill creatures to earn protective layers, as previously mentioned. Once you gather 20 layers, you can enter one of the first two tasks.
Treasure Hunting
The entrance to this task is on the first floor of the crypt in a small room east.

Too Hot to Handle Quest - Treasure Hunting Task
This task has an easy concept but could be problematic depending on your luck. Get a Gnome Shovel  from the chest as soon as you get in the mission room and start digging. There are four possible results from digging: nothing, stones, a Tunnel Devourer, or a treasure.
If you don't dig anything you can just dig another hole immediately, but if you dig stones you'll receive a message saying you are exhausted (This was quite exhausting. You need a little break.) and are forced to take a break of a few seconds.
The worst case is waking up Tunnel Devourers. Once that happens you can choose to kill them or just run around the room with them attacking you. Time management is very important as you only have 3 minutes to find the treasure.
Once you find the treasure, all players in the room receive 10 crystal splinters.
Monster Killing
The entrance to this task is on the second floor of the crypt in a room north-east.
This task is quite straight forward. You and your teammates are teleported to a room with divisions and your goal is to kill all Toxic Swarms in it within two minutes.
Initially only five of these rooms have creatures in them, two for each room, however as you kill them 8 new ones spawn in the central room. In summary, you need to kill a total of 18 swarms. Also, the last two creatures in the central room need to be killed in the same attack turn, otherwise they will respawn.
This task will give you 10 Crystal Splinters.
Shield Level 2
When you get 20 Crystal Splinters, go to Gnomevisor and ask him about shield to receive an upgrade. Your shield now has a capacity of 540(?). The stronger shield allows you to enter a new area, the Grotto of the Lost, where you'll fight the following Fire attacking creatures:
| Creature | HP | EXP |
|---|---|---|
| Lavafungus | 7200 | 6200 |
| Lavaworm | 7500 | 6500 |
| Streaked Devourer | 7000 | 6300 |
In this Crypt, both tasks are located in the same small room: after entering the teleport, go down using stairs or levitating and go to the north-west until you find a ramp here. You'll find the teleporters for two tasks above.
Gnomish Explorer
Enter the north teleport to start this task.

Too Hot to Handle Quest - Gnomish Explorer escorting task
This is a scouting mission. Your job is simple: escort the Gnomish Explorer through the cave and protect him from the Hungry Menace and lava holes. Once you get to the other end of the cave, allow the Explorer to do this research, which you can see thorugh the counter near his name. Once it reaches 10, you can escort him back to the entrance.
The recommended strategy is to have a Knight go in front and Challenge the Hungry Menaces. You can also use Mass Healing and Ultimate Healing Runes to heal the Explorer.
This task will give you 20 Crystal Splinters.
Wax Research
Enter the south teleport to start this task.
On this task you'll help the Gnomes research the melting point of Eldritch Wax  . You'll have to constantly do two things. First, pick up the Gnome Pick
  from the ground near the entrance. Then start taking turns between the two objectives below:
- Pick up Firewood
 from the pile at the entrance and use it on the fireplace. There's a short cooldown that prevents you from taking wood too fast.
 - Use the pick to collect wax from the large area to the south. Then, use the Wax on the fireplace. Beware that the Wax disappears quickly from the ground and from your inventory, so don't linger too much.
Orange Messages will appear at the center of the room indicating your progress.
This task can be done by two players. One should focus mainly on getting the Wax spots further south, and another focus on the Firewood and the Was near the Fireplace. Due to the Firewood cooldown, however, the player focusing on wax should help some times with the wood too.
This task will give you 10 Crystal Splinters.
Shield Level 3
Now that your shield has been upgraded to level 3, your maximum shield capacity will be 720 and you will receive an Eldritch Casket when you upgrade to this level. You now have access to the Dwelling of the Forgotten, a crypt with several floors and 3 new tasks. In this area you'll face these creatures:
| Creature | HP | EXP |
|---|---|---|
| Cave Chimera | 8000 | 6800 |
| Varnished Diremaw | 9000 | 6300 |
| Tremendous Tyrant | 11500 | 6950 |
Fishing in Lava Pools
This task is accessed on the second floor of the crypt through a red teleport to the east shown on the map to the right.

THTH - Fishing Task
This task can be very complicated at first because there will be a lot of things happening at the same time. Your objective is to use the Gnomish Lava Fishing Rod  to fish for lost data crystals. The rods will appear near the entrance of the room. To be able to fish, you'll need Sticky Elemental Goo
  which will appear on the floor when you kill an Instable Fire. Use the Gnomish Lava Fishing Rod on the fire on top of the lava while standing close to it. You need 15 data crystals to complete the task.
There are a few mechanisms however that will make your task harder:
- The Instable Fires run from you pretty fast, and they will also disappear after a while if they are not killed.
- When fishing for a data crystal, you may spawn a Magma Fiend instead. This will not add to your progress.
- While inside the room, you'll have a heat level, which slowly increases over time. If your heat level gets to 200, you'll be kicked out from the task.
- To reduce your heat hevel, you can use the Gnomish Supercooler
 near the entrance. It will shoot a refrigerating beam to the east and remove 60 points from your heat. This can only be done once every 40 seconds, for everyone in the room (when its light is on it means it's ready to be used). This means that your team needs to be organized and everyone should be in front of the machine to have their heat reduced.
- To reduce your heat hevel, you can use the Gnomish Supercooler
- The Glowing Lavas inside the room also have this spell (Fire Berserk) that increases your heat by 50. They cannot be killed but they are easy to outrun.
- Every 25 seconds, there will be an announcement and lava eruptions will happen after 10 seconds in the room coming from the North or West which increases your heat by 50 if hit. The Eruptions are announced as orange text from the center of the room. There are two ways to protect yourself from the eruptions:
- Use a Magic Wall Rune to create a barrier. Beware that the Glowing Lavas also destroy magic walls near them, so you should create your protection away from them.
- Kill a Magma Fiend, which will become a stone pillar.
Fish all 15 data crystals while protecting yourself from the heat to complete your task and receive 25 Crystal Splinters.


Shield Level 4
With a shield level 4 your maximum capacity increases to 1080(?) and you get access to the third floor of Dwelling of the Forgotten.
The Lost Structure
This task is accessed on the second floor of the crypt through an orange teleport to the east shown on the map to the right.
This task is somewhat simple but it has some mechanics that could complicate things up. Your goal is simple: remove obstacles towards the north of the room.
Few seconds after you enter the task room five Fiery Gnomish Stonesmasher  will appear on the floor next to the entrance. Get one of them and use it to break the Sulphur Stones
  to start creating a path. It's recommend that you and your team stick to the same path so you can progress faster.

Too Hot to Handle Quest - The Lost Structure task
After 20 seconds of its appearance a stonesmasher will lose its heat and will be unable to break rocks. There are two ways to reignite your stonemasher:
- Attacking a Lavaling until its health drops below half, forcing it to become a Fireling, then using the stonesmasher on it;
- Being hit by an explosion.
 Lavaling |
⇒ |  Fireling |
Despite both ways working explosions happen a lot less often than Lavalings spawns. Additionally, once hit by an explosion your character can get ignited, forcing you to douse the flames on the Gnomish Fire Douser  located where you started the task. If you don't douse the flames your heat will increase rapidly and you'll be kicked out of the area when it reaches 800. After reigniting the stonesmasher you'll be able to use it for 20 more seconds and then you'll need to repeat the process.
If your stonesmasher loses its heat and you take longer than 60 seconds to reignite it it will disappear and you'll need to rely on your teammates to progress. The stonesmasher is the most important tool in this task as it's impossible to progress without it, so make sure to keep on reigniting it.

Basaltwall
After some progress you'll face a different kind of obstacle: Basaltwalls. There are two ways to break them:

Instable Lavaling
- Hit a Lavaling, forcing its transformation into a Fireling, then keep it close to the wall. After few seconds it will self-explode and that will break the wall.
- Lure a Lavaling on a Lava Hole
 so it becomes an Instable Lavaling. Then, lure the Instable Lavaling near the Basaltwall so it explodes and breaks it.

Deadly Heat
The first method only works for the first Basaltwall, however. For the second and third barriers you'll need to use Instable Lavalings. That's because a Fireling becomes a Deadly Heat if it walks over a Lava Hole. Deadly Heats are a problematic and immortal creature that will follow you across the room and try mess your timings and potentially trap you. In order to get rid of them you need to go south and douse them in the Gnomish Fire Douser.
For that reason it's recommended that, as you progress through the room, you just lure Lavalings and only transform them into Firelings when you really need to reignite your stonesmasher or when you are already close to a Basaltwall and is ready to destroy it.
Once you reach the target area on north, just wait few seconds and you'll be teleported out of the room and receive 30 Crystal Splinters.
Shield Level 5
With a shield level 5 your maximum capacity increases to 1440(?) and you get access to the Mega Magmaoid fight, also located at the Dwelling of the Forgotten.
Mega Magmaoid


This task is basically a boss fight that happens in three stages, so be prepared for a battle where you'll take mostly Fire Damage.
First Stage

THTH - Mega Magmaoid
Upon entering the room you'll find four Magmaoids (Lava Lurkers). Your first objective is to kill all four of them. A few seconds into the fight, Blasting Flames (Fire Elementals) will start to spawn. These are summons that will heal the other creatures with their Fire attacks, so they must be kept away from the Magmaoids since they quickly respawn if killed.
When the Magmaoids die, they'll become red vortices. These vortices heal the creatures that walk over them, so try to kill all 4 magmaoids together and then stop using that part of the room. For example, kill all of them in the north.
Second Stage
Killing all four Magmaoids will make Massive Magmaoids spawn. Just like before, you have to kill them and keep the Blasting Flames away from them. They have quite a lot of health, so this takes longer than the previous step. Their corpses also become red vortices that heal the boss.
Since both Massives heal each other, a good strategy here is to kill one at a time. Focus on the first one using SDs/Bolts on e.g. the right side of the room. Then, bring the second Massive to the center of the room. You should kill it there because that's where the final boss will spawn, which prevents it from targeting the shooters.
Third Stage
Finally, The Mega Magmaoid will spawn. If you already used the north, right and center parts of the room, you can kill it on the left. Along with it, Excess Heat (Massive Fire Elementals) will start to spawn, which are summons like the Blasting Flames. Kill them quickly to prevent them from healing the boss.
Attention!: When the boss dies, it will explode dealing 2500 Fire Damage around itself, so be careful!
You'll succeed when you defeat The Mega Magmaoid and receive 40 Crystal Splinters for this task.
Shield Level 6
This shield level will increase your shield capacity to 1800 and allow you to enter the last floor of the Dwelling of the Forgotten, where you'll be able to fight The Brainstealer.
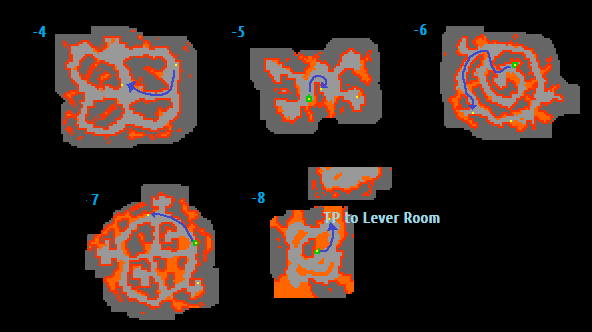
Be very careful when jumping to the last floor of the cave. There will be lots of creatures coming from all sides due to the map design. The teleport to lever room is located here. You can follow the next route:
The Brainstealer

Too Hot to Handle Quest - The Brainstealer


The fight against The Brainstealer is relatively simple. Initially, all you have to do is attack the boss.
MADNESS : If you take damage from the boss, you'll get a Madness counter on you. The higher the counter is, the more vulnerable you'll be to the attacks from the Brain Parasites in the room. This counter lowers itself naturally over time if you don't take more damage from the boss. Since the main blocker will probably have a higher Madness counter, it's recommended that the shooters block / kill the Parasites. Furthermore, the Madness is contagious and will pass from one player to another if they are near each other.
 |
|
|
|
|
 |
|
|
|
|
.gif) |
When the boss gets to half hitpoints, it will become immortal and two Mental-Nexus will appear (one north and one south of the room). You have to kill them to be able to damage The Brainstealer again. To damage the Mental-Nexus, position one or both Fleeting Thoughts close to it. Their berserk-like attacks will damage the Nexus. At the same time, no player should stand near the Nexus otherwise it will heal itself with its lifesteal attack. Just hold this position for some time for each Nexus until they are both dead.
Resume attacking The Brainstealer, which will be vulnerable again. When it reaches 25% health, you'll have to repeat the Mental-Nexus mechanic. After that you can kill the boss.
Report your progress to Gnomevisor. You'll receive an Eldritch Casket (and the permission to buy more Caskets for 75 Crystal Splinters), the Some Like It Hot Achievement and you will be allowed to upgrade your Crystal Shield to level 7.
Shield Level 7
After defeating The Brainstealer you can ask Gnomevisor for the last Crystal Shield upgrade, for the maximum capacity of 2160. This shield level will not open access to any new area, however, you won't need to worry about your Heat Level anymore since this shield will completely protect you from it.