

Kilmaresh Quest
Explore Kilmaresh and help its citizens.
All the island of Kilmaresh.
Reward
Dangers
19


History
The Wanted and Aspiring Oracle missions were added to the quest with the Summer Update 2021.
Method
There are 5 citizens of Kilmaresh that require some help. Visit each one of them to receive their mission.
Fafnar's Wrath
Find Eshaya on the second floor of the building north of the market, here
Investigate the Ambassador's House
Eshaya wants to investigate the Ambassador of Rathleton in Kilmaresh. Find his house on top of the city wall southeast of the city (here
- The Pile of Scrolls on the first floor;
- You examine the scrolls carefully. Those are orders from Rathleton for the Ambassador. No sign of treason here.
- The
 Half Burnt Scroll on the second floor;
- Documents were burnt here recently. Only the part of one scroll still lies in front of the chimney but it's too sooted to read.
- The
 Torn Piece of Paper on the second floor;
- Paper scraps lie scattered on the floor. It takes some time to put them back together. But it's only a badly written poem.
- Walk around the rooftop.
- You find nothing in the Ambassador's house. If he's in fact a traitor he got rid of any evidence that could incriminate him.


Retrieve the Ring of Secret Thoughts
Return to Eshaya, which will tell you to look in his memories using a Ring of Secret Thoughts. To do that, you'll have to kill Urmahlullu the Immaculate, which can be found in a cave south of the city, here.
The fight against Urmahlullu is simple, but long. The boss have 5 forms, 3 of which have a lot of health. It's recommended to trap the boss near the exit teleport or on the south-west corner. You'll first have to kill Urmahlullu the Immaculate, then the Wildness of Urmahlullu, Urmahlullu the Tamed, Wisdom of Urmahlullu and finally Urmahlullu the Weakened. Note that the 4th form, Wisdom of Urmahlullu, attacks from distance and will run away from the team unless it's trapped.
All participating players will get a Ring of Secret Thoughts every time they defeat the boss until they complete this mission. The boss room can be entered again after a 20-hour cooldown.
Obtain the Ambassador's thoughts
To get the Ambassador's thoughts, find him inside the Library and give him the ring, which he will gladly accept. In order to recover it, however, you'll need the help of a thief. Visit Moe two floors up the building north of the Market and ask if he is a thief. He will ask for 10 Sphinx Feathers. Once you have the feathers, give them to him. Moe will ask for some time to steal the ring and you must then wait 1 hour.
Note: This request from Moe appears as a separate mission called Gifts for Moe in the Quest Log.
Go back to Moe and ask again about he being a thief or about the ring, then you'll receive a Ring of Secret Thoughts (Charged).
Extract the Memories from the ring
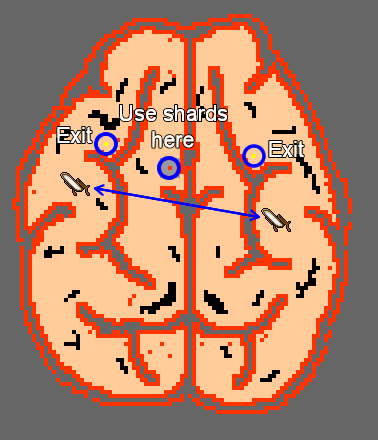

To analyze the memories, visit The Librarian NPC at the library for instructions on how to do so, ask him about the ring. He will tell you to buy a Flask of Hallucinogen from Faloriel, the potions NPC. Buy the Hallucinogen from him by asking for it specifically. (You can buy multiple Flasks of Hallucinogen, and give them to players that have already completed the mission so they can re-enter the brain and help you.)
Now, go to the temple of Bastesh (south building on the west side of town, here
Note: Be careful that in here you'll have to fight many Earworms, which are similar to the other creatures of Kilmaresh in strength. Also note that the Ambassador's Mind has two sides and you can be sent to any one of them, apparently randomly. This means that your team might be split and will have to reunite using the Mirror Neurons.
Your task here is to loot 3 memory shards:  green,
  violet and
  blue. Each player will need one of each shard. Do not step on the energy fields, if you do that one of the shards in your backpack will vanish. After getting all shards, go to the left side of the map, where there's a Memory Enlightener (a Fire Basin). Use one of each shard on it. Now find your way back to the exit teleport (and be careful not to lose your Shards, you'll still need them).
Report back to Eshaya, who will tell you to report to The Empress. Talk to The Empress while holding the three memory shards in your backpack.


One last favor
Given your success with the Ambassador's investigation, The Empress will ask for your help with another matter. Your mission will be to bless 5 Statues of Fafnar that the cultists have enchanted in the Catacombs, using a Sceptre of Sun and Sea which she will give you.
Since you will have to visit the Kilmaresh Catacombs, you must first find four masks, each one unlocking a set of doors of the catacombs.
- The Mirror Mask can be found in a coffin that is located in a dungeon under the Central Steppe. It unlocks the first door

- The Ivory Mask can be found in the Library after using a Small Emerald on the Ornamented Ankh there. It unlocks the doors

- The Silver Mask from a tree on the small island west of the Central Steppe. It unlocks the doors
- The Gryphon Mask from a Gryphon Nest on top of the Kilmaresh Mountains. It unlocks the door

Now, with the Sceptre in hand, go down to the catacombs and fight your way to the 5  Statues of Fafnar, and use the Sceptre on each of them. The safest route is to start at the north by entering through the Sphinx/Crypt Warden cave. Locations of the 5 Statues:



After using the Sceptre on all of them, return to the Empress. Upon delivery of your final task you'll receive a Sun Medal.
Midnight Rituals
Talk to Kallimae two floors above the building just east of the depot, here,
The Ingredients
She needs help gathering several ingredients for magic rituals. Before gathering the ingredients, you'll need some tools:
 The Ritual Scissors can be found inside a sarcophagus, here.
 The Bark Peeler can be found in a crate in a small house near the harbor, here.
 The Hand Auger can be bought from any Tool Shop NPC, in Issavi (Tefrit) or other towns.
 Empty Honey Glasses must be looted from the Cultists found in the Issavi Sewers, Kilmaresh Catacombs and Kilmaresh Mountains.
 The Pick (Enchanted) is given to you by Yonan when you ask for his list.
Once you have the tools, you're ready to start collecting the ingredients. The NPCs Yonan, Tefrit, Narsai and Shimun each have a list, which you can receive by asking them for a mission:
- Yonan's List (found at the market, here
 3 Scorpion Tails: loot from Scorpions.
 12 Veldt Flowers: use Scissors on
  Veldt Flowers (Object).
 10 Tagralt Nuggets: use a Pick (Enchanted) on
  Veined Stones. Note: The pick can be used 3 times before losing its enchantment. Wait for 5 minutes until it recharges.
- Narsai's List (located just south of the market, here
 10 Vial of Cactus Milk: use a Hand Auger on
  Flowering Cactus.
 2 Piece of Crocodile Leather: loot from Crocodiles.
 5 Glass Full of Honey: use an Empty Honey Glass on
  Honey Palms.
- Shimun's List (found in a small house at the Nykri Delta, here
 1 Lizard Heart.
 12 Snake Maws: use Scissors on
  Snake Maw (Object).
 5 Vial of Ink: use a
  Vial on a dead Biting Book (two can be found under Kilmaresh's library).
- Tefrit's List (hidden on top of the Kilmaresh mountain, here
 5 Crab Pincers: loot from Crabs.
 20 Honey Palm Bark: use a Bark Peeler on Honey Palms.
 25 Spiderweb Clouds Shreds: use Scissors on Large Spider Webs
 15 Wild Desert Roses: use Scissors on
  Wild Desert Roses.
After gathering all items, deliver them to their respective NPCs.
Midnight Pilgrimage
Talk again to Kallimae, which has a final mission for you: To do the Midnight Pilgrimage - a search for several Omens once betokened by Bastesh herself. Go to this four locations:
- On the small temple north of the Nykri Delta, find the Owl and walk close to it.
- You discover an owl resting in a tree. That's special, because you have never seen an owl in all of Kilmaresh.
- Inside the Kilmaresh Catacombs, find the Basin Filled with Blood.
- You find a golden symbol at the bottom of the blood-filled basin.
- Note: You can obtain a Symbol of Sun and Sea
 during this mission by clicking on the Basin but only if you don't have a ring equipped in your ring slot. The item is not required for the quest but you cannot take it anymore after delivering this mission.
- All the way east of the Southern Steppe, find the Sun-Marked Goanna and kill it to obtain a Goanna Hide with Sun Symbol.
- You see goanna hide with sun symbol. It weighs 0.60 oz.
- On the western part of the Green Belt by the mountain and find a Bloodspot on a Sequoia Trunk that was hit by an arrow.
- You discover an arrow sticking in a tree. Mysteriously, fresh blood is trickling from the spot where the arrow hit the trunk.


Report back to Kallimae and you'll receive a Blue and Golden Cordon.
The Boards that Mean the World
Find the medusa Alyxo northeast of the depot and ask for a mission.
The 3 Demons
Alyxo needs help killing 3 Demons that have been summoned and are threatening Kilmaresh:
- Bragrumol can be found down a cave on the Central Steppe.
- Xogixath can be found on Nykri Delta in a small cave.
- Mozradek can be found in a small cave north-east of Issavi, on the second floor.
Cultists, Present and the Lyre
In this mission Alyxo will actually give you three tasks:
- Kill 300 Fafnar Cultists, which can be done in the Kilmaresh Catacombs, Issavi Sewers or the Kilmaresh Mountain. Note that only Priestesses of the Wild Sun and Burning Gladiators count for this mission.
- Find a present for its beloved Narsai, which is a Small Tortoise. You can loot them from Young Goannas or catch them using a Net on the sea of Kilmaresh (it will take several tries).
- For Ivory Lyre you need to talk to NPC Moe to know the location and take permission to open the closed door. Ask him about Ivory Lyre, Then go find and recover the Ivory Lyre (the Lyre can be found two floors down here,
Note that you have to deliver the tasks individually, by saying fafnar cultists, small tortoise and lyre. Then you can ask her about mission. You'll receive a Sunray Emblem.
The Revenge of the Ogres
Note: In order to complete the mission from Saideh you only need to complete the 4 first puzzles. The 5th and 6th puzzles are only required to open the last floor as a hunting ground and to complete one of the missions of the Grave Danger Quest. All puzzles are explained here since you should take the opportunity and complete them all.
Go around the Central and Southern Steppe to reach the west side of the Green Belt, then walk into the Kilmaresh Mountain. Swim into the river and walk behind the waterfall, where you'll find Saideh, which needs help reburying the remains of their hero, Dayyan. To do that, you'll have to go through a dungeon full of creatures and solve several puzzles. Enter the cave, go down one floor and then find the Wooden Cage Key on the west part of the cave, door.
Puzzle 1 - The Vocations
The first puzzle is very simple. Each one of the teleports has a respective item that represents one of the four vocations. Enter the corresponding teleport.
Note: If you use the wrong teleport you'll be sent to the surface of the Green Belt.

Puzzle 2 - The Basins
Here, you'll find three Fire Basins that keep turning on and off, and 4 teleports. You have to enter the teleports that correspond to the number of ignited basins at that exact moment, going from 0 to 3 from left to right. For example, enter the leftmost teleport when all basins are off, or the rightmost teleport when all basins are on.

Puzzle 3 - The Mummies
You'll find yourself in a room again with 4 teleports. South of them is a small room with two Mummies and black "stripes" on the floor, which correspond to each teleport. To proceed, enter one of the teleports when at least one of the mummies are walking on their respective stripe.

Puzzle 4 - The Path
On this puzzle, there are 4 lines with different tiles which you must cross. South of them there are 4 tiles, each one representing one of the lines, that tells you what's the safe tile to step on. The first tile to left represents the tile you have to step to cross the first line. The second tile, the second line, etc. The recommended strategy is to first cross the first line. Then, wait until the pattern changes, quickly memorize what the tiles for the 2nd, 3rd and 4th lines are and run through them.
Follow the path west, you'll find a big Scorpion Grave in a large room. Use its left side to receive a message and quest log update.
Warning: You will take 50% of your total hitpoints as Fire Damage when using the right side of the Scorpion Grave, so be careful specially if you haven't killed all creatures yet.


Puzzle 5 - The Board
Follow the path west, then south, to reach the fifth puzzle. Here, there are two rectangles of the same tiles as before, which constantly change, as well as one teleport for each type of tile. You have to enter the teleport which corresponds to the tile that is present in the greatest amount at that exact moment.

Puzzle 6 - The Labyrinth
The final puzzle is a labyrinth you must cross. Your objective here is to step on all the Sparkles that close the small rooms, without going over any of them twice. If you make a mistake you'll seed Red Musical Notes on your character and you'll have to use the lever on the west side of the room to reset the progress. There are many different possible routes, one is represented below:

The Sarcophagus
Note: this is the final part required only for the Grave Danger Quest. If you don't have this quest open you will not be allowed downstairs.
After going through the puzzles, go to the lower floor and use the Vial of Potent Holy Water on the sarcophagus.
Hand in the mission
Return to Saideh behind the waterfall and report on your mission. You will receive a Golden Bijou as a reward.
A Shark in Need
Find Ninev in the temple of Bastesh and as her about her shark. The mission here is very simple and consists of gathering the materials to fabricate a medicine for the sick shark. You'll need the two items:
 Box with Balm, which you can find just north of the exit by the boat, here.
 Greasy Wool, which you can obtain by using Scissors on a live Sheep. There are some Sheep on the west of the Nykri Delta.
Once you have both items, use the Greasy Wool on the Box with Balm to create a Box with Waterproof Balm. Deliver this item to Ninev. As a reward, you'll receive a Golden Sea Horse Figurine.
Aspiring Oracle
Find NPC Taya west on the Nykri Delta, here,
Go back to Issavi and talk to Narsai just south of the city market. Ask her about oracle as well. You'll have to find the two parts of an ancient artefact.
Eye-shaped Frame
To get the frame, go to the Salt Caves south of Issavi, here.
 inside the Floating Cask at the center of the cave.
Red Gem
Travel to Krailos and enter the Krailos Ruins (Nightmare Scions cave). Go to the second floor and take the Red Gem (Eye)  from the Sarcophagus here.
Use the gem on the frame to create The Eye of Suon  (You put together the bright red gem and the golden frame. The Eye of Suon is restored.).
Report back to Narsai saying oracle again.
Offer Sacrifices
You'll receive an Old Parchment with the name of 7 sphinxes and lamassu and a bottle of Sacramental Wine  . To offer the sacrifices, you'll have to equip The Eye of Suon on the necklaces slot and use the Sacramental Wine near each statue. The location of the statues are:
- East of depot: here
Return to Taya and ask her about oracle again.
Enusat the Onyx Wing
Now you'll have to find Enusat the Onyx Wing in a tomb under the Central Steppe, here.
Kill it and return to Taya to receive the three parts of the Sun Mosaic.
Wanted
Talk to Eshaya north of the market and ask him about wanted. Then, find Kallimae east of depot and ask her about wanted as well. You'll have to perform a ritual.
For this mission, you'll need to recover your Ivory Mask  from the previous missions, or get a new one.
- Go to the Ruins of Nuur and pick up the Golden Hand Mirror
 from an Ornate Case in a small room to the east.
 anywhere in Issavi so it becomes a Blackened Hand Mirror
  .
.A young woman's face appears in the mirror and a voice seems to whisper into your ear: 'Petaris is innocent.'
If you don't have the mask equipped or if you scratch the mirror anywhere but on the altar you'll have to use it on fire to blacken it again.

Kilmaresh Quest - Wanted Mission Minibosses
Report back to Eshaya about your discovery. You'll now have to fight the three outlaws, which are minibosses you must kill alone:
- Neferi the Spy: The portal is located near the boat in Issavi, here
Report back to Eshaya after killing all of them. You'll receive the basic Citizen of Issavi Outfits.
Shortcuts
After completing all missions of the quest you'll be allowed to use the two shortcuts near Issavi to the hunting grounds:
- From the Nykri Delta, here,
Assembling the Regalia of Suon
After getting all parts of the The Regalia of Suon (Blue and Golden Cordon, Golden Bijou, Sunray Emblem and Sun Medal), you need to talk to Yonan to assemble them by saying the regalia of suon.
Fafnar's Wrath
|
Eshaya: Suon's and Bastesh's blessing, dear guest! |
|||
|
Eshaya: Suon's and Bastesh's blessing, dear guest! |
|||
|
Player: mission |
|||
|
Player: hi |
|||
Aspiring Oracle
|
Player: hi |
|||
|
Player: hi |
|||
|
Player: hi |
|||
|
player: hi |
|||
|
Player: hi |
|||
Wanted
|
Player: hi |
|||
|
Player: hi |
|||
|
Player: hi |
|||
Assembling the Regalia of Suon
|
Player: hi |
|||
Aspiring Oracle
|
Player: hi |
|||
|
Player: hi |
|||
|
Player: hi |
|||
|
player: hi |
|||
|
Player: hi |
|||
Wanted
|
Player: hi |
|||
|
Player: hi |
|||
|
Player: hi |
|||
Assembling the Regalia of Suon
|
Player: hi |
|||
Wanted
|
Player: hi |
|||
|
Player: hi |
|||
|
Player: hi |
|||
Assembling the Regalia of Suon
|
Player: hi |
|||
Assembling the Regalia of Suon
|
Player: hi |
|||