

Gold Tokens
The daily Heart of Destruction run. There is no single route to memorise — three vortexes lead in, only one is open at a time, and the open one decides which boss you start on.
Each entrance owns a passage the other two have closed, which is why the wiki says each boss is bound to a city. The open vortex re-rolls every two hours after server save, so check with a Spying Eye, then pick that city below.
- Cooldown
- 20 hours
- Team
- up to 5
- Time in a boss room
- 15 minutes
- Entrance re-rolls
- every 2 hours
From Zao
Rupture → Anomaly → Outburst → Eradicator · ≈16 tokens- 1Ground
- 1Glowing Vortex, west of the Zao Steppe
The first time only, kill ten of the things wandering around it — Sparkions, Reality Reavers, Dread Intruders, Breach Broods — and the vortex is yours permanently. Talk to the Messenger of Heaven first if you have never done the quest.
- 2
Through the vortex, then north
Go down to -7-6- AStart here
- BGo down
You come out on -6. Head north and slightly east to the way down.
- 3
- 4
West to the lever
You're there-6- AStart here
- BGo here
Back on -6, then a long run due west. The lever and its tiles are at the end of it.
- 5-6
- AStand on the tiles, pull the lever
- BRed vortex, once the room is charged
Cracklers can't be hurt until four players stand on the vortexes in the room, which turns them into Depolarized Cracklers — then everyone burns them down without moving. The vortexes relocate, so you find them and stand on them again. Depolarized ones close to melee range and hit harder, so if you get surrounded, step off and they back away again.
The permanent vortex on the east side is the exit. Step on it before the room is charged and you start the whole thing over. Drop a Fire Bomb Rune on it as a marker.
- 6-7
- APull the levers on this island
- BRupture's room
The red vortex drops you on an island with levers. Pull them and you are in with Rupture.
- 7
When a Damage Resonance spawns, everybody stops attacking. Every hit Rupture takes while it is up heals it 4,000 HP.
- That includes damage over time, so leave those off entirely for this fight.
- Kill the Damage Resonance, then go back to the boss. It spawns with four Sparks of Destruction each time.
- Leave through the green vortex on the west side of the room — it puts you at the hub.
Protect againstEnergyDeath - 8-7
- AYou land here after every boss
- NWNorth-west — Anomaly and Outburst, both
- NENorth-east — Eradicator
- WDCentre — World Devourer, not part of the daily run
Every boss spits you back out here, so the hub is the only room you actually have to know. Three exits matter.
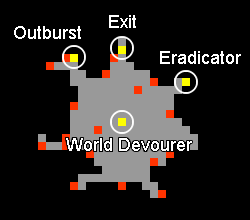
The hub as the wiki draws it The north-west teleport is two bosses, not one. Take it and walk back out west and you're at Anomaly; take it and pull the lever in the room instead and you fight Outburst.
- 9-7
- AFive tiles and a lever — you land here
Leave the lever alone for now and walk out west, which puts you at Anomaly. The lever is Outburst, and he keeps.
- 10
When it turns into a Charged Anomaly it is immune to everything — lure it onto a red vortex, which takes 6,000 HP off it.
- The red vortexes move around the room. Standing on one costs you 100 energy damage, so only the blocker should be walking.
- The charged form hits much harder but moves slower, and it re-targets often — the team holds still and lets the blocker do the luring.
- The Charger and Overcharge puzzle on the wiki is the quest version. Coming from the hub you skip it and walk straight into the boss.
Protect againstDeathEnergy - 11-7
- ABack at the hub
- BNorth-west teleport, the same one
Same exit as last time. This time stand on the five tiles and pull the lever instead of walking out.
- 12-7
- AThe five tiles and the lever
- BOutburst's room, just east
The lever throws you a short way east, straight into the fight.
- 13
The Charging Outburst form explodes after 12 seconds. Kill it inside that window or everyone eats a lot of energy damage.
- The charging form is the vulnerable one, and only to physical — knights and monks on physical weapons, paladins on Ethereal Spear, mages on Explosion Runes.
- If your team can't reliably kill it in time, wear a Shockwave Amulet and a Might Ring for the explosion.
- Four Sparks of Destruction spawn with the boss.
Hit it withFireEnergyDon't bother withDeathProtect againstDeathEnergyCharging OutburstHit it withPhysical - 14-7
- ABack at the hub
- BNorth-east teleport
The other exit that matters. Take it and you land in another room of five tiles and a lever.
- 15-7
- AFive tiles and a lever — you land here
- BEradicator's room, to the west
Stand on the tiles, pull the lever, and you are in with the last one.
- 16

It resists everything except death damage. A team without death weapons does not kill this boss.
- Death weapons, death spells and Sudden Death Runes; paladins want Powerful Reap on the crossbow.
- Every time it switches to its vulnerable form, four more Sparks of Destruction appear — two north, two south. Clear them as they come or you get swamped.
Hit it withDeathProtect againstDeathEnergy - 17-7
- NNorth teleport out of the hub
Standing in the hub and using a Temple Teleport is what most people do. If you'd rather walk, the north teleport starts the way out — south and down two floors, towards the Ankrahmun entrance, whether or not that's the one that's open.
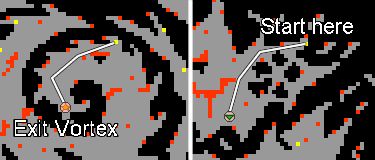
The walk out, from the wiki


Map tiles from TibiaMaps.io.