

The New Frontier Quest
After centuries the resources beneath and around the Big Old One became alarmingly short. Some decades ago, the imperial mining guild financed a project to search and establish new mines far away from Kazordoon.
Reward
Dangers
12


Required Equipment
Mission 01: New Land
Note: to do this mission you need the spell Levitate or 3 parcels/crates/ice cubes.
- Go to Farmine through the Steamship and talk to the leader (Ongulf) there about helping him.
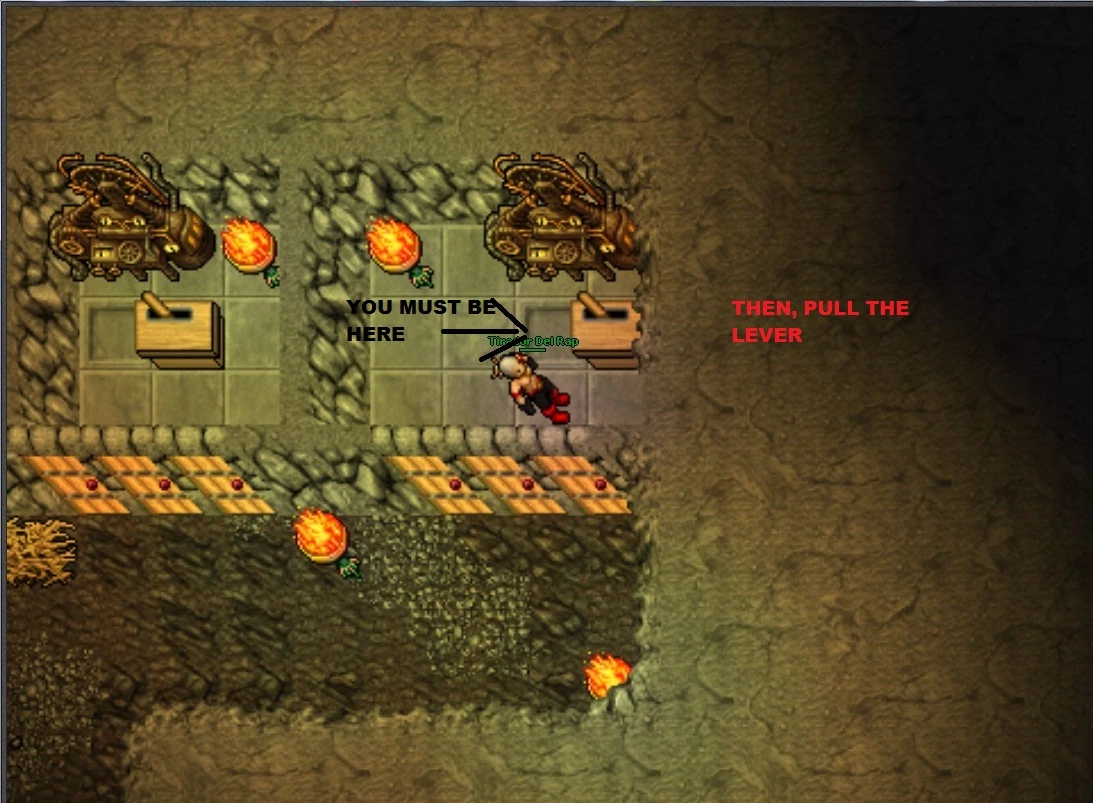
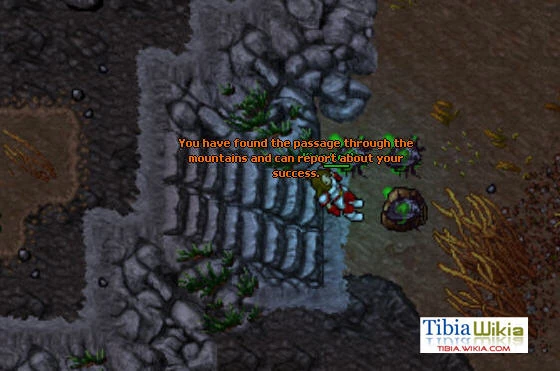
- After talking with Ongulf head east of him through the sealed doors, stand on the switch and use the (right lever). Explore the passage to the East and when you have stepped foot off the mountain and reached here
Report back to Ongulf and ask him for next mission.

Mission 02: From Kazordoon With Love
Talk to Ongulf, he will tell you that he needs to send a message to the dwarves in Kazordoon. Travel there and then walk to the Dwarf Mines to the west. Cross the two rivers and find NPC Melfar here.
- Tree 1: (Recommendation: do this tree last, so you won't need to run after the thieving squirrel to re-aquire your bait. If doing it first, a suggestion: Cast invisibility / or use a stealth ring, so the squirrel won't run away from you and you can kill it to retrieve the bait.) You have marked the tree but its former inhabitant has stolen your bait! Get it, before it runs away! Kill the Thieving Squirrel. (A GFB or other area of effect rune or spell is recommended. The squirrel appears about 2 squares north of the tree, where King Rockey is standing.) The squirrel casts invisibility so if you lose it, you must pay Melfar 100 gp for another flask of bait.
- Tree 2: You have marked the tree but it seems someone marked it already! He is not happy with your actions and he brought friends! (1 War Wolf and 4 Wolves will spawn.)
- Tree 3: You have marked the tree but also angered the squirrel family who lived on it! (4 Enraged Squirrels will spawn).
Return to talk to Melfar before heading back to Farmine.


Mission 03: Strangers in the Night
You need to find the tribe which lives in the mountains. Walk down the mountain almost like you did in Mission 01, and directly walk north here
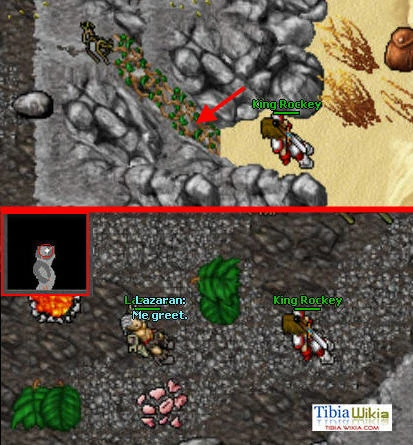
After you talked with Lazaran and come back to Ongulf, you will see Farmine has reached Stage 2 of its development. Pompan will trade in normal Equipment now, Esrik will not trade yet, with Prezil nothing changes either.
Mission 04: The Mine Is Mine
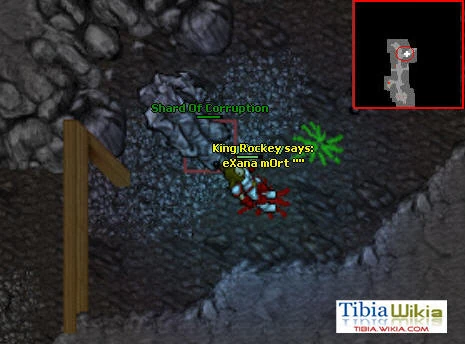
Head back to the levers and this time use the left one. Go North through the tunnel of Stone Golems. Kill the boss, Shard of Corruption at the end of the tunnel.
Mission 05: Getting Things Busy
This mission consists of getting support from 6 people around Tibia. You need to say farmine and then one of the following keywords (depending on the person):
- Flatter
- Threaten
- Impress
- Bluff
- Reason
- Plea
These words may be different for every person. Yet, you can interpret which word you should use.
If you do not ask them the correct word you will have to appease them with something to get another chance. You can be unlucky and they still refuse appeasement even though you say the correct word. Just go back to Black Bert, buy the bribes, and return to the NPCs and speak to them again.
It is not fully known how the system works, as the same attempts may convince the NPC and make them mad at you. It may be completely random whenever it will work. It is possible some approaches are always wrong. Nevertheless, saying the same word several times may have different effects.
NOTE: Having done The Thieves Guild Quest is good for this mission, in case you say the wrong keyword (and the NPC gets mad at you) you can buy apology gifts from Black Bert to continue the negotiation.
If you don't mind spending the money get a few of the following items to do any excess travel:
| Name | Buy from... | ...for | |
|---|---|---|---|
| Almanac of Magic |  |
Black Bert | 600  |
| Map to the Unknown |  |
Black Bert | 650 |
| Universal Tool |  |
Black Bert | 550 |
| Flask of Crown Polisher |  |
Black Bert | 700 |
| Soul Contract |  |
Black Bert | 666 |
| Baby Rotworm |  |
Black Bert | 600 |
If time is not a concern simply 1 of each item will do to save you hassle, otherwise you can take your chances and simply buy items only when you need them.
Support of the Thaian king
Talk to King Tibianus in Thais here.
First time or wrong use the word "flatter".
Support of the Venorean traders
First time use the words "impress". If wrong use the words "reason" or "flatter".
Support of the Explorer Society
First time use the words "bluff" or "impress". If wrong use the word "impress" or "bluff".
Support of the Edron academy
Talk to Wyrdin in the Ivory Towers here.
First time use the words "plea", "bluff" or "flatter". If wrong use the word "impress", or any of the others.
Support of the inventor Telas
Be careful here since sometimes a werebadger appears. Close the door to Telas' house when talking to him to avoid being surprised by the creature.
First time use the words "reason" or "flatter". If wrong use the word "plea". If wrong, the word "reason" may work too.
Support of the wormtamer
First time or wrong use the words "flatter" or "threaten".
Once you have completed this mission, you have access to the Depot and Tavern in Farmine. To see this stage 3 of Farmine you have to use the lever behind the right sealed door to go away to the surface. When you come back you'll see the changed Farmine.
Mission 06: Days Of Doom
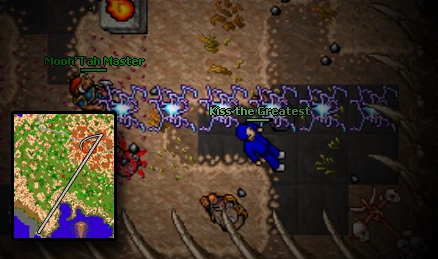
- Once you have completed this mission, you have access to the Bank in Farmine.
Mission 07: Messengers Of Peace
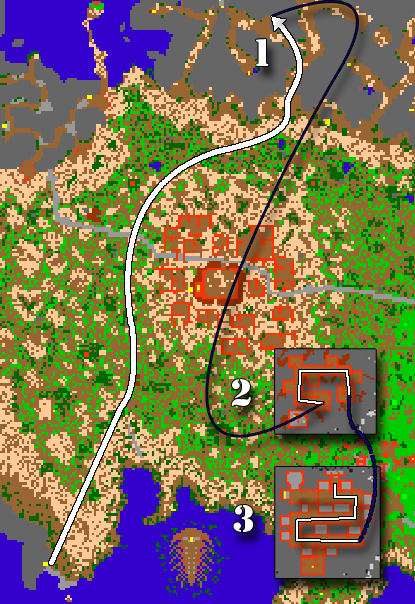
After making peace with the Cavemen and the Orcs for Ongulf, you now have to contact the Lizards, the real rulers of Zao. After accepting the mission from Ongulf, go to the Dragonblaze Peaks and find a rope-hole (here
- There is more than one quest door in the Lizard area but you will only be able to open one of them, which is the correct door for your mission.
- In the room west of the quest door (see 3rd image below) is a Chest (Quest) which contains a Tome of Knowledge.
Mission 08: An Offer You Can't Refuse
- There is a note, under a bed (called Strange Grass Mat), in the top north-west corner of the room. (you can see it sticking out a little). Use the bed to get the note and then use it and you will read that there is an exit to the north. Click on the Dragon Decoration in the middle of the north wall and you will appear on the other side.
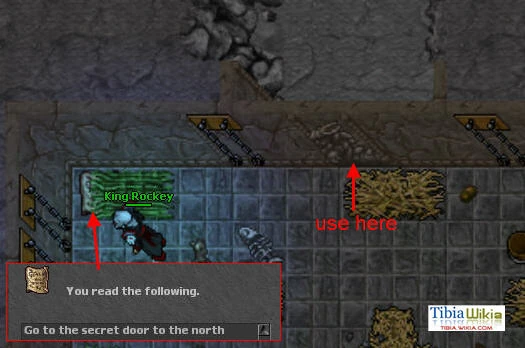
- Head north and speak with NPC Ztiss the Lizard leader, and then exit through the teleport in the top left. You will appear at a pair of teleports in the north of Zao Steppe. These teleports can take you to Muggy Plains. To the north-east of these teleports in Muggy Plains is a boat that can take you to Chazorai, (the "Isle of Strife") where the Arena is located. You do not have to fight in the Arena right now, you can return later.
- Once you have completed this mission, you have access to the shops in Farmine.
- NPC Cael (just north of Ongulf) now accepts 6 Tomes of Knowledge from you.
Mission 09: Mortal Combat

Go to the teleporter in the north of Zao Steppe and walk into it to get to Muggy Plains. Once there, head a little north-east, following the shore-line, and you will find a ferry/boat (here
Note: To complete this mission successfully you will need a strong team and either bring some friends who will help you to reach the arena without wasting too much of your battle supplies or bring some extra pots! Of course, only 2 players can go, so it is recommended you use either a Knight and Sorcerer, Druid or Paladin team, or just 2 Paladins can do it together. Another possibility is Knight and Paladin. If you use a Knight and Druid team (Most recommended), the Druid should sio and use Sudden Death and Icicle runes as the Knight spams Challenge. The mage should look at using 180 charges of Sudden Death, with 160 Great Mana Potions. 2 Knights could do this as an Exori Gran team but they would use lots of Great Health Potions and Mana Potions. As a level 100 Knight you can easily block this quest as long as the shooter is capable of killing the Creatures in time. The last few creatures will also retarget semi-frequently, so it is still recommended to have enough hp/mana to take 1200 damage without dying. The main problem encountered is timing, a lot of people die through lack of damage per second, and end up with 3 or maybe even 4 of the last boss monsters attacking them at once, which is a very risky situation no matter what level you are. 2 Sorcerers could do this using Hell's Core with relative ease, of course using Sudden Death runes whilst recharging mana. This is the fastest but most dangerous method as there is no one to take the damage and some creatures are very fast.
You will have to fight 13 Boss monsters, in waves of 2 at a time.
- Baron Brute and The Axeorcist, two strong Orcs. Both Neutral to all damage, one (Baron Brute) strong to fire.
- Menace and Fatality, two strong Lizards. Both Immune to Earth damage, weak to Fire (110%) and neutral to all other types of damage
- Incineron and Coldheart, which represent the elements of fire and ice. Both Immune to Ice & Fire. Incineron is strong to Energy. Neutral to all other damage.
- Dreadwing and Doomhowl, two strong Mammals. Dreadwing is immune to Death & Earth. Doomhowl is strong to Physical. Both neutral to all other damage.
- Haunter and The Dreadorian, two strong Demons. Haunter strong to Death (90%). Both neutral to all other damage.
- Rocko and Tremorak, representing the elements of stone and earth, Rocko Immune to Death & Earth, strong to everything else in this order of strength/% of damage taken: Fire 70%, Energy 75%, Ice 80%, Physical 85%, Holy 90%. Tremorak Immune to earth, weak to fire, strong to everything else in this order of strength/% of damage taken: Energy 15%, Holy 50%, Physical 50%, Death 65%, Ice 80%
- Tirecz, last boss. Is Strong to all damage, taking on this % of damage: Fire 50%, Earth, Energy, Ice, Holy and Death: 70%, Physical 90%
Pay high attention that you have few minutes time to kill each wave of bosses and if you are not fast enough, next wave of 2 bosses will spawn after 90 seconds, even if earlier bosses are still alive! Also note that sometimes both bosses may spawn outside your screen, so you can time the 90 seconds to know when every boss wave will spawn and lure them to you if needed. When you have defeated Tirecz, you will be teleported to the reward room and the following message will appear:
- You have won! As new champion take the ancient armor as reward before you leave.
Don't forget to grab your outfit from the wardrobe in the reward room before you leave.
Don't forget to report your victory to the NPC Chrak! If you don't report back, you can't say "mission" to NPC Ongulf to complete the quest.
Mission 10: New Horizons
Go back to Farmine and talk to Ongulf about your mission. You will receive 8000 experience points.
- After speaking with Ongulf, you now have permission to use the Magic Carpet on the mountain above Farmine.
- NPC Cael now accepts more Tomes of Knowledge from you.
Enjoy your new outfit!
Mission 01: New Land
|
Player: hi |
|||
|
Player: hi |
|||
|
Player: hi |
|||
Mission 02: From Kazordoon With Love
|
Player: mission |
|||
|
Player: hi |
|||
|
Player: hi |
|||
|
Player: hi |
|||
Mission 03: Strangers in the Night
|
Player: mission |
|||
|
Player: hi |
|||
|
Player: hi |
|||
Mission 04: The Mine Is Mine
|
Player: mission |
|||
|
Player: hi |
|||
Mission 05: Getting Things Busy
|
Player: mission |
|||
Note: The answer is different if you manage to convince the NPC and when you failed to. Always read the response or check the status in your Quest Log: the respective entry disappears upon success.
Support of the Thaian King
|
Player: HAIL TO THE KING! |
|||
Support of the Venorean Traders
|
Player: hi |
|||
Support of the Explorer Society
|
Player: hi |
|||
Support of the Edron academy
|
Player: hi |
|||
Support of the inventor Telas
|
Player: hi |
|||
Support of the Wormtamer
|
Player: hi |
|||
|
Player: hi |
|||
Mission 06: Days Of Doom
|
Player: mission |
|||
|
Player: hi |
|||
|
Player: hi |
|||
|
Player: hi |
|||
Mission 07: Messengers Of Peace
|
Player: mission |
|||
Mission 08: An Offer You Can't Refuse
|
Player: hi |
|||
Mission 09: Mortal Combat
|
Player: hi |
|||
After the battle:
|
Player: hi |
|||
Mission 10: New Horizons
|
Player: Hi |
|||
Mission 02: From Kazordoon With Love
|
Player: mission |
|||
|
Player: hi |
|||
|
Player: hi |
|||
|
Player: hi |
|||
Mission 03: Strangers in the Night
|
Player: mission |
|||
|
Player: hi |
|||
|
Player: hi |
|||
Mission 04: The Mine Is Mine
|
Player: mission |
|||
|
Player: hi |
|||
Mission 05: Getting Things Busy
|
Player: mission |
|||
Note: The answer is different if you manage to convince the NPC and when you failed to. Always read the response or check the status in your Quest Log: the respective entry disappears upon success.
Support of the Thaian King
|
Player: HAIL TO THE KING! |
|||
Support of the Venorean Traders
|
Player: hi |
|||
Support of the Explorer Society
|
Player: hi |
|||
Support of the Edron academy
|
Player: hi |
|||
Support of the inventor Telas
|
Player: hi |
|||
Support of the Wormtamer
|
Player: hi |
|||
|
Player: hi |
|||
Mission 06: Days Of Doom
|
Player: mission |
|||
|
Player: hi |
|||
|
Player: hi |
|||
|
Player: hi |
|||
Mission 07: Messengers Of Peace
|
Player: mission |
|||
Mission 08: An Offer You Can't Refuse
|
Player: hi |
|||
Mission 09: Mortal Combat
|
Player: hi |
|||
After the battle:
|
Player: hi |
|||
Mission 10: New Horizons
|
Player: Hi |
|||
Mission 03: Strangers in the Night
|
Player: mission |
|||
|
Player: hi |
|||
|
Player: hi |
|||
Mission 04: The Mine Is Mine
|
Player: mission |
|||
|
Player: hi |
|||
Mission 05: Getting Things Busy
|
Player: mission |
|||
Note: The answer is different if you manage to convince the NPC and when you failed to. Always read the response or check the status in your Quest Log: the respective entry disappears upon success.
Support of the Thaian King
|
Player: HAIL TO THE KING! |
|||
Support of the Venorean Traders
|
Player: hi |
|||
Support of the Explorer Society
|
Player: hi |
|||
Support of the Edron academy
|
Player: hi |
|||
Support of the inventor Telas
|
Player: hi |
|||
Support of the Wormtamer
|
Player: hi |
|||
|
Player: hi |
|||
Mission 06: Days Of Doom
|
Player: mission |
|||
|
Player: hi |
|||
|
Player: hi |
|||
|
Player: hi |
|||
Mission 07: Messengers Of Peace
|
Player: mission |
|||
Mission 08: An Offer You Can't Refuse
|
Player: hi |
|||
Mission 09: Mortal Combat
|
Player: hi |
|||
After the battle:
|
Player: hi |
|||
Mission 10: New Horizons
|
Player: Hi |
|||
Mission 04: The Mine Is Mine
|
Player: mission |
|||
|
Player: hi |
|||
Mission 05: Getting Things Busy
|
Player: mission |
|||
Note: The answer is different if you manage to convince the NPC and when you failed to. Always read the response or check the status in your Quest Log: the respective entry disappears upon success.
Support of the Thaian King
|
Player: HAIL TO THE KING! |
|||
Support of the Venorean Traders
|
Player: hi |
|||
Support of the Explorer Society
|
Player: hi |
|||
Support of the Edron academy
|
Player: hi |
|||
Support of the inventor Telas
|
Player: hi |
|||
Support of the Wormtamer
|
Player: hi |
|||
|
Player: hi |
|||
Mission 06: Days Of Doom
|
Player: mission |
|||
|
Player: hi |
|||
|
Player: hi |
|||
|
Player: hi |
|||
Mission 07: Messengers Of Peace
|
Player: mission |
|||
Mission 08: An Offer You Can't Refuse
|
Player: hi |
|||
Mission 09: Mortal Combat
|
Player: hi |
|||
After the battle:
|
Player: hi |
|||
Mission 10: New Horizons
|
Player: Hi |
|||
Mission 05: Getting Things Busy
|
Player: mission |
|||
Note: The answer is different if you manage to convince the NPC and when you failed to. Always read the response or check the status in your Quest Log: the respective entry disappears upon success.
Support of the Thaian King
|
Player: HAIL TO THE KING! |
|||
Support of the Venorean Traders
|
Player: hi |
|||
Support of the Explorer Society
|
Player: hi |
|||
Support of the Edron academy
|
Player: hi |
|||
Support of the inventor Telas
|
Player: hi |
|||
Support of the Wormtamer
|
Player: hi |
|||
|
Player: hi |
|||
Mission 06: Days Of Doom
|
Player: mission |
|||
|
Player: hi |
|||
|
Player: hi |
|||
|
Player: hi |
|||
Mission 07: Messengers Of Peace
|
Player: mission |
|||
Mission 08: An Offer You Can't Refuse
|
Player: hi |
|||
Mission 09: Mortal Combat
|
Player: hi |
|||
After the battle:
|
Player: hi |
|||
Mission 10: New Horizons
|
Player: Hi |
|||
Mission 06: Days Of Doom
|
Player: mission |
|||
|
Player: hi |
|||
|
Player: hi |
|||
|
Player: hi |
|||
Mission 07: Messengers Of Peace
|
Player: mission |
|||
Mission 08: An Offer You Can't Refuse
|
Player: hi |
|||
Mission 09: Mortal Combat
|
Player: hi |
|||
After the battle:
|
Player: hi |
|||
Mission 10: New Horizons
|
Player: Hi |
|||
Mission 07: Messengers Of Peace
|
Player: mission |
|||
Mission 08: An Offer You Can't Refuse
|
Player: hi |
|||
Mission 09: Mortal Combat
|
Player: hi |
|||
After the battle:
|
Player: hi |
|||
Mission 10: New Horizons
|
Player: Hi |
|||
Mission 08: An Offer You Can't Refuse
|
Player: hi |
|||
Mission 09: Mortal Combat
|
Player: hi |
|||
After the battle:
|
Player: hi |
|||
Mission 10: New Horizons
|
Player: Hi |
|||
Mission 09: Mortal Combat
|
Player: hi |
|||
After the battle:
|
Player: hi |
|||
Mission 10: New Horizons
|
Player: Hi |
|||
Mission 10: New Horizons
|
Player: Hi |
|||