
Cults of Tibia Quest
Secret cults are hiding all over Tibia.
Reward
Dangers
36


Required Equipment
Method
You can start most cult missions by going directly to the cult hideout, however, it's a good idea to first visit Gerimor in Feyrist, offer your help and then ask about all cults he mentions. By doing so, you'll have all cults opened in your Quest Log and it will be easier to track your progress. You can do all the cults access and bosses in any order, but you must defeat all bosses at least once to be able to do the final mission.
With the exception of the Patron of the Arts and the final one, all other missions consist in finding the Cult hideout and gaining access to its Boss so you can defeat it. The cult bosses can be fought in teams of up to 5 players every 20 hours, and once you gain access to it you just need to enter the lever room to kill it again. The final boss, The Source of Corruption, can be fought by up to 10 players at the same time, also every 20 hours.
Barkless
This cult is located in Ab'Dendriel's troll cave, entrance here.
Go into the building west of Tigo and then out by the door to the north. Follow the path and go up the hole at the end of it. Be careful because in this area you will find lots of Barkless Devotees and Barkless Fanatics. These creatures are much stronger than regular Elves and their Poison Ball spell can do quite some damage, even if you have a blocker. You will now have to pass two trials and a purification.
The Tar trial
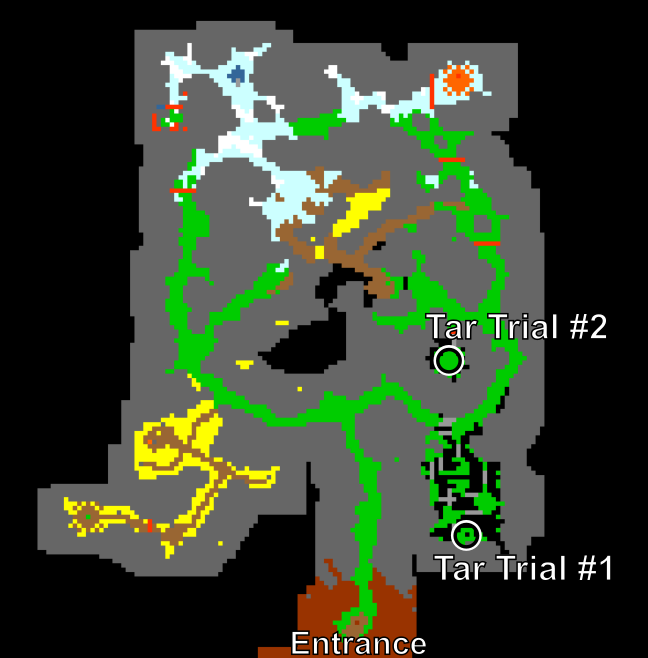

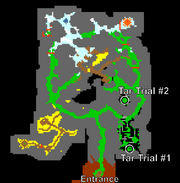
Walk north-east until you reach the tar area. Fight your way to the end of this area until you reach a special tar tile, here,
As you enter the tar pits, you feel the heal around you rising dramatically. Survive the heat long enough to prove worthy.
Your body is heating up, the air around you is flickering. (twice or more)
The heat is now unbearable, the blood in your body feels like lava. There's almost no strength left in you - act quickly!
As soon as you see the last message, step on the tar tile. You should then receive this message:
Embrace the stigma of bad fortune. The tar does not feel so hot anymore. You passed the tar trial.
Now you must run to another tar tile, located behind a sealed door, here.
You are now ready to prove your worth. Take heart and cross the threshold of tar.
This means you have completed the tar trial and are ready to move on.
The Sulphur trial
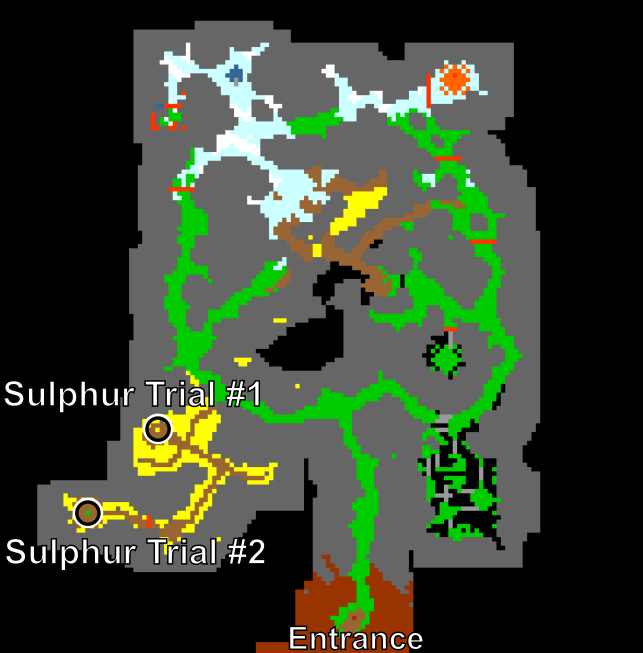
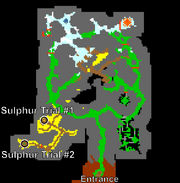

This trial works very similarly to the tar trial. First, go to the walkable sulphur tile here
As you enter the sulphur pits, you feel the dry, burning vapours of the sulphur all around you. Prove worthy, survive the acid.
The sulphur is burning your skin. You almost feel your body melting away in acid. (twice or more)
The acid burning is now unbearable, your skin feels like a sieve. There's almost no strength left in you - act quickly!
Once you step on the sulphur tile, you will see this message:
Embrace the sigma of vanity. The sulphur does not burn your skin anymore. You passed the trial.
Just like before, run to the other tile here.
You are now ready to prove your worth. Take heart and cross the threshold of sulphur.
The purification
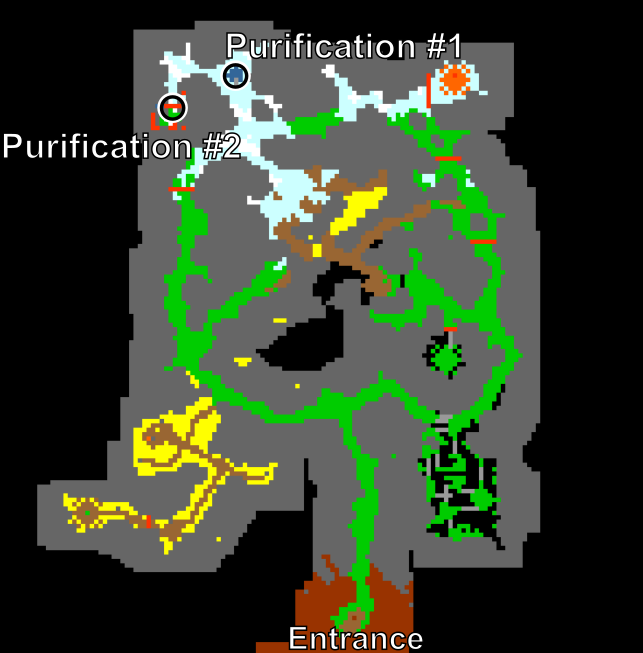

After passing both trials, you have to purify your body. Walk to the cold area to the water here.
As you enter the icy cavern, you feel an unnatural frostiness. The ice cold air stings in your face. Survive and prove worthy.
Your body temperature sinks. You can see your breath freezing in the cold. (twice or more)
The icy cold is grasping to you. You can barely move anymore.
Step on the small bridge to wash yourself:
You are now washed and ready to purify yourself in the chamber of purification.
Now go to the purification chamber south-west (here

The Powerful Relic
Go back to the cult area in Ab'Dendriel. You now must absorb the power of 10 Barkless Cult Symbols  hanged on the walls around this cave. The first symbol is located right next to the Mystic Flame, here.
Note: To be able to open the doors here
The remaining 5 symbols are west of the trials area, past the sealed door (that you should now be able to open), here.
Now head to the large room in this area and use the Cult Object in the center of the room (As you reach out to touch the cult object, a surge of energy bursts from the skull. You banished its power.). Finally, you have access to the boss room.

Ravenous Hunger
It's recommended that you wear a Dwarven Ring during this fight since you will be affected by Drunkenness area spells.
Inside the boss room you will first encounter Leiden at the center and the Wine Cask (Creature) to the north. Leiden will have around half his full health, but you cannot damage him directly, and if you try to he will heal instead. To kill him, go to the north of the room and attack the Wine Cask (Creature). It will summon Liquor Spirits, which when attacked, casts area spells that can damage Leiden. Therefore, you must keep the Liquor Spirit close to Leiden but only damage the Spirit, while attacking the spirit as much as possible (you can also place Fire Bombs on the floor and run the Liquor Spirit over it for additional hits). The Spirit will evaporate a few seconds after being summoned, and you will have to resume attacking the Wine Cask (Creature) so it summons more Spirits. Beware that the damage caused by Leiden and its two Barkless Fanatics summons is quite high, so be careful.
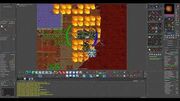
Cults of Tibia - Ravenous Hunger (Ab'Dendriel - Barkless)
Killing Leiden using the Healing method
There is also an alternative way to deal with Leiden, which is simply to "Heal" it using Mass Healing and Ultimate Healing Runes. When this happens, Leiden actually takes damage, so by using this strategy you can completely ignore the Cask and Liquor Spirits.
Once you Defeat Leiden, Ravenous Hunger will spawn. The Liquor Spirits have the opposite effect on him (they heal the boss), so you should move away from the Wine Cask (Creature) now. Deal with Ravenous Hunger as regular strong creature (he is immune to Death Damage). You can use Fire Bomb Runes to keep the summoned Mutated Bats away and decrease the damage taken by the blocker.
After killing the boss, report back to Gerimor to receive 50,000 Experience Points.
Misguided
Go to the Outlaw Camp and go down the stairs here.
Go down the hole to the south, then up again to reach the area with Misguided Thieves and Misguided Bullies. Your first task will be to obtain a Rubbish Amulet from them. Since this item is a semi-rare drop, this might take some time.
Once you loot the amulet, equip it and you should see this message:
The amulet burns your skin. It hungers for energy right now, gather a large amount of energy as fast as possible to charge it.
You'll need to charge it by killing 10 Misguided creatures. Once it's charged it will change into a Glowing Rubbish Amulet and you will have 5 minutes to use it on a living Misguided to turn it into a Paralysed Bully or Paralysed Thief (You paralyze the bully/thief and the amulet reveals the true face of the creature behind the possession of this misguided creature.), and reveal its true form (a Misguided Shadow will spawn).
If you are in the building area, the map will change and all the gold on the ground will disappear, the illusion of wealth is gone! Kill the Misguided Shadow to complete the first exorcism. After using the amulet it will lose all its charges (The amulet you are wearing suddenly feels quite cool and emits a strange light.) and become a regular Rubbish Amulet again. You need to repeat this process 4 times in order to complete the required 5 exorcisms.
Note that once you start charging the Rubbish Amulet you have to do it quickly or it will fall from your neck and lose all charges (The amulet fell off. You took too long to recharge it. Whatever power it accumulated is now lost.). Make sure you pay attention to avoid your amulet dropping to the floor!
Also, the exorcism point goes towards the player that deals most damage to the Misguided Shadow, however if you are in a party with share experience everyone that dealed damage will get an exorcism point.
After finishing 5 exorcisms you can go past the energy barrier at the ended of the Misguided cave, here,
The Souldespoiler
Enter the boss room and you will find The Sinister Hermit (Yellow) (invulnerable) and several Inactive Geysers. Of all Inactive Geysers, one will always be active (a SPLASH message will appear on screen when a Geyser gets active).
Lure The Sinister Hermit (Yellow) to the active geyser so it can turn into The Sinister Hermit (Blue), which is vulnerable. Attack it while the geyser is active (10–15 seconds), and then move on to the next active geyser.
Be aware that The Sinister Hermit will only be vulnerable while standing on top of the geyser and it moves often, so it advised to use another players to block his movements.
Note that every time The Sinister Hermit changes forms two Vermin Swarms will spawn, so you should kill them to avoid getting swarmed.
Once The Sinister Hermit is dead, The Souldespoiler will spawn. Initially it will be close to invulnerable, but as the time passes Freed Souls will spawn, making The Souldespoiler weaker. Keep attacking the boss, by the time three Freed Souls have spawned it will be very weak and easy to kill.
After killing the boss, report back to Gerimor to receive 50,000 Experience Points.
Patron of the Arts (Prosperity)
Go meet Gareth at the Museum of Tibian Arts in Thais (west of the Knights Guild, enter this teleport
Use the codeword has the cat got your tongue and Iwar will offer you to pay 10 thousand gold to get the picture back. Confirm with yes.
Go back to Gareth in and tell him about your mission. He will send you to Angelo below the Dark Pyramid to get a magnifier. Head to the lowest floor of the pyramid and go to the southwest room, where you will find a Hole (Pitfall). Follow the path north and you will find Angelo. Ask him about a magnifier and he is glad to let you take one from his crate. Go to Angelo's Crate and use it to obtain a Loupe (Perfect! You took a wonderful loupe from the crate.). (If you have already killed The Sandking, Angelo will refuse to talk and you'll just have to use the crate immediately).
Back in the museum, go to the pictures straight west from Gareth. Use your magnifier on the corner of the pillar with the paintings to discover that this is the fake picture (This is it. It looks like it was painted by a child!). Talk to Gareth about your mission. He will ask you to get a new artifact from Angelo.
When you ask Angelo about a new artifact he is, however, not trusting you. Therefore you have to report your failure to Gareth. Upon telling him about your mission, he gives you access to the lowest floor of the building (just west of the room with the Ransom Note).
In the western portion of the -2 floor you will find the NPC Denominator behind two Sealed Doors. Use the north one. Go downstairs, and then all the way east where you will find a Lever, here.
012X45
0X2345
01X345
Note that numbers are read from left to right, starting from 0. In this case, your numbers would be 3, 1 and 2. Memorize your numbers because you will need them to answer the questions from the NPC.
Now go back to the Denominator and talk to him, tell him you are ready for his questions and say yes. The questions he asks vary from player to player and also at every try, but they aren't very hard. These are some of the known questions he asks, along with the answer according to the example above:
- What is the sum of the first and the second digits? Answer: 3 + 1 = 4.
- What is the sum of the first and the third digits? Answer: 3 + 2 = 5.
- What is the sum of the second and the third digits? Answer: 1 + 2 = 3.
- What is the digit sum? Answer: 3 + 1 + 2 = 6.
- Is the number divisible by 3? Answer: 312/3 = 104, so yes.
- Is the number divisible by 5? Answer: It doesn't end with 0 nor 5, so no.
- Is the number prime? Answer: 312 is not a prime, so no.
- Does the number belong to a prime twin? Answer: 312 isn't a prime twin of neither 310 or 314, so the answer is no.
- What is the correct number? Answer: Just tell your number without spaces and symbols, 312.
You have to answer 5 questions in a row without making any mistakes. If you miss one, you have to start over. If it takes too long for you to get the answers right the lever downstairs will be reset and you will have to go get a new number.
After getting all answers right, this mission is over since there is no boss fight. Report back to Gerimor to receive 50,000 Experience Points.
The Orc Idol
Go to the Edron Orc Cave and enter the Orc Cult cave here.
 For the first barrier, you have to be transformed into a regular Orc;
 Go down the hole, then south until you find another barrier which required you to be transformed into an Orc Warlord;
 Go down again, then south-east to find the last barrier, for which you need to be an Orc Shaman.
Note: After going through the barriers transformed into the correct orc for the first time, you will be granted permission to go through it automatically the next time, so you don't have to wait for the Priest's transformation again.
The Unarmored Voidborn

Cults of Tibia Quest - The Unarmoured Voidborn
After the pulling the lever, your team will be teleported to a room containing 4 Security Golems, a Containment Machine and The Armored Voidborn. For now, the boss will be protected by the energy wall between the blue Large Crystals and you don't have to worry about it. Kill the 4 Security Golems and then destroy the Containment Machine. When you do so, the energy barriers will disappear and the crystals will turn into Containment Crystals.
Do not try to attack The Armored Voidborn by yourself, it's strong to all types of damage and you'll barely scratch it. In order to kill it, you must attack the Containment Crystals, which will in turn use an area spell that can damage The Armored Voidborn.
Do not let the Crystal die! Have at least one Druid using Mass Healing close to the crystal being targeted to heal it (unlike regular creatures, the Containment Crystals can be healed by players). This can be done without a Druid, as the Containment Crystals also heal themselves slowly.
Careful! The Crystals reflect damage - mages should notice their HP.
While attacking the Containment Crystals, Voidshards will spawn in the room. It's recommended that you kill them so you don't have to deal with too many at the same time. Do this until you kill The Armored Voidborn. In case you destroy one crystal, move on to the next.
If all 4 Crystals are destroyed, you won't be able to finish the boss.
After killing The Armored Voidborn it will become The Unarmored Voidborn. This boss is weak to every type of damage (you will see a lot of hits of more than 2000 HP), but it has a lot of health so it will take some time to kill it. Once you kill The Unarmored Voidborn you're done. Go back to Feyrist and report your success to Gerimor to receive 25,000 Experience.
The Secret of the Sandy Cave (Life)
Go to the last floor of the Dark Pyramid, then down the hole here.
Now you have to investigate the sandy caves. You'll find one Giant Spider and several Bonebeasts and Putrid Mummy during your missions. The Putrid Mummies are much stronger than a regular Mummy, but you can still easily outrun then, since they are slow. Follow the cave all the way to the south-east, and rope yourself one floor up. Go north and go up again. Now go east to find a teleport, here.
Intrigued by the Oasis, Angelo will ask you to investigate it and he will give you a Tool for Analyzing Fluids. Go back to the Oasis and use the tool to collect some water on its western side, here.
After analyzing the water sample you brought to him, Angelo will ask you to apply a counteragent to the water and will give you a tube with Pink Fluid. Again, go to the Oasis and use the Pink Fluid on the same spot you took a water sample. The water will change to a green dirty form (in fact, you get teleported to a similar room north of the clean Oasis). In this room you will find the lever to access the boss room, but you don't need to do it now and can come back later with the necessary team and supplies.
The Sandking
Note¹: Do NOT attack the Sand Vortexes. They are immortal and will reflect all damage back to you, which can be fatal when using large area spells.
Note²: If The Sandking steps on Sand Brood or Enraged Sand Brood corpses, it will heal for 7500 hitpoints. In order to avoid that, move the corpses near the walls of the room or disintegrate them.
The fight against The Sandking happens in 3 stages:
Stage 1:
The Sandking will spawn in the center of the room. Attack it with all your firepower until it disappears. When this happens, Sand Vortexes and Sand Broods will spawn in the room. You have to kill a certain number of Sand Broods in order to make The Sandking appear again. This will have to be done a few times until The Sandking reaches around 50% of his total hitpoints and you move to stage 2.
Stage 2:
The Sandking will now triplicate itself and you'll have to deal with 3 bosses. They all share the same hitpoints, however, so it doesn't matter which one you attack. During this stage Enraged Sand Broods will start spawning, make sure you don't forget to deal with their corpses. When you kill the bosses you'll move to the final and third stage of the fight.
Stage 3:
This is the final stage. The Sandking will now be much weaker and slower. Just attack it until it's dead.
After killing the boss, say hi to Angelo and then report back to Gerimor to receive 50,000 Experience Points.
The Strenghtening of the Minotaurs
Go to Mintwallin's entrance and then follow the path east where you will find a teleport, here.
Now you have access to The False God. Go back into the Minotaurs area, the teleport is located on the -2 floor here.
The False God

Cults of Tibia Quest - The False God
After going into the teleport in the Minotaur area, enter the west teleport to go into the lever room. The east teleport will take you back to Jamesfrancis and you'll have to go through the Minotaur Cults again. You can battle The False God with a team of up to 5 players. After pushing the lever go to the north-west corner of the boss room. The Orc Idol Statues will come to life in the shape of a Minotaur Idol. They are quite strong, so you should focus on killing them first otherwise they will pile up and become a real problem. They will come to life in order, from west to east on the north side, then from east to west on the south.
Once you start damaging The False God, Sphere of Wrath will begin to spawn in the room. Be very careful with them as they hit very hard and are indestructible! Their spawn seem to be triggered by the boss' health, and a total of 4 Spheres will have spawned before you kill it. It might be a good strategy to avoid attacking The False God until all Minotaur Idols have been killed. Once there is more then one Sphere, it is recommended that the team runs around the room to avoid their damage. They move very slowly and only have one Berserk-like attack, so a well coordinated team can avoid most of their damage, while still focusing all firepower on the boss.
After defeating the The False God, go to Jamesfrancis and say hi to report your success. You can go then go to Feyrist and report your findings to Gerimor to receive 25,000 experience points.
Zathroth Remnants (Humans)
This cult is located under the Carlin Graveyard. Before going there you should pick up Key 3520 if you don't have it already, inside a chest here.
Your task here is obtain 10 Remains of a Decaying Soul (green) and 10 Remains of a Withering Soul (blue), which appear when you kill Cult Believers, Cult Enforcers and Cult Scholars. You have 20 seconds to collect (by stepping on) them before they vanish. The green souls are necessary to go past the energy barrier before the stairs to the second floor, and the blue souls to access the third floor. Once you have access to the third floor, go to the other Gate of Deathstruction here
Note: When you leave the temple, the stone wall will be blocking the exit. You can open it from the inside by using the Fragile Torch Bearer right by the wall.
Essence of Malice
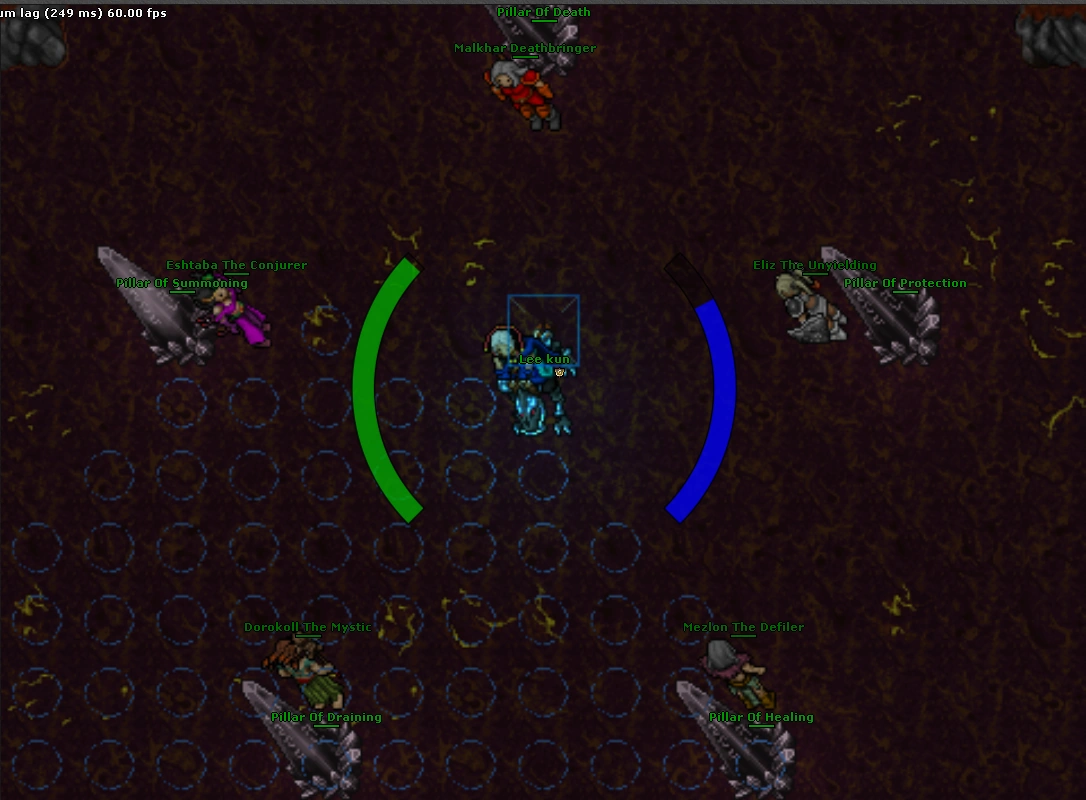
Inside the boss room you will first find 5 Pillars protecting 5 different mini-bosses, each one with a special area of effect ability. The Pillars are arranged on the vertices of a pentagon and their respective mini-bosses can only be targeted when the Pillar has zero hitpoints (they don't die). It's recommended that you walk near the walls where you will only be targeted by one or two pillars, avoiding the center of the room. The Pillars and Bosses are:

Cults of Tibia - Essence of Malice (Zathroth Remnant - Carlin)
- Pillar of Healing and Mezlon the Defiler (heals the other Pillars)
- Pillar of Draining and Dorokoll the Mystic (drains mana)
- Pillar of Summoning and Eshtaba the Conjurer (summons Dread Minions)
- Pillar of Death and Malkhar Deathbringer (deals Death damage)
- Pillar of Protection and Eliz the Unyielding (deals Life Drain damage)
You must destroy the Pillars in order to make the respective mini-boss vulnerable and then kill it (they will turn into a Destroyed Pillar). Their health will decrease quickly at first but then much slower once it's on red HP. You can kill them in any order, but a good strategy is starting with the Pillar of Summoning so you won't have to deal with an excessive number of Dread Minions. From there on, destroy the pillars and kill the mini-bosses one by one, remembering to avoid the center of the room.
Note. The mini-bosses can be healed by players, so Druids should avoid using Mass Healing unless it's extremely necessary.
Note. It is strongly advised to wear as much Death protection as you can as the Malkhar Deathbringer can deal up to 800 hp of death damage per turn and you will be hit by it all across the room.
After you are done with the 5 mini bosses, Essence of Malice will spawn. Attack it using your regular weapons and spells, it is immune to Death damage but weak to Earth by around 30% approximately. Mages should use Ultimate Healing Runes as the boss takes a lot of damage from them.
After killing the boss, report back to Gerimor to receive 25,000 Experience Points.
The Source of Corruption
After fighting all Cult bosses and reporting to Gerimor, you'll have access to the final boss. Enter the building next to Gerimor and then into the teleport. Go south and enter the teleport again. You'll be in the lever room, and this time the team can have up to 10 players. This fight happens in two stages:
The Remorseless Corruptor
When entering the room, you will find two bosses. The Remorseless Corruptor and the Zarcorix of Yalahar. Both are invulnerable, and more importantly, the Zarcorix of Yalahar will reflect all damage it receives back to you 3 times stronger, so do not attack it and avoid using area spells and runes. The safest strategy is to have one Elite Knight to lure the Zarcorix of Yalahar far from the team while the rest of the team do the rest. You will also find Stolen Souls and Soul Reapers in the room.
On each side of the room there are stairs leading to a small upper floor with 2 Dark Souls. You need to have 1 or 2 players on each room killing the Dark Souls. Once dead, they will turn into Guilt. The players upstairs must throw the Guilt downstairs to the other players, who must use them on The Remorseless Corruptor to weaken it (You have raised the guilt of the corruptor). When enough Guilt has been applied, the boss will become The Corruptor of Souls, which is vulnerable and must be killed. Players must keep using Guilt on it, otherwise it will become the invulnerable The Remorseless Corruptor again. Once you kill The Corruptor of Souls, the Zarcorix of Yalahar will disappear and The Source of Corruption will spawn.
Note that if you don't kill the Dark Souls quickly, they will disappear and Soul Reapers will spawn downstairs. The best strategy is having fixed players upstairs killing them while the players downstairs deal with The Corruptor of Souls.
The Source of Corruption
This is the final version of the boss. Try to trap it in a corner (summoned Fire Elementals are useful here) and then attack it until it dies. It will keep summoning 2 Soul Reapers, sou you should just ignore these last 2 and focus on the boss.
After killing The Source of Corruption, report back to Gerimor to receive 50,000 Experience, your vocation's crown, a Mystery Box and the Corruption Contained achievement.
Misguided
|
Player: hi |
|||
Patron of the Arts
After solving the puzzle of Denominator:
|
Player: prosperity |
|||
The Orc Idol
After killing The Unarmored Voidborn:
|
Player: orcs |
|||
The Secret of the Sandy Cave
|
Player: hi |
|||
After discovering the oasis:
|
Player: hi |
|||
After bringing the sample of water:
|
Player: hi |
|||
After applying the counteragent but not fighting the boss:
|
Player: hi |
|||
After defeating The Sandking:
|
Player: hi |
|||
|
Player: life |
|||
The Strenghtening of the Minotaurs
After defeating The False God:
|
Player: hi |
|||
|
Player: hi |
|||
Zathroth Remnants
After defeating the Essence of Malice:
|
Player: humans |
|||
The Source of Corruption
After defeating the boss:
|
Player: missions |
|||
Patron of the Arts
After solving the puzzle of Denominator:
|
Player: prosperity |
|||
The Orc Idol
After killing The Unarmored Voidborn:
|
Player: orcs |
|||
The Secret of the Sandy Cave
|
Player: hi |
|||
After discovering the oasis:
|
Player: hi |
|||
After bringing the sample of water:
|
Player: hi |
|||
After applying the counteragent but not fighting the boss:
|
Player: hi |
|||
After defeating The Sandking:
|
Player: hi |
|||
|
Player: life |
|||
The Strenghtening of the Minotaurs
After defeating The False God:
|
Player: hi |
|||
|
Player: hi |
|||
Zathroth Remnants
After defeating the Essence of Malice:
|
Player: humans |
|||
The Source of Corruption
After defeating the boss:
|
Player: missions |
|||
The Orc Idol
After killing The Unarmored Voidborn:
|
Player: orcs |
|||
The Secret of the Sandy Cave
|
Player: hi |
|||
After discovering the oasis:
|
Player: hi |
|||
After bringing the sample of water:
|
Player: hi |
|||
After applying the counteragent but not fighting the boss:
|
Player: hi |
|||
After defeating The Sandking:
|
Player: hi |
|||
|
Player: life |
|||
The Strenghtening of the Minotaurs
After defeating The False God:
|
Player: hi |
|||
|
Player: hi |
|||
Zathroth Remnants
After defeating the Essence of Malice:
|
Player: humans |
|||
The Source of Corruption
After defeating the boss:
|
Player: missions |
|||
The Secret of the Sandy Cave
|
Player: hi |
|||
After discovering the oasis:
|
Player: hi |
|||
After bringing the sample of water:
|
Player: hi |
|||
After applying the counteragent but not fighting the boss:
|
Player: hi |
|||
After defeating The Sandking:
|
Player: hi |
|||
|
Player: life |
|||
The Strenghtening of the Minotaurs
After defeating The False God:
|
Player: hi |
|||
|
Player: hi |
|||
Zathroth Remnants
After defeating the Essence of Malice:
|
Player: humans |
|||
The Source of Corruption
After defeating the boss:
|
Player: missions |
|||
The Strenghtening of the Minotaurs
After defeating The False God:
|
Player: hi |
|||
|
Player: hi |
|||
Zathroth Remnants
After defeating the Essence of Malice:
|
Player: humans |
|||
The Source of Corruption
After defeating the boss:
|
Player: missions |
|||
Zathroth Remnants
After defeating the Essence of Malice:
|
Player: humans |
|||
The Source of Corruption
After defeating the boss:
|
Player: missions |
|||
The Source of Corruption
After defeating the boss:
|
Player: missions |
|||